Creating A Basic Hub World
Introduction
At this point you can build a dedicated UE5 server that activates successfully when hosted on a GameLift EC2 Fleet.
However, our client is lacking the ability to receive connection information in order for our players to join multiplayer sessions on these fleets.
In this section we will implement a basic hub-world where the player automatically joins a session when the client is launched.
The basics of players requesting placement in a GameLift session and then acquiring connection details for that session requires some form of player authentication, a request for session placement (secured using player authentication) and some way for the client to receive their session connection details asynchronously.
There are many ways of achieving this flow and we will cover some alternative approaches to this in other tutorials in the future.
For the sake of brevity, we are going to go with a simple example and an off-the-shelf product which has a built-in GameLift integration.
This will allow us to skip a lot of custom scripts and infrastructure that you might need if you were to build this flow from scratch.
Note
This tutorial is part of a series of tutorials on deploying UE5 multiplayer builds with AWS GameLift.You can see Part 4 of this tutorial below.
brainCloud & GameLift
This hub world will be hosted on a GameLift server running on an EC2 instance as we have set up above.
We will use brainCloud for player authentication and brainCloud’s GameLift integration will act as our server-to-server connection route.
brainCloud also provides an Unreal plugin that makes it easy for the client to communicate with your brainCloud app using C++ or blueprints.
brainCloud also provides a server-to-server C++ library which can be installed on your server builds in order for brainCloud to communicate with your GameLift fleets directly.
brainCloud also has a wide range of backend features such as teams, leaderboards, custom-scripts, custom-databases, etc.
One of the features we are going to use alongside GameLift is brainCloud’s Lobby feature.
brainCloud lobbies can be integrated with GameLift so that you can use player-lobbies to connect players to GameLift.
Authentication is a crucial component in creating a secure multiplayer gaming experience for players.
We will be using anonymous authentication as it allows each player to be uniquely identified when joining lobbies without the need to supply a username, password or 3rd party token.
Note
One caveat of anonymous authentication is that players do not have a strong link between their identity and their player’s account or profile on brainCloud. This means that their identity could be lost if they use another device or reinstall the app.
For this example, anonymous authentication will get us set up quickly and easily, however, you may want to look at other forms of authentication.
brainCloud has a large number of authentication options as well as custom authentication options if you need something specific.
The brainCloud Lobby feature allows us to perform basic matchmaking.
We will be finding the currently running hub world, or creating one if there isn’t one running at the moment of searching.
The lobby feature also integrates with GameLift so we don’t have to worry about creating game sessions, player sessions or FlexMatch.
This simplifies the process for this example, but can also be expanded upon easily for more complex matchmaking using the brainCloud matchmaking feature itself instead of going through lobbies.
The last thing to be aware of is that we will also use brainCloud RTT which adds a real-time channel to the brainCloud client libraries. This channel allows clients to listen to, and react to real-time events.
Since matchmaking isn’t instantaneous, we will be listening to events related to lobbies to find out when we’ve been placed into a server and what its connection details are.
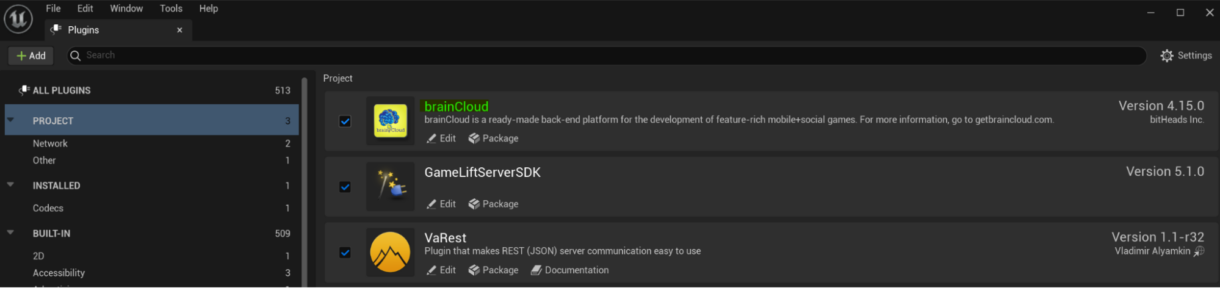
We will be adding the brainCloud Unreal Plugin, the brainCloud S2S library and the VA Rest Plugin to our Unreal Project.
Project Setup
We will first need to create a new App with brainCloud.
You’ll need to create a brainCloud account for this. Go through the signup process here.
Once you have an App created you are ready to continue.
GameLift Integration
brainCloud provides an out-of-the-box GameLift integration. This allows brainCloud to call GameLift APIs on our behalf so we won’t need to worry about starting a game session, listening to queues, setting up callbacks and any other components required for manual set up.
The first thing we need to do is create an AWS IAM user that brainCloud will use to interact with GameLift.
GameLift – Create IAM & User Access Key
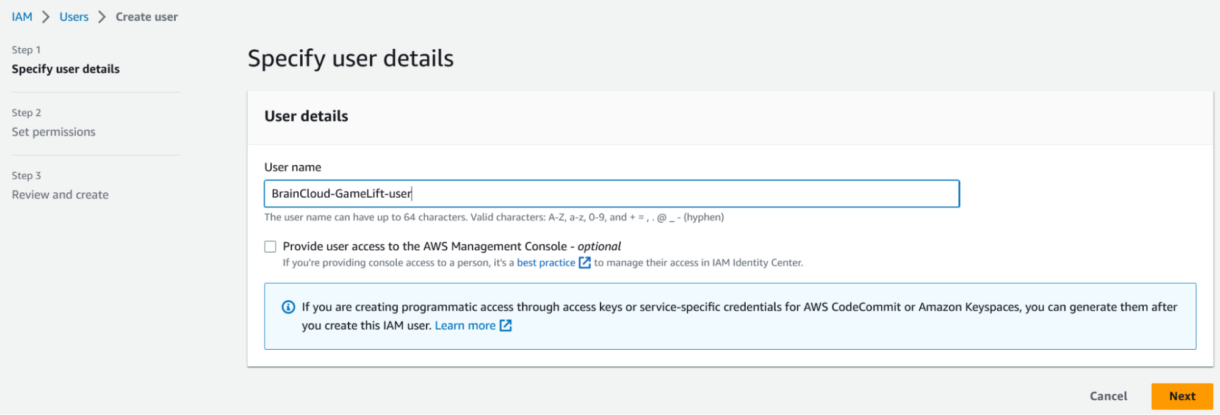
1. Navigate to the IAM Service in the AWS portal, select Users on the sidebar and click on the “Add User” button

2. Name User and click on the “Next” button
Note
This user does not require console access.
3. Select “Attach policies directly” and click on the “Create policy” button
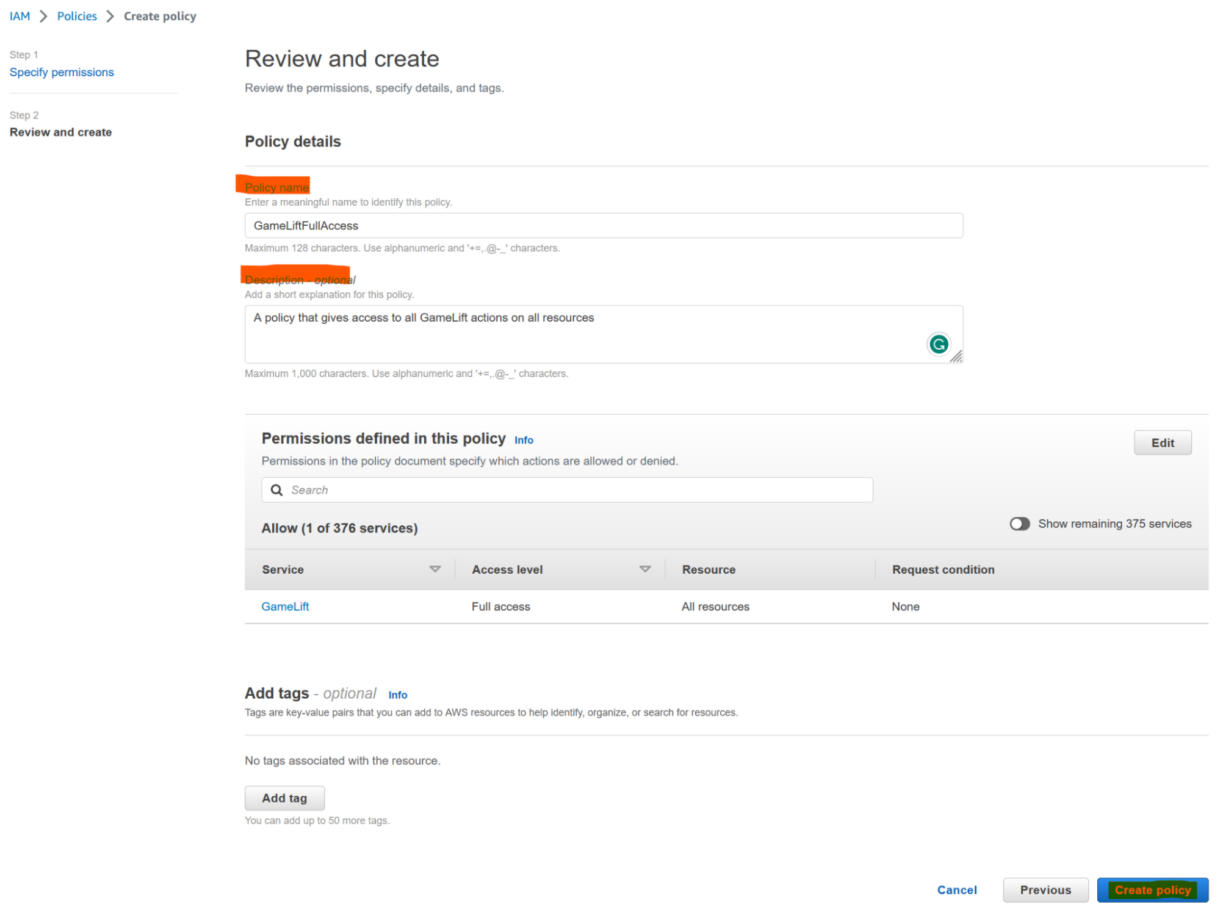
Next we are going to attach a custom policy that will give access to all GameLift actions on all resources.
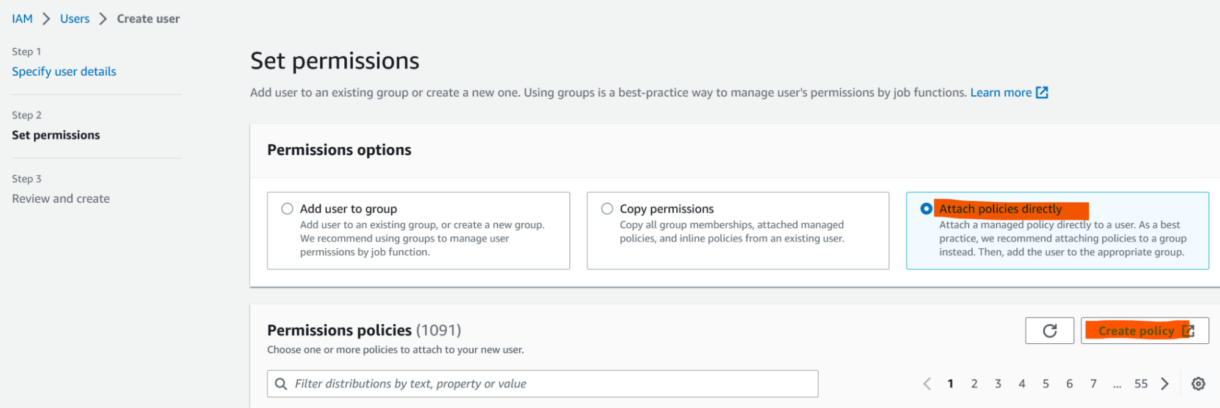
This will open a new tab where we can create a new policy.
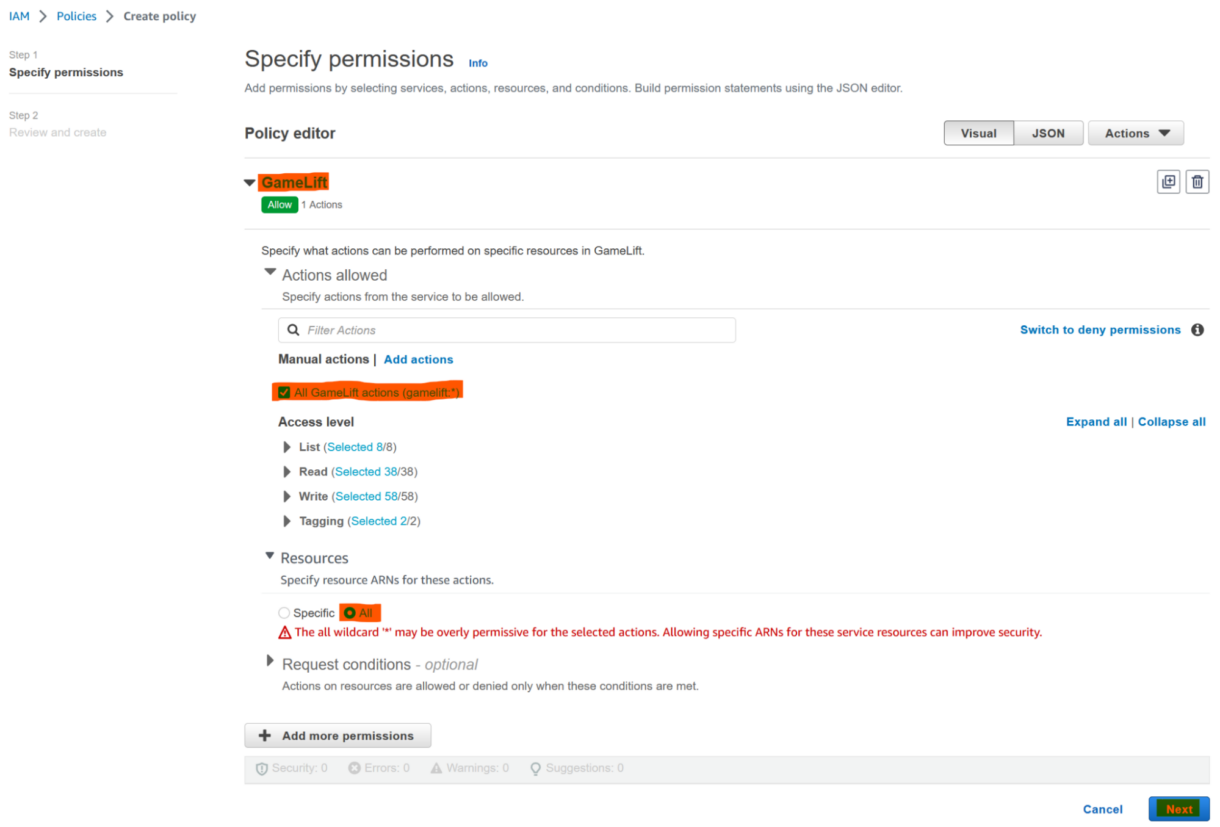
To create the policy, search for the GameLift service, tick the “All GameLift actions” box and then click all under the resource section.
4. Click the “Next” button
5. Name your policy and click on the “Create policy” button
Return to the IAM User creation tab and refresh the policies list.
You should now be able to find your newly created policy and add it.
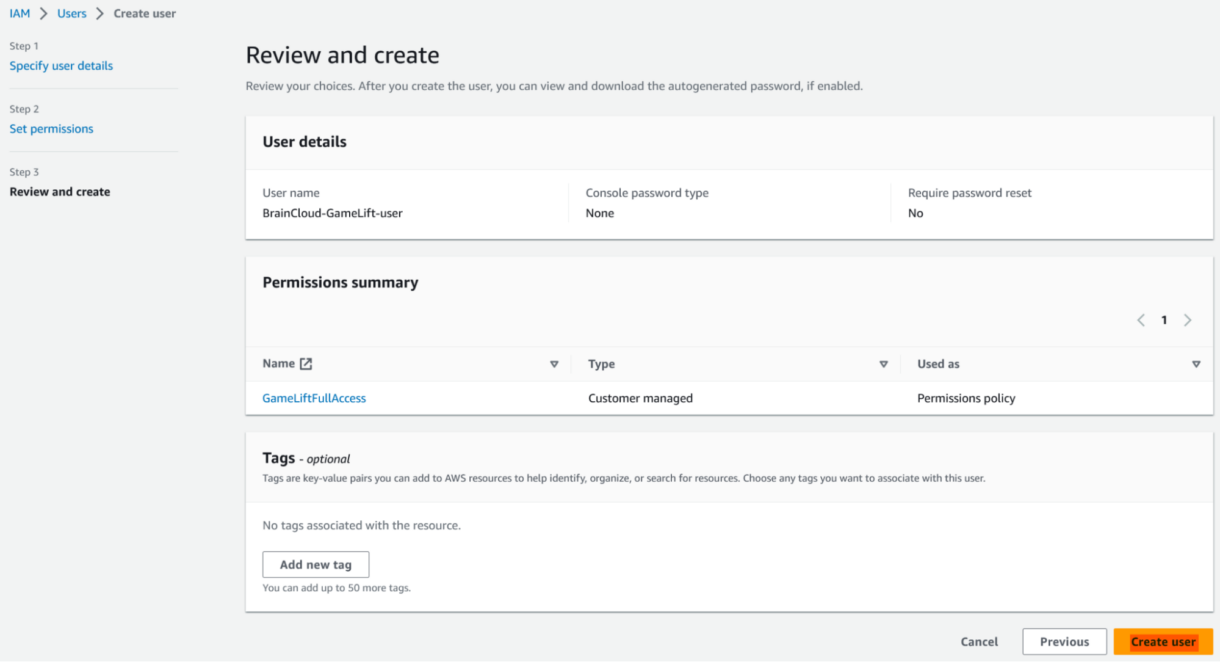
6. Then click the “Next” button

7. Add tags and click the “Create user” button
Now we need to create the access key that brainCloud will use to communicate with GameLift securely.
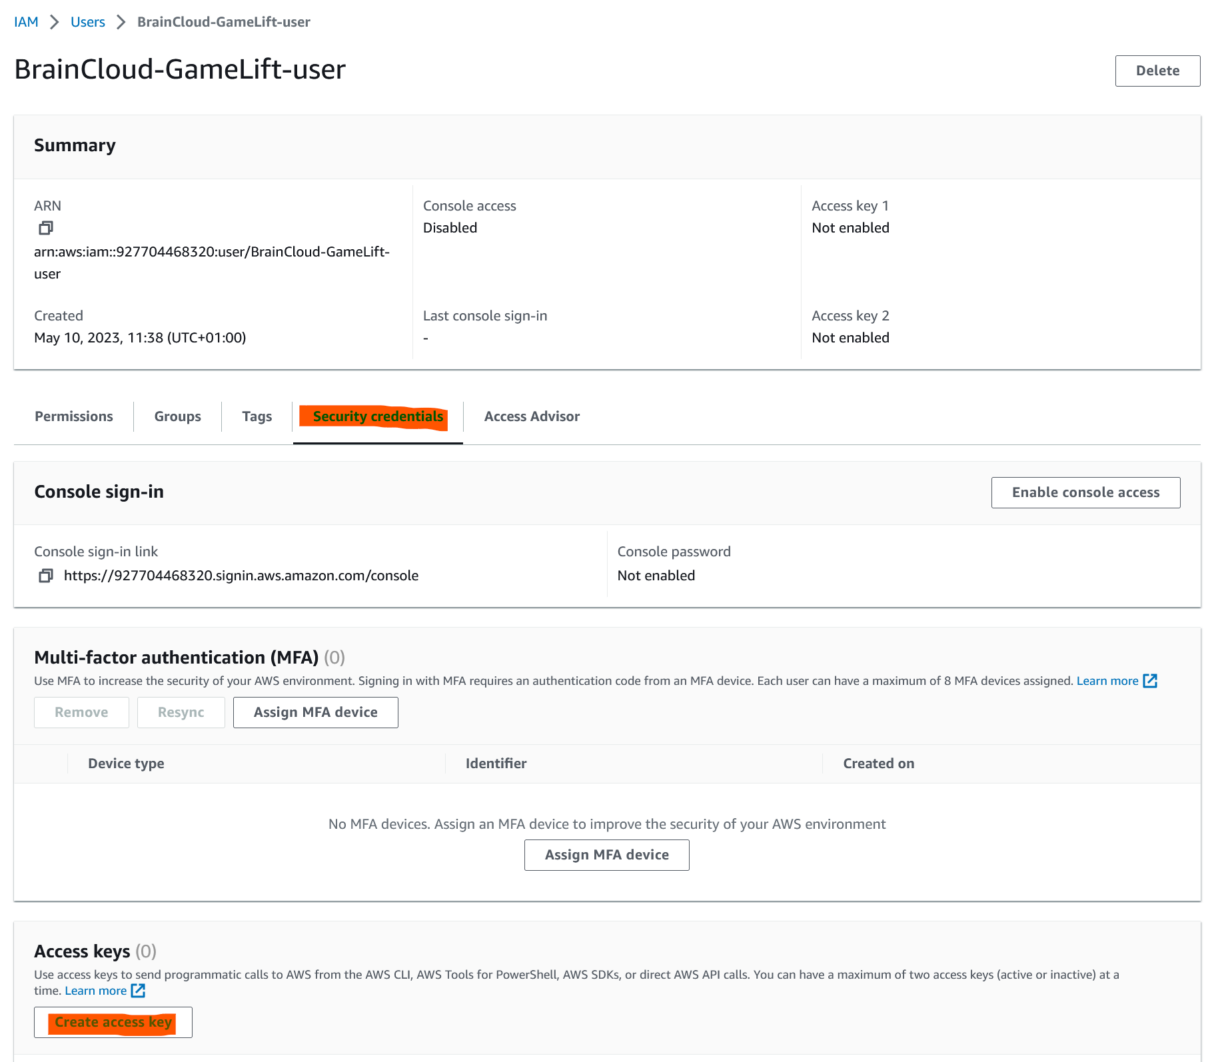
In the Users section of the IAM portal, find your user and view it by clicking on it.
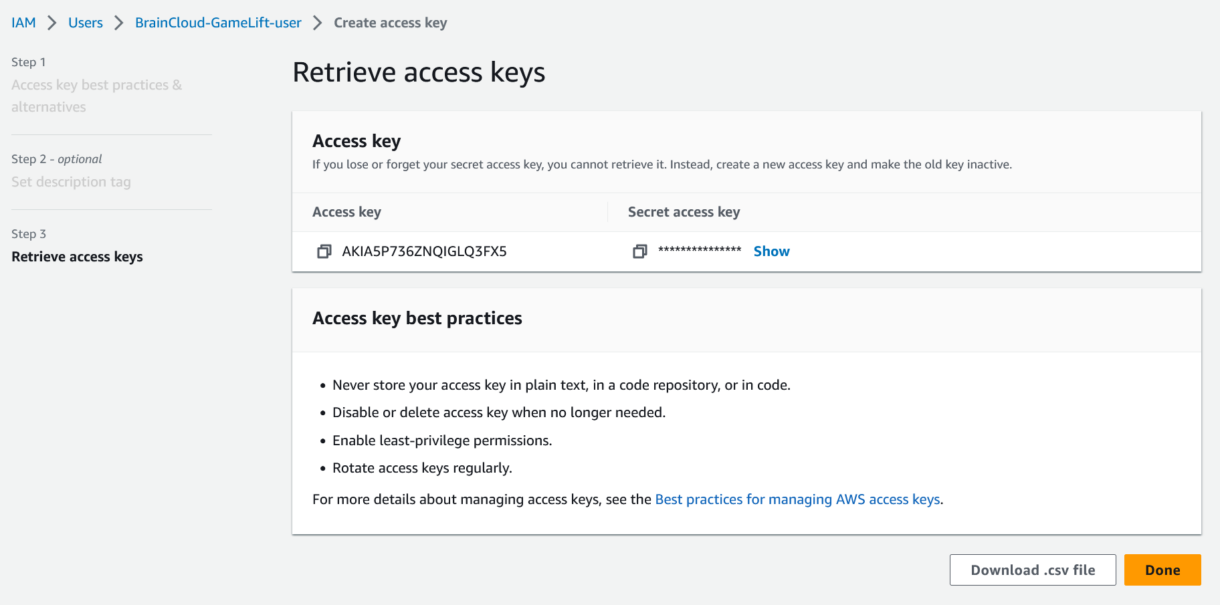
8. Go to the “Security credentials” tab and click on the “Create access key” button
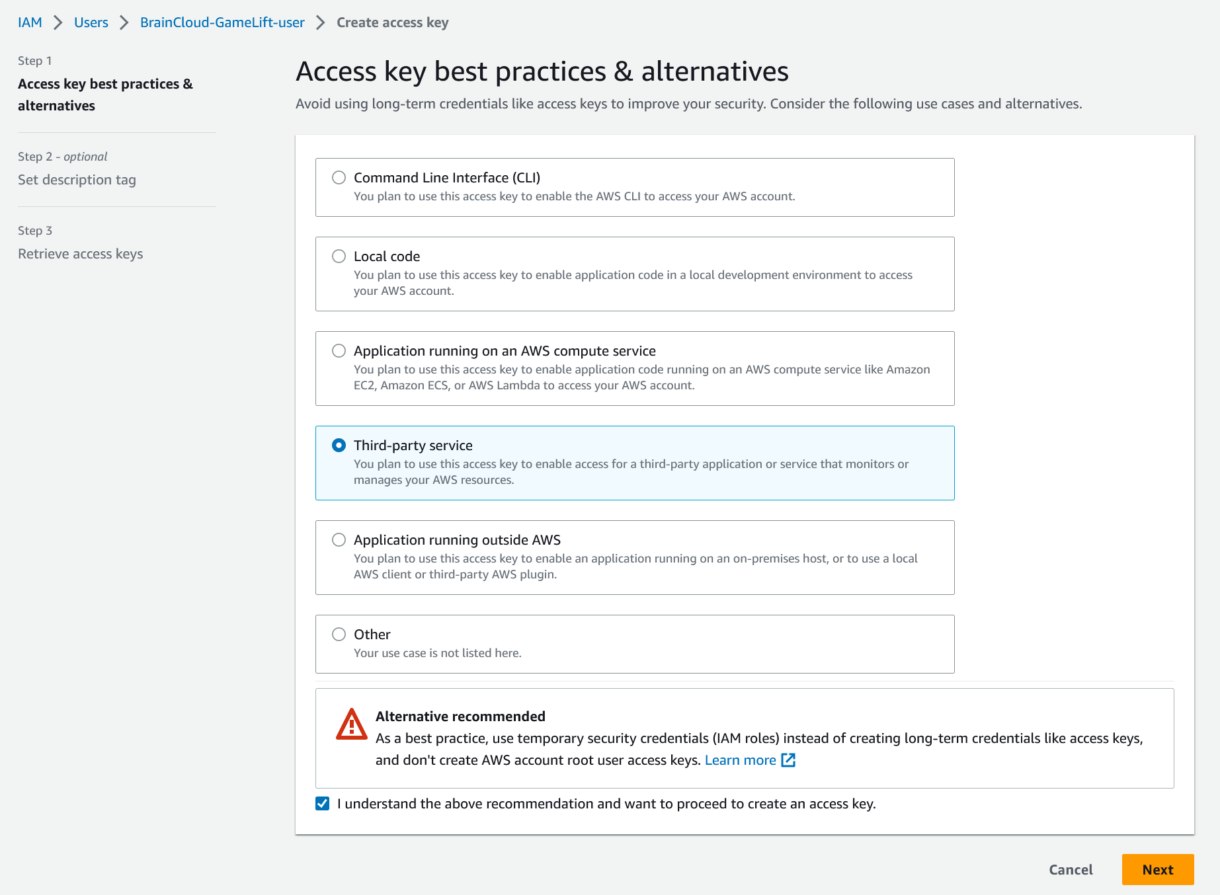
9. Select the relevant toggles and click the “Next” button
10. Tag the access key and click the “Create access key” button
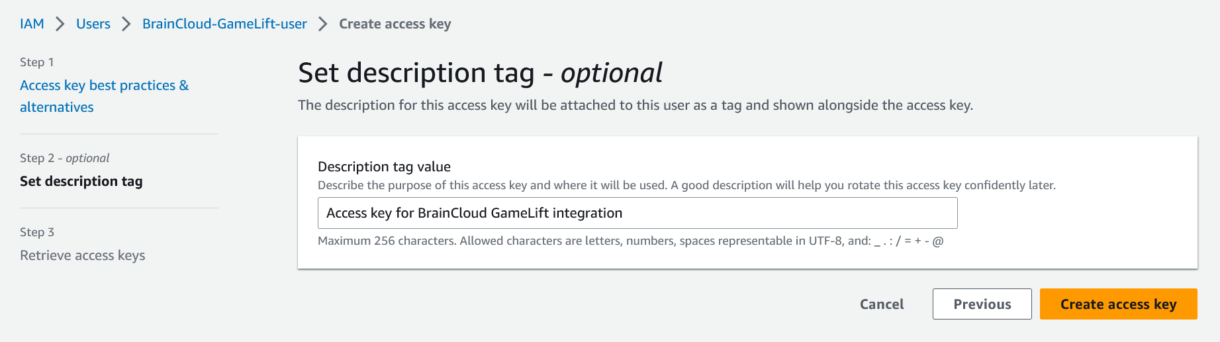
Important
Make sure you save this access key to a safe location since you will not be able to retrieve it after leaving this next screen.
11. Now click the “Done” button
Set GameLift Integration In brainCloud Portal
We will now need to take the details from the IAM user we set up in AWS and apply them to your brainCloud App.
In the brainCloud portal, select the game you are configuring. Navigate to the Design tab at the top menu of the page. Click on the “Integrations” tab on the sidebar and then click on “Manage Integrations”.
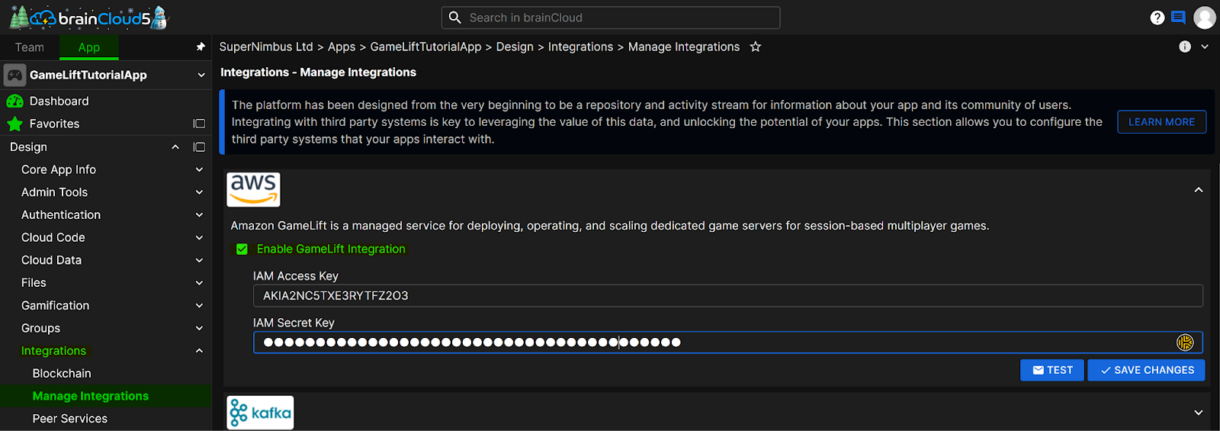
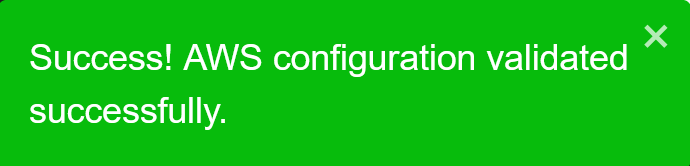
Now we can enter the IAM Access Key and Secret Key we created earlier and click the “Save Changes” button.
You can also test the integration here by clicking the “Test” button.
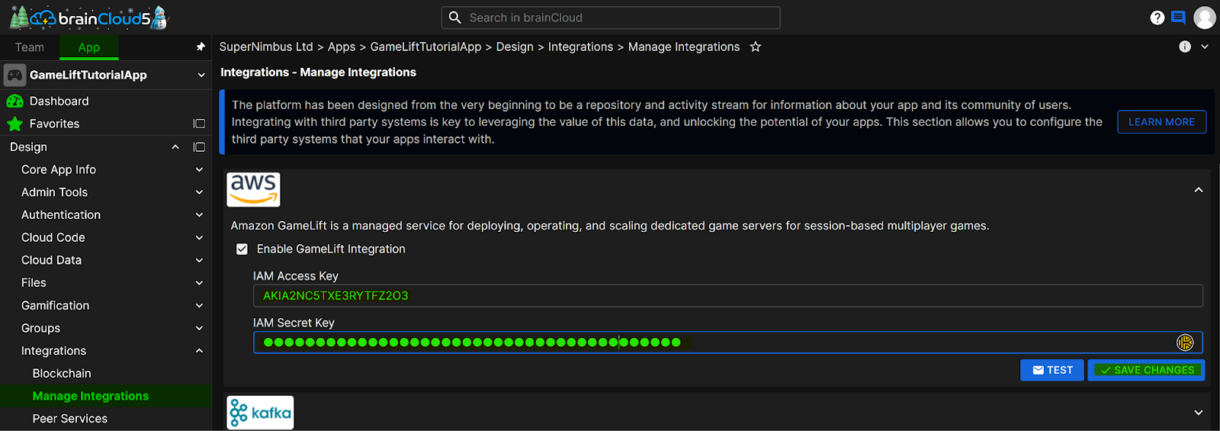
When testing the credentials, you should see a “Success” popup.
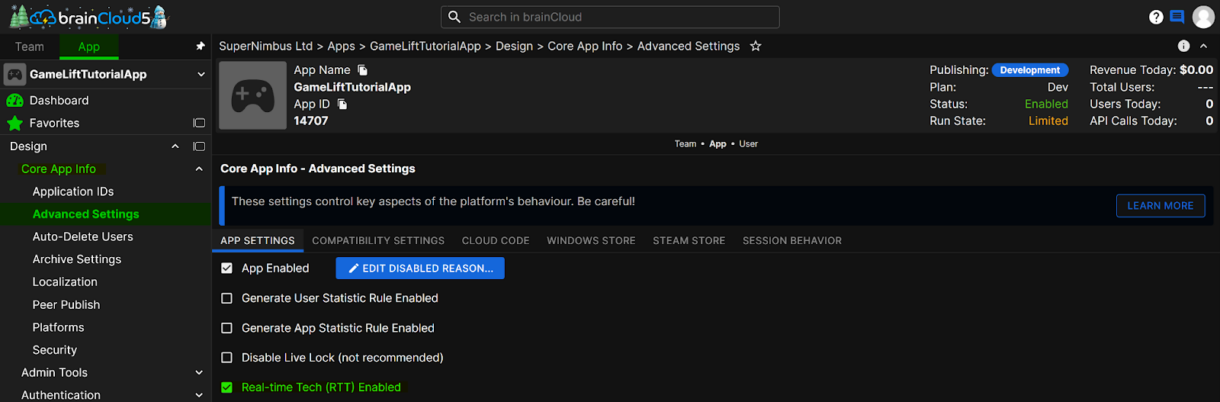
Enabling RTT
To make use of brainCloud Lobbies, we will need to enable RTT (Real-time Tech) on our App.
Once again, navigate to the “Design tab” in the brainCloud portal and in the “Core App Info” section on the sidebar and click on “Advanced Settings”.
In the App Settings section, tick the box that says “Real-time Tech (RTT) Enabled“.
Creating A GameLift Queue
The brainCloud GameLift integration utilises GameLift Queues. Queues are a way of defining rules for which Fleet your players will connect to based on certain criteria. We will not go into too much detail about Queues but they are the preferred way of directing players to the appropriate fleets based on location, ping, cost, etc.
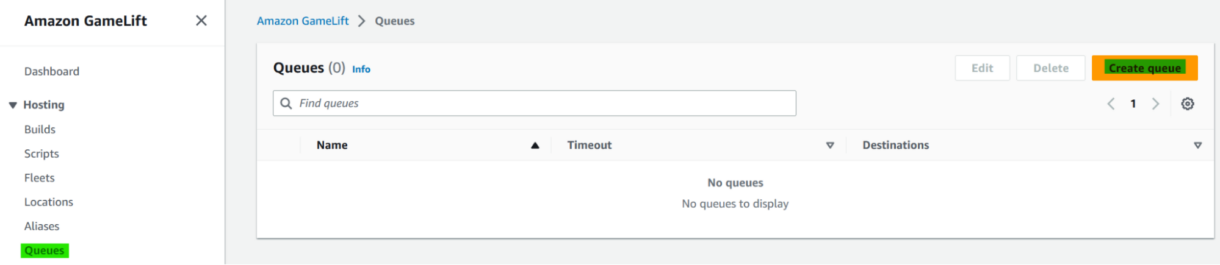
We need to create a GameLift Queue that brainCloud will use to place users into game sessions.
Back in your AWS GameLift dashboard, navigate to the Queues section and click on the “Create queue” button on the left hand side of the dashboard.
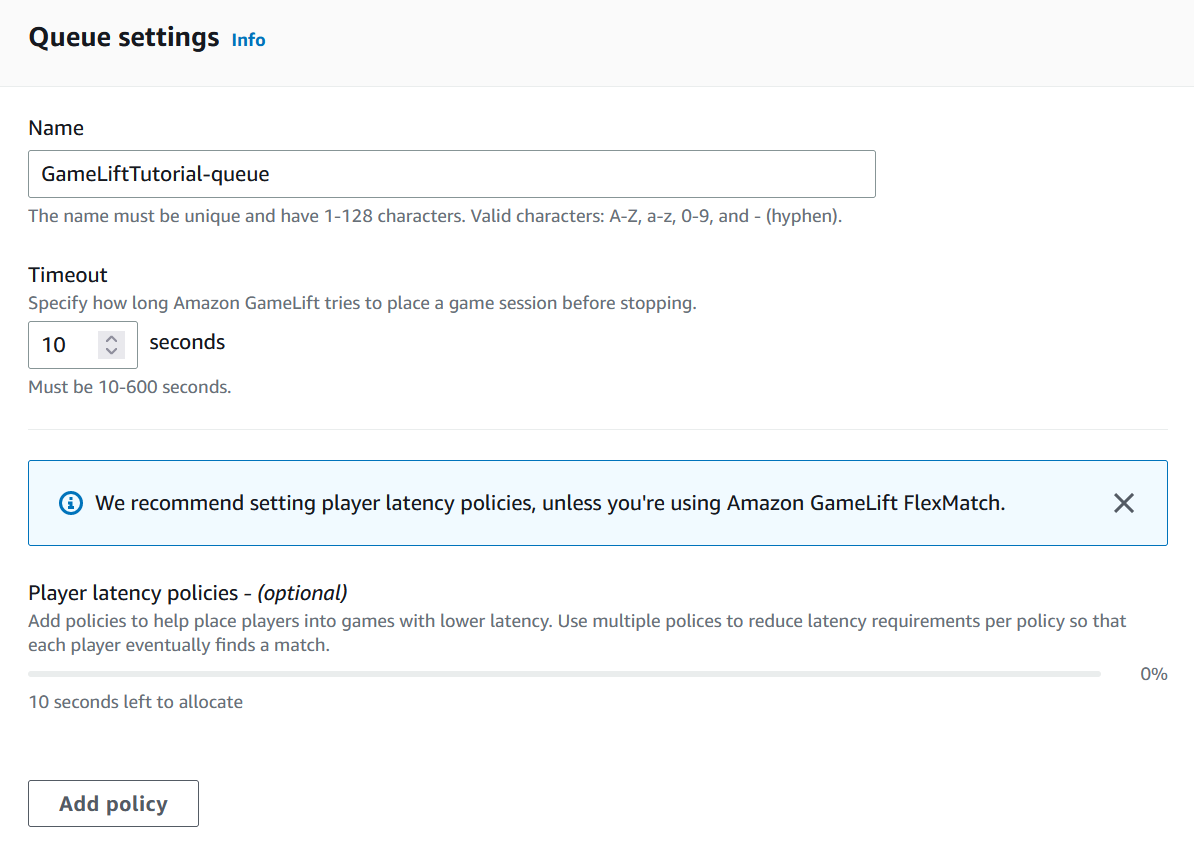
Give the queue a name and set the game session timeout.
For this simple example, the server activates very quickly, so we can set the timeout to be quite short.
For a more complex game, your game server may take some additional time to initialise so keep that in mind as you progress through development.
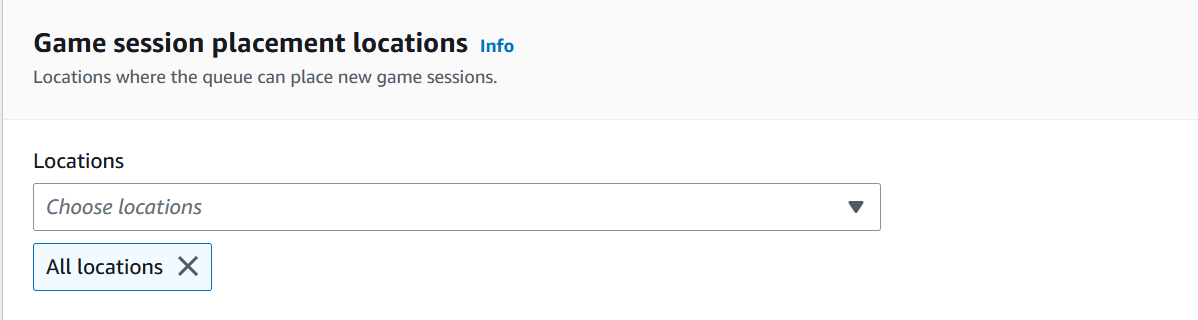
We want to set our queue to be allowed to place players into all available locations.
Note
Your game might have some specific locations you want to focus on so you might want to come back to this setting later and change it, but for now this is fine just to get our sessions up and running.
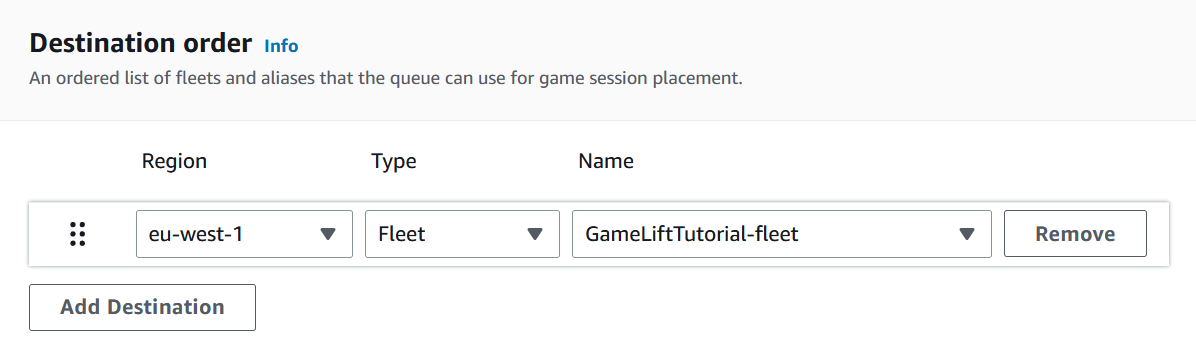
Make sure to include your Fleet or Alias in the destination order.
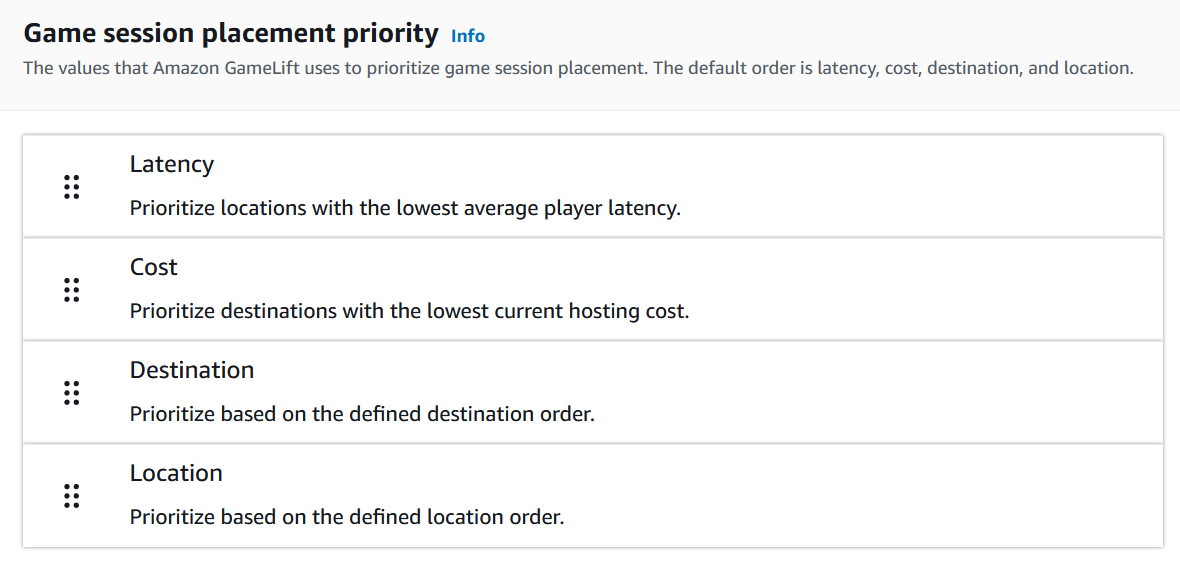
You can leave the session placement priority as it is by default.
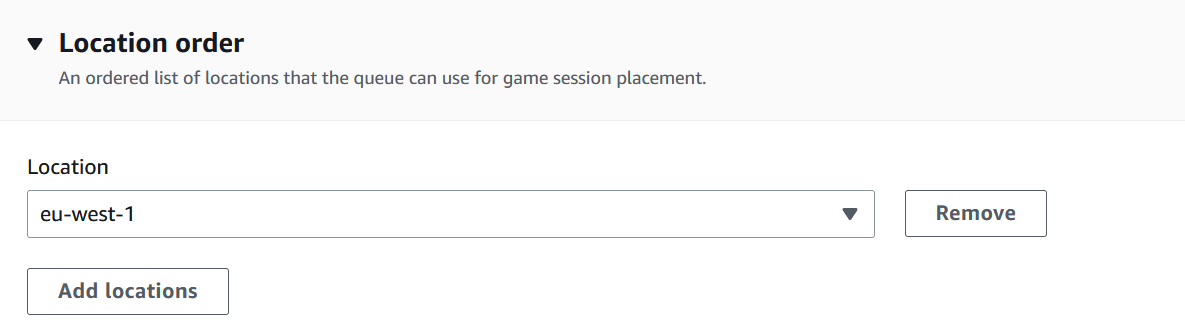
Now set the location order.
We only have fleets in eu-west-1 for this example, but your fleets might be deployed in different regions so keep that in mind.
The rest of these setting we can leave as the default.
Now click the “Create” button at the bottom of the page.
Create the Custom Server
Now that we have our Queue setup, we need to return the brainCloud dashboard and link our app to this Queue.
Once this is done brainCloud will be able to communicate with our GameLift Queue via the server-to-server API.
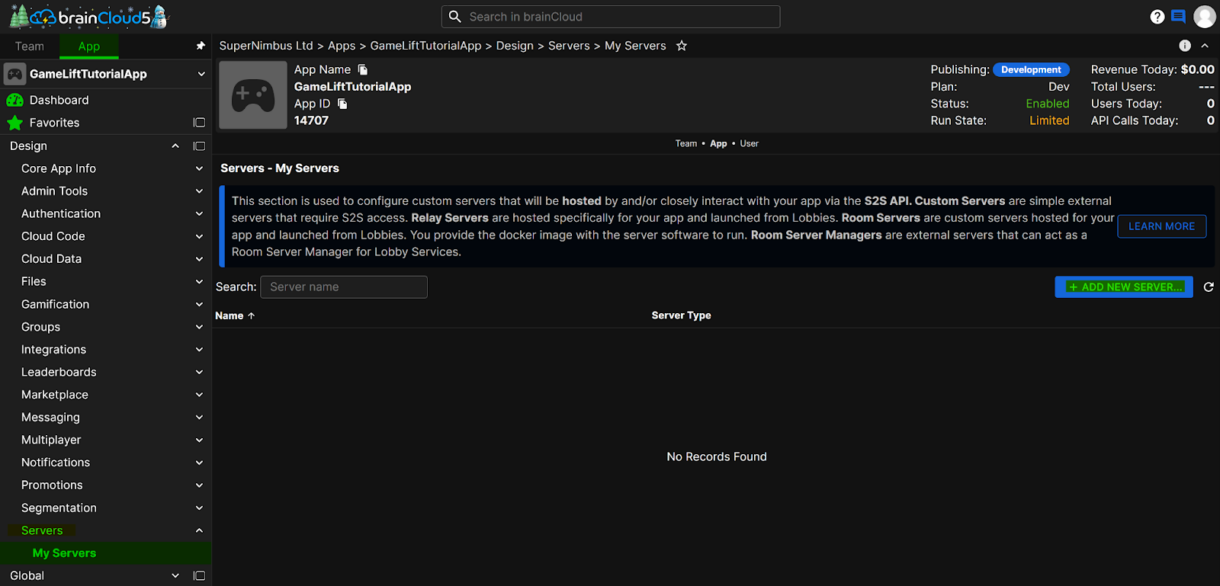
Navigate to the “Design“ tab in the brainCloud portal and in the “Servers” section on the sidebar and click on “My Servers”.
Here we can click the “Add New Server” button.
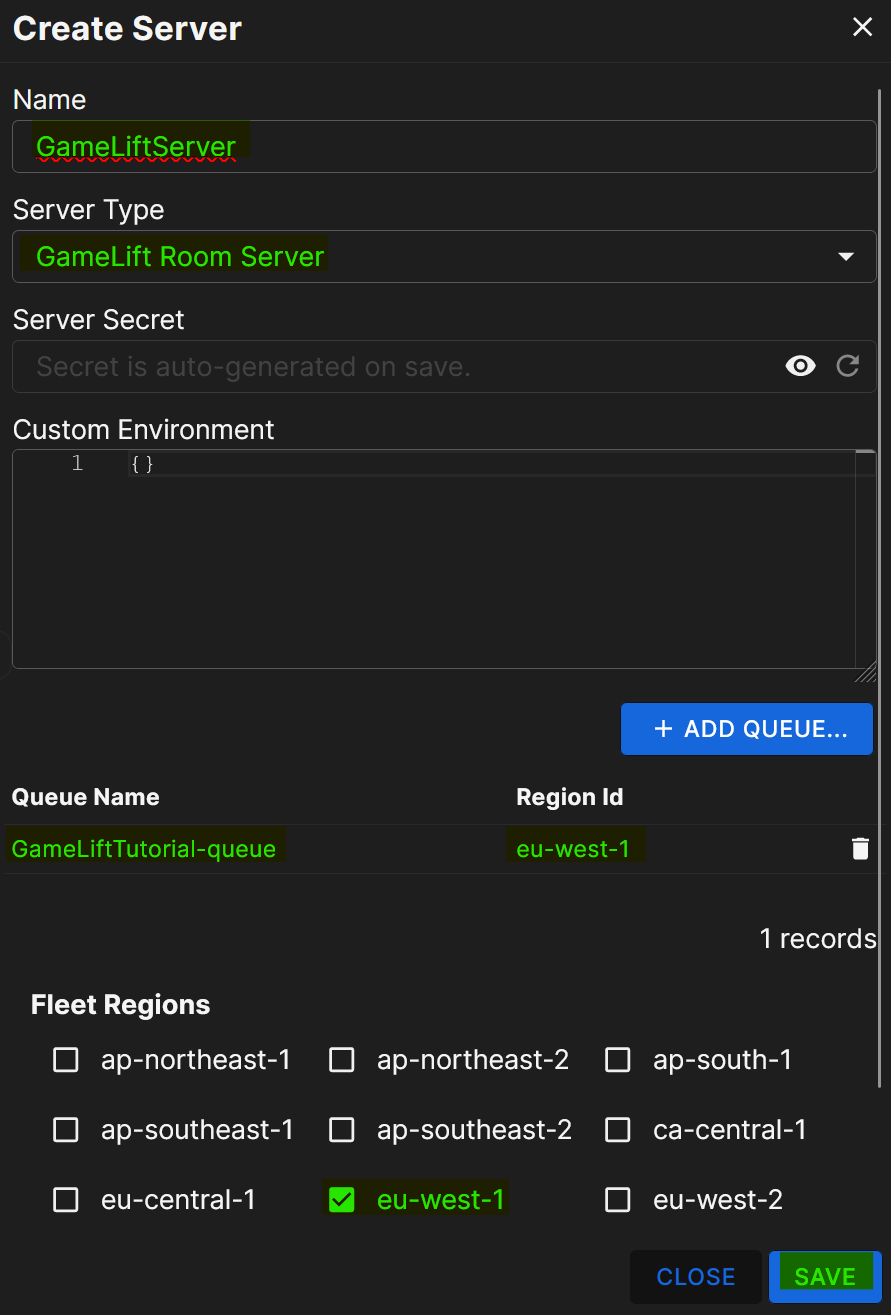
Set the new server Name and set the Server Type to “GameLift Room Server”.
Add the Queue we set up for our GameLift servers (make sure you specify the correct region the queue is located in) and set the Fleet Regions where servers can be started (we configured this in the GameLift fleet).
Now click the “Save button at the bottom of the page”.
That’s it!
Our GameLift and brainCloud integration is fully ready to use.
brainCloud – Lobby Configuration
As mentioned previously, we will be using Lobbies for matchmaking purposes in collaboration with the GameLift server we just set up.
Lobbies are used to gather participants together in preparation for shared multi-user experiences.
Lobby settings determine the composition of a lobby, the rules for lobby progression, and any custom configuration data required from the server at launch.
Note
For this example we don’t use any custom configuration data that we need to send to with these lobby creation requests.An example of what custom data you might want to send is anything that might be needed when the new match starts.This might be stats from a previous match if the players are running a campaign. You might also want each player to submit personal data necessary for the session.
Navigate to the Design tab in the brainCloud portal.
On the Multiplayer section on the sidebar and click on Lobbies.
First, we need to enable the Lobby service using the toggle at the top of the page.
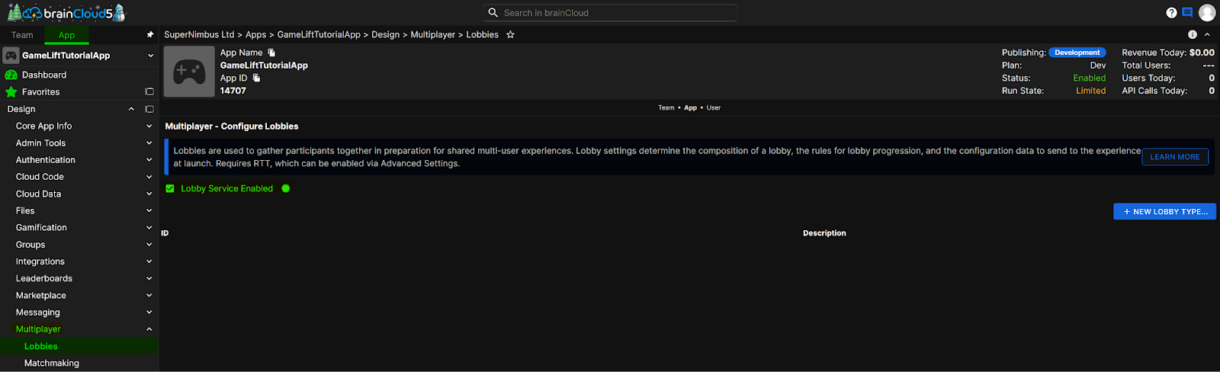
Next, click on the “New Lobby Type” button to configure a new lobby.
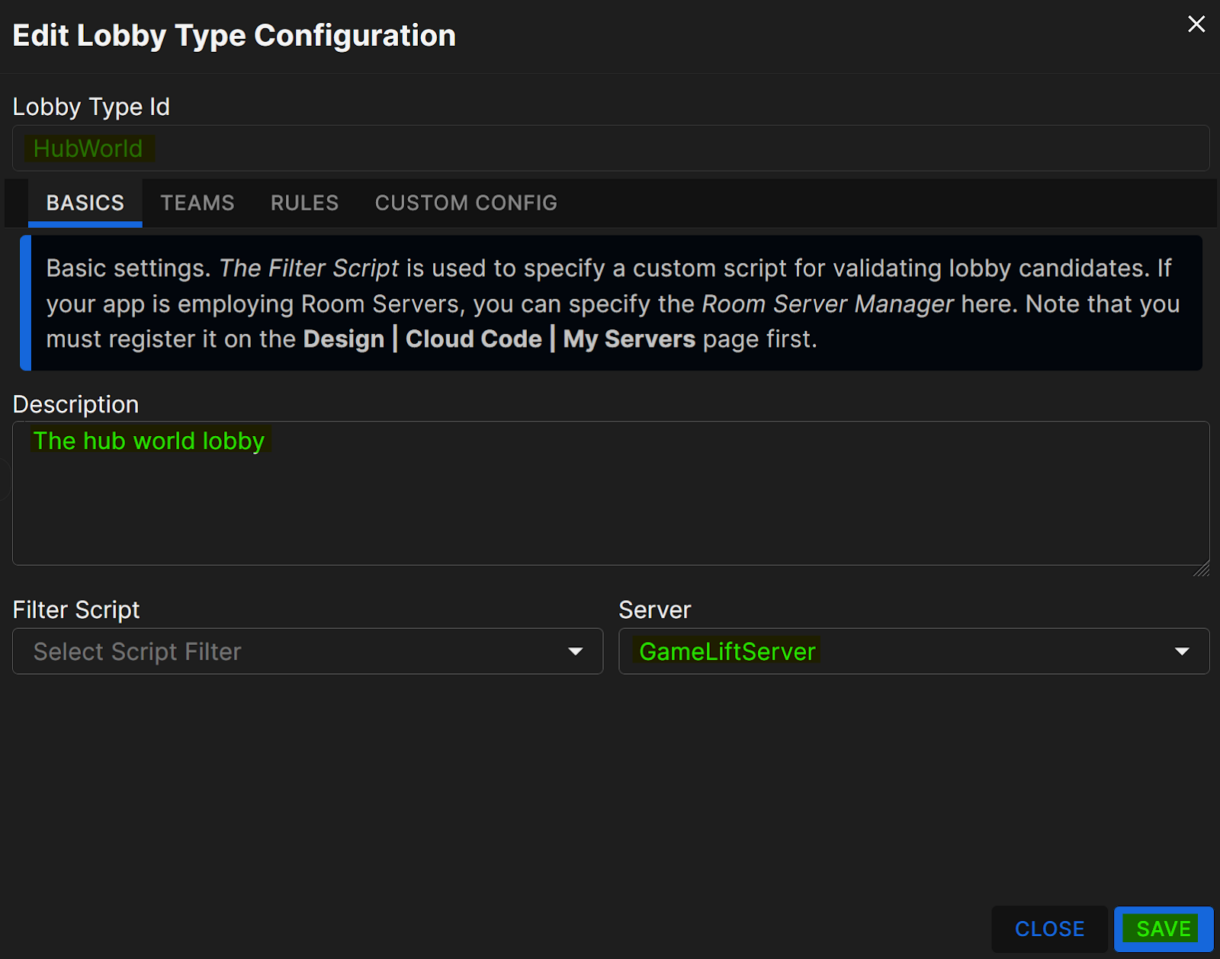
This will bring up a new window where we can configure our lobby.

In the “Basics” tab, set the Lobby Type ID.
Write a description and select the GameLift server we created earlier from the drop-down menu.
Next, in the “Rules” tab, set the lobby times, ready-up minimums and the tick boxes to what is shown in the screenshot.
Hit the “Save & Close” button to complete set up.
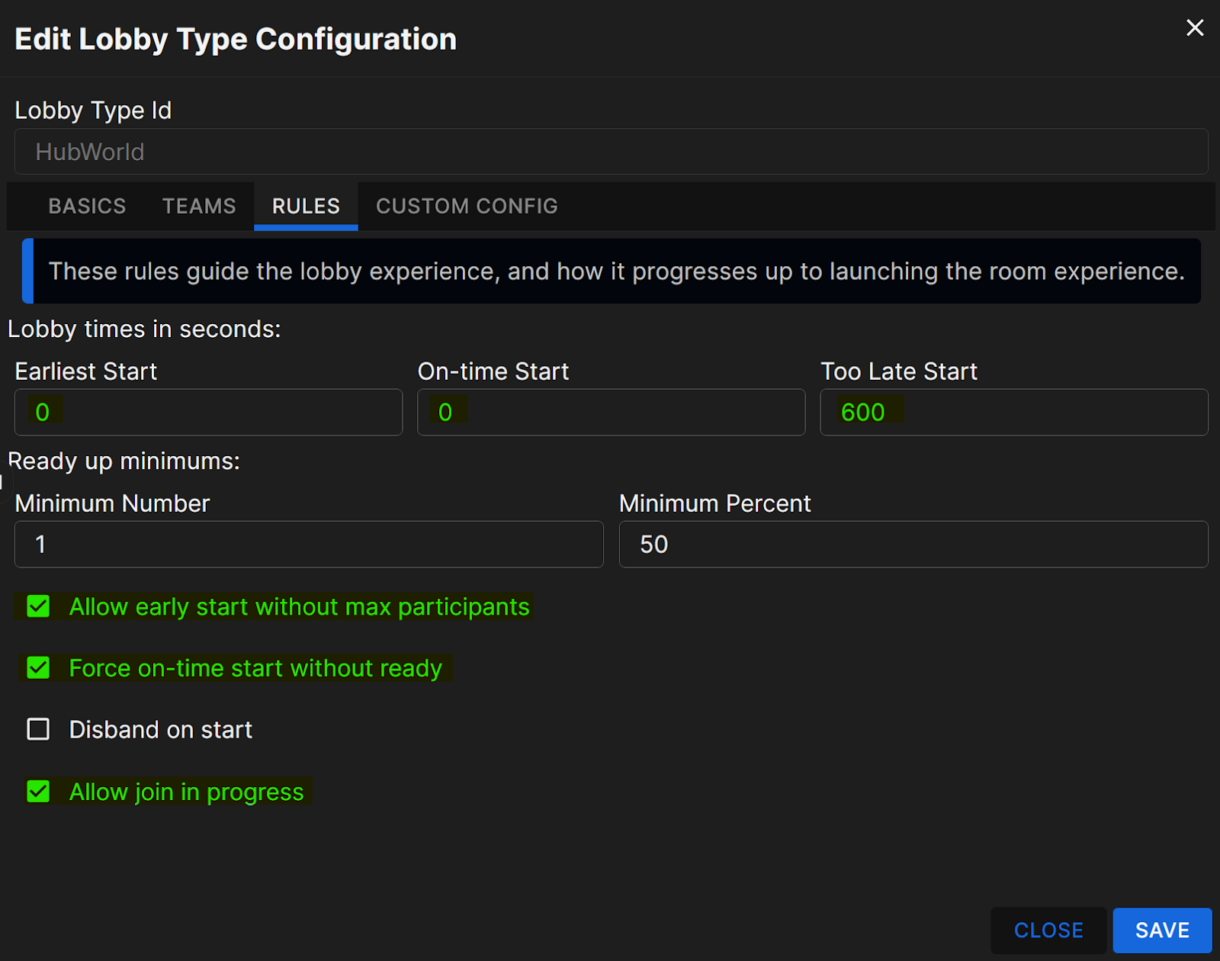
Some lobby rule basics:
- Earliest Start defines the earliest point a lobby can start and launch a server.
- On-time Start defines when the lobby will start checking whether to launch the server if the Early start option is not enabled.
- Too Late Start defines when the lobby will time out and fail if it hasn’t launched yet.
You can see an example of this flow described below.

For this example, we set the lobby up in such a way that the first player to join will instantly launch the server.
The “Allow join in process” tick box allows the lobby to be back-filled, meaning players can still join an active lobby providing the lobby has not reached capacity.
In the future, we can use additional lobby functionality like teams or provide custom JSON data to the server using the Custom Config, but this is not needed at the moment.
Current EC2 Fleet
With all of these additions to the game, you might be wondering if our GameLift fleet setup requires any changes to support the brainCloud integration. Luckily, minimal changes are required.
The fleet that we will be running our server on will be essentially the same as the basic GameLift fleet we created earlier.
However, we did add some additional concurrent processes.
This allows us to constantly cycle between three possible servers.
When one process ends or is full, another is ready to activate a new game session instantly.

Client Flow
The high-level overview of the Client flow looks like this:
- Initialise the brainCloud Client Wrapper
- Authenticate with brainCloud
- Enable an RTT connection
- Register a Lobby Callback Listener
- Find or Create a lobby for the Hub-World
- Join the server

Installing The brainCloud Client Plugin
Now that we have lobbies setup and all our brainCloud components configured, we will need to add the brainCloud plugin to our Unreal project.
Download the latest version of the brainCloud Unreal Engine client lib from GitHub here.
Extract the zip and copy the “BCClient” folder into your project’s Plugins folder.
Alternatively, you can install it with the use of a Git Submodule using the command:
git submodule add https://github.com/getbraincloud/braincloud-unreal-plugin-src.git Plugins/BCClientRegenerate your VisualStudio project files using the .uproject file and build the Development Editor.
You can see how to do this in a previous section here.
You can now launch the project again.
In the plugins view of the Engine, you should now see the brainCloud client plugin.
Enable the plugin here and restart the engine. You will need to rebuild the Development Editor from VisualStudio again after enabling the plugin.
Note
This way of installing plugins is what BrainCloud recommends in their README.md.However, you can skip launching the Editor just to enable the plugin by adding the BCClient to the .uproject file Plugins array the same way we did for the GameLiftServerSDK
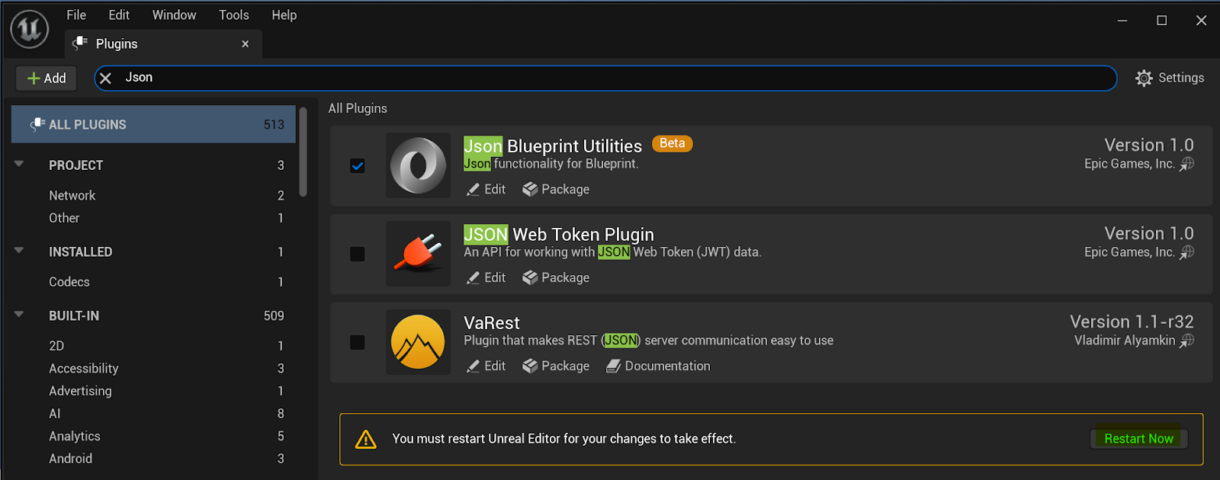
Installing The JSON Blueprint Utilities Plugin
Response and notifications from brainCloud contain JSON payloads that we will need to parse. The JSON Blueprint Utilities plugin provides the functionality that allows us to do this neatly in blueprints. It also makes forming JSON in blueprints much easier, which will be useful when you start sending payloads brainCloud in the future.
Head to the plugins section in the Unreal Editor and search for JSON.
Tick the box beside the plugin and restart the editor using the “Restart Now” popup button.
Note
The Json Blueprint Utilities plugin is still in beta at the time of writing this tutorial.If you do not want to rely on a plugin in beta, a good alternative would be the VaRest plugin, which also supports parsing and forming JSON.
Game Instance Blueprints
For this guide we will be using blueprints instead of C++ code. This functionality is still possible with the brainCloud SDK using C++.
All of our client-side code will live in a “GameInstance” blueprint. The GameInstance blueprint is a high-level manager object which spawns at game creation and is not destroyed until the game instance is shut down. This is great for us since we want to keep a constant RTT connection between the client and brainCloud.
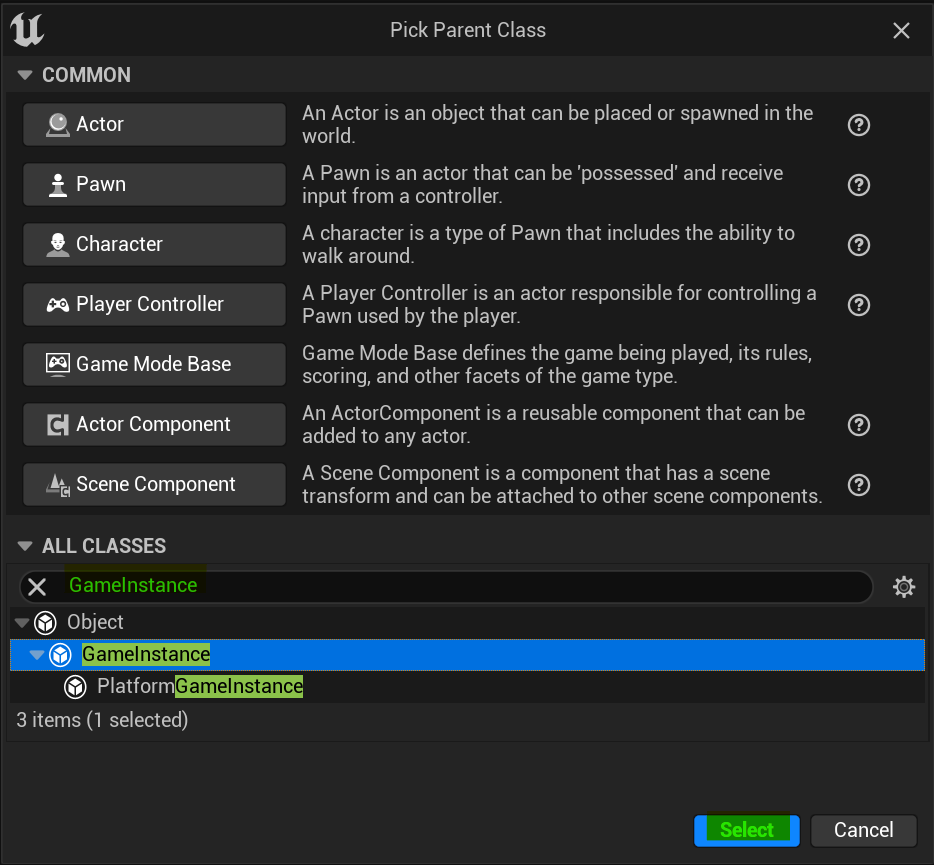
To create a GameInstance blueprint, in the Editor right click on the content drawer and select Blueprint Class.
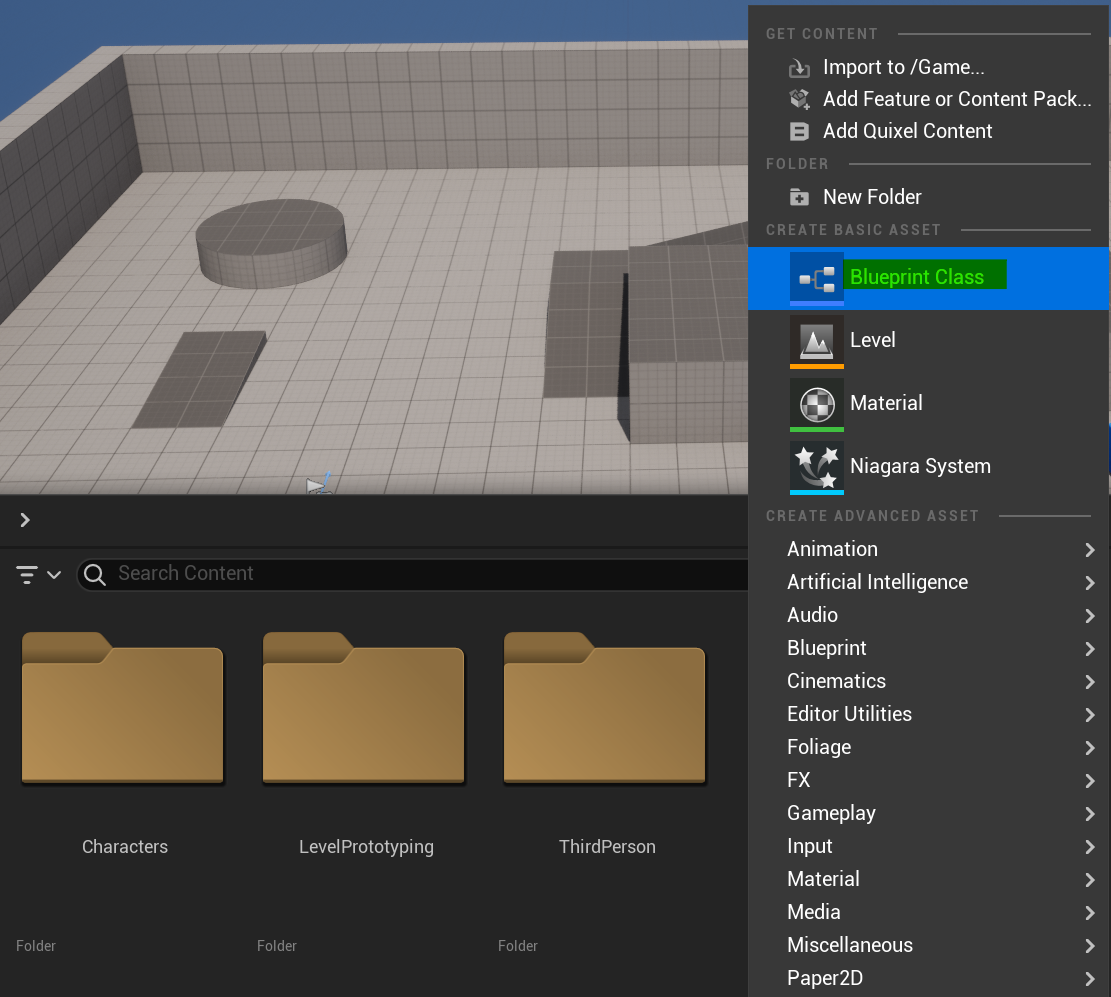
In the parent class selector, search for GameInstance and click Select.
Name your new GameInstance blueprint. We named ours MainGameInstance.
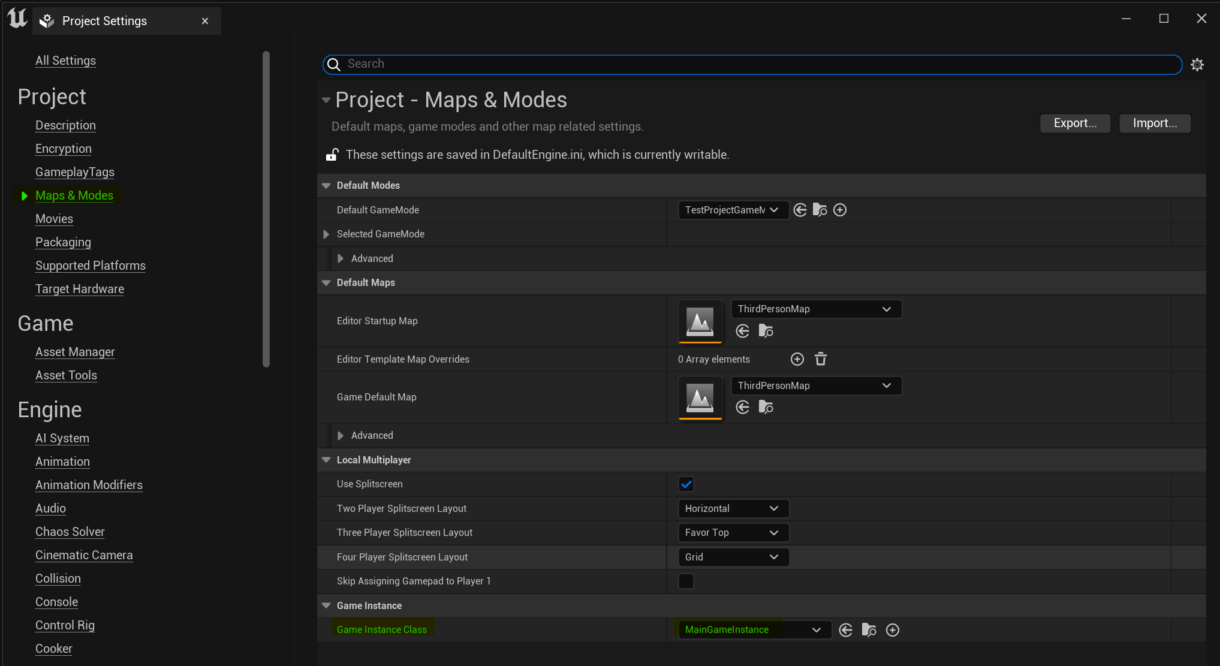
Head to your Project Settings and click on “Maps & Modes” in the side bar.
Make sure that the new GameInstance class we just created is selected at the bottom of the settings.
We can now start scripting in our GameInstance script. Double click it to open the Blueprint editor.
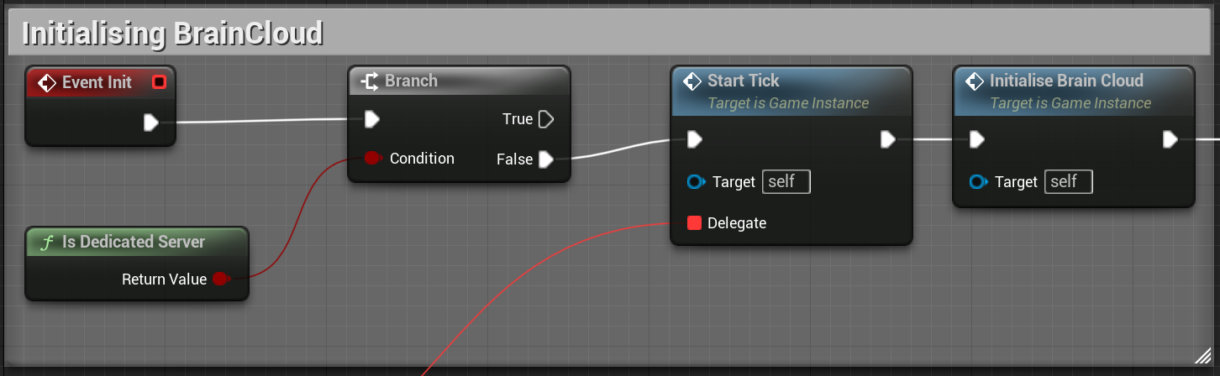
On the GameInstance “Event Init” event, we check if we are running on a client.
If we are running on the client, we start a manual tick event.
This tick event will run brainCloud callbacks so that our requests can receive responses asynchronously.
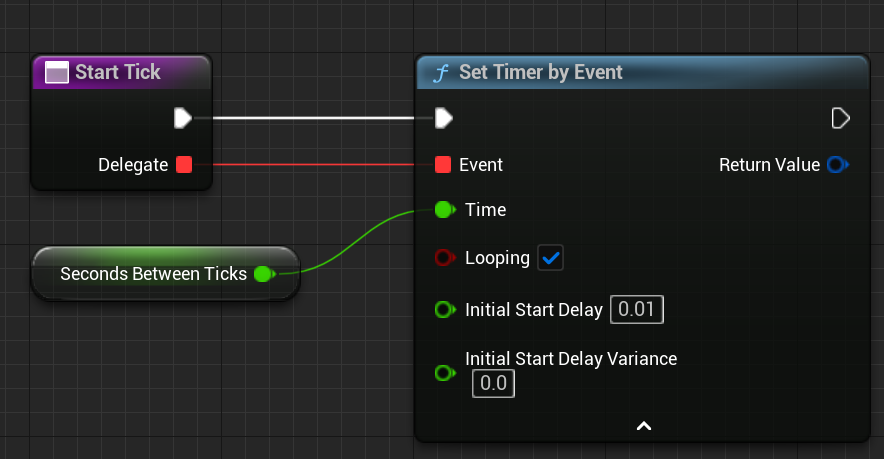
We set seconds between ticks to 0.01. This will result in roughly 100 ticks per second.
You can speed up or slow this down however you wish.
Connected to the tick event, we pass in an event delegate that will be called on each timer tick.
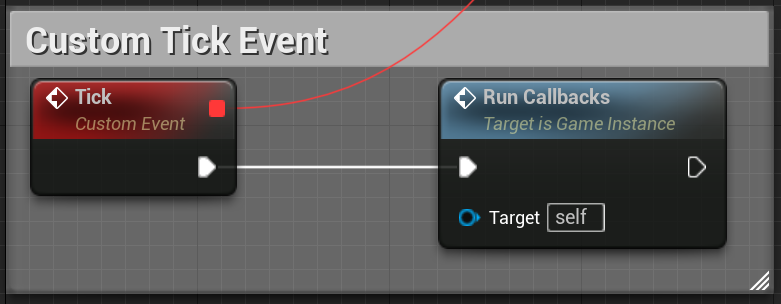
The “Run Callbacks” function calls the brainCloud wrappers Run Callbacks function if we have successfully initialised brainCloud.
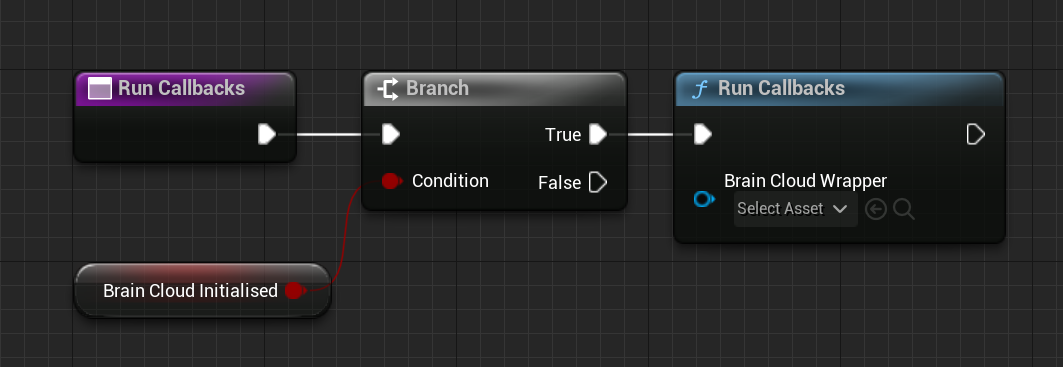
After starting the ticking, we initialise the brainCloud SDK in a custom function. In this function we first create a brainCloud Wrapper object and set a local variable if we need it later.
We then also set the brainCloud default instance to that object so that we do not need to pass in an object reference whenever we make future brainCloud calls.

Next, we Initialise the brainCloud Wrapper with app details from our brainCloud app.
The required parameters are the Server Url, our app’s secret key, our app’s id and the version of the client.
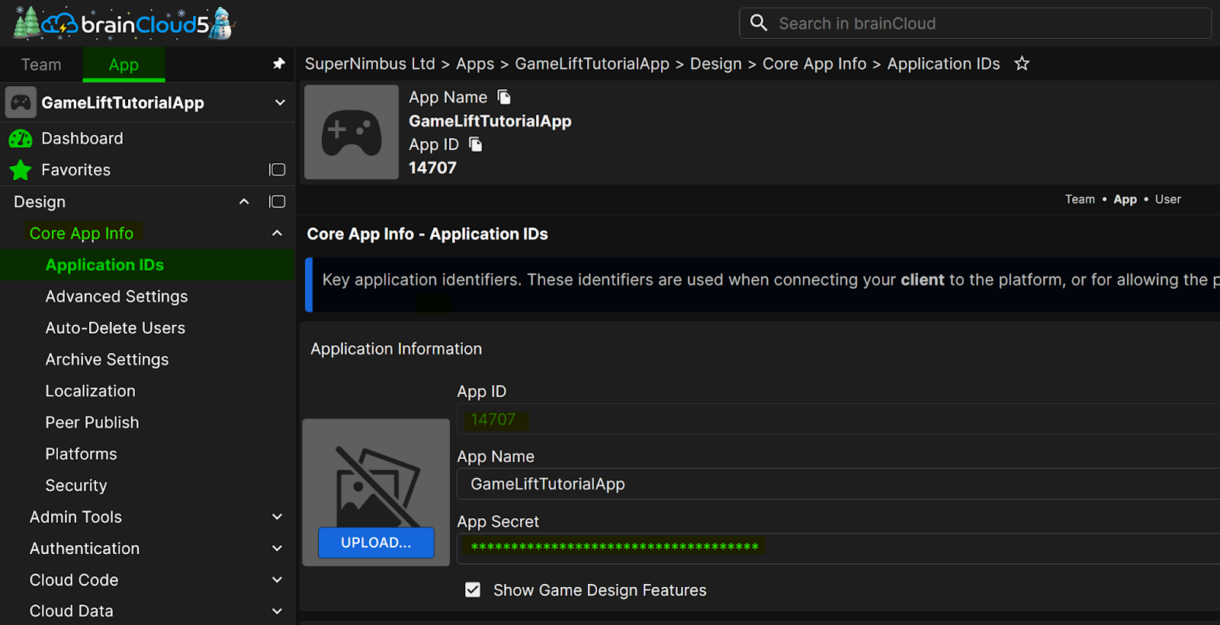
You can get your app id and secret from the Application IDs section in the brainCloud portal. The version will not be set by default so any value will work for your first time.
If you did set a minimum version in the portal, make sure the version provided by the client is equal or higher.
The server URL will be the same for all projects: https://sharedprod.braincloudservers.com/dispatcherv2
The version isn’t important for this example, but is useful for managing backend changes across later client releases.
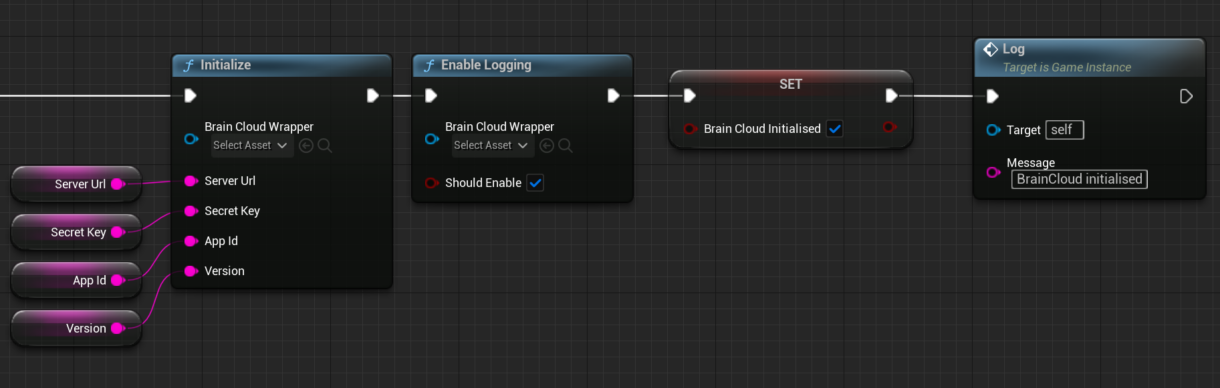
We are pulling in our brainCloud appId, secret, version and url from local variables in this example but we would recommend storing project secrets in config files which are ignored in source control.
Now that brainCloud is initialised, we use the brainCloud Wrapper to authenticate anonymously.
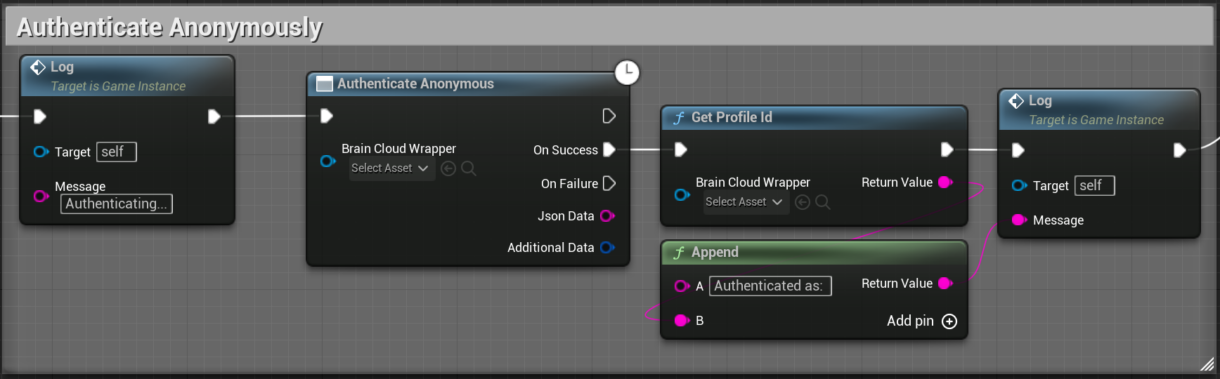
Note
For the sake of brevity we don’t do any error handling for this authentication flow but we would strongly suggest that you implement error handling for invalid authentications or failed authentications attempts in your own project.
Next, we will initialise the RTT connection to brainCloud using the WebSocket protocol.
This will allow us to receive asynchronous responses from the server. For our example it is particularly important to set up asynchronous calls for getting lobby details which contain server connections details from GameLift which brainCloud forward on to the players using RTT callbacks.
We then register a custom function to handle any callback messages relating to Lobbies.
This custom lobby callback function is the most complicated part of the client code in this example.
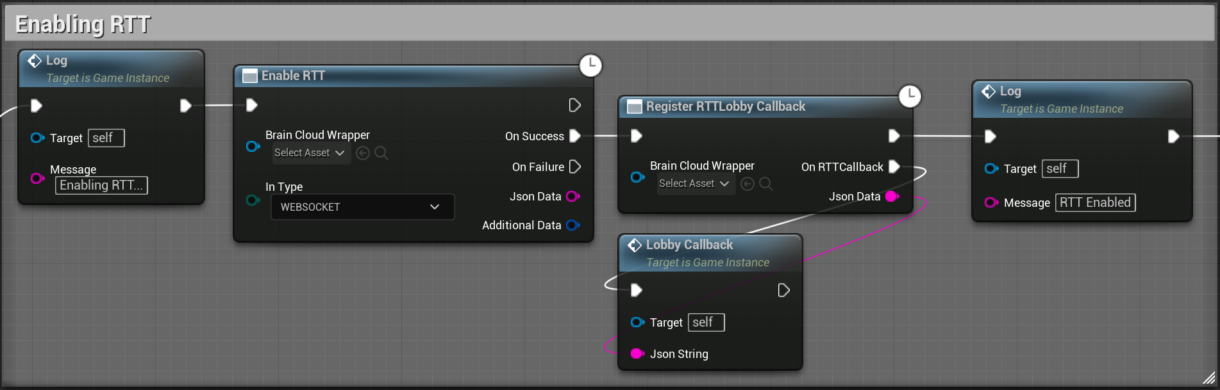
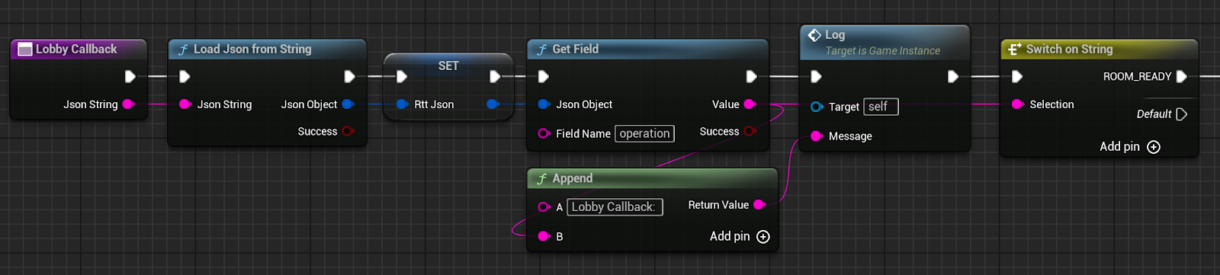
When we receive a lobby message from brainCloud (upon player being successfully placed in the lobby) we parse out the event operation from the message JSON.
Note
Since this is just a demo project, we are not configuring error handling with our RTT setup.In any real and production ready game, ensure that all of the BrainCloud calls have their errors handled. This will depend on how you want your client to behave in case of errors.
An example of a RTT message JSON looks like this:
{
  "service": "lobby",
  "operation": "ROOM_ASSIGNED",
  "data": {
    "lobbyId": "14432:testLobby:22",
    "connectData": {
      "address": "35.178.184.243",
      "ports": {
        "gamelift": 7777
      }
    },
    "passcode": "14da5a"
  }
}
Based on the operation type we receive from the message we can call specific handlers using a basic switch statement.
For this example we only need to listen for the ROOM_READY messages since this is the message you receive when the player attempts to join a server.
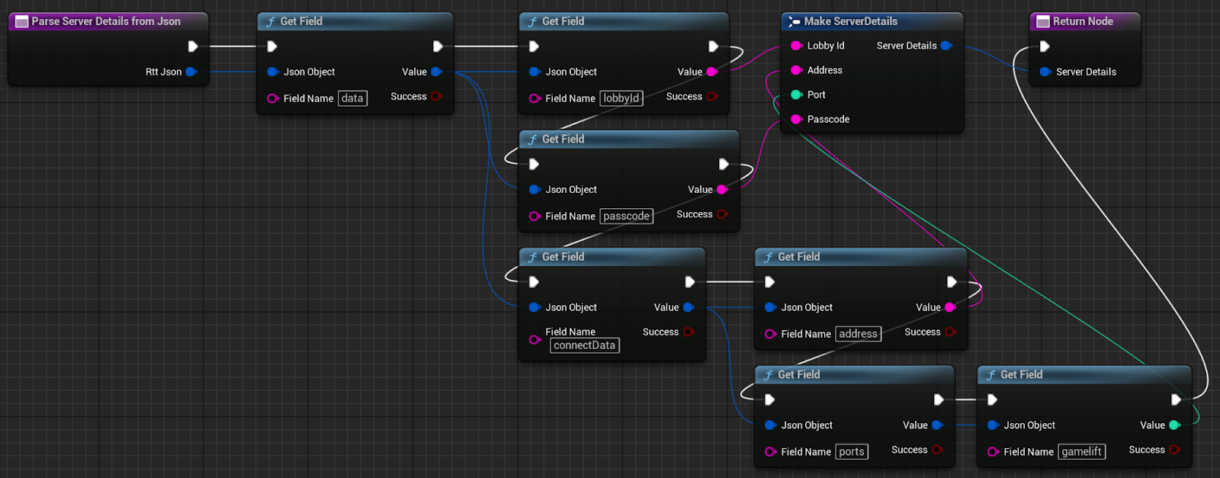
When we receive a ROOM_READY message, we parse the server details from the JSON and connect to the server using the details.
The important parameters from the ROOM_READY message are the server address and port, as well as the player’s passcode.
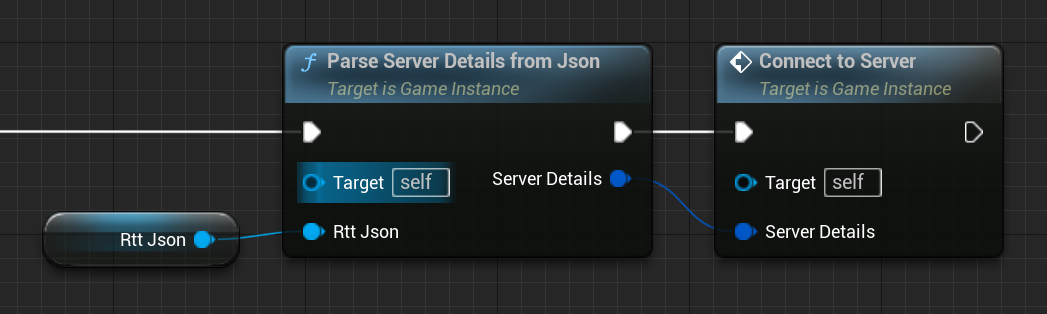
ServerDetails is a custom structure we’ve put together that contains all of the needed details to join a GameLift server.
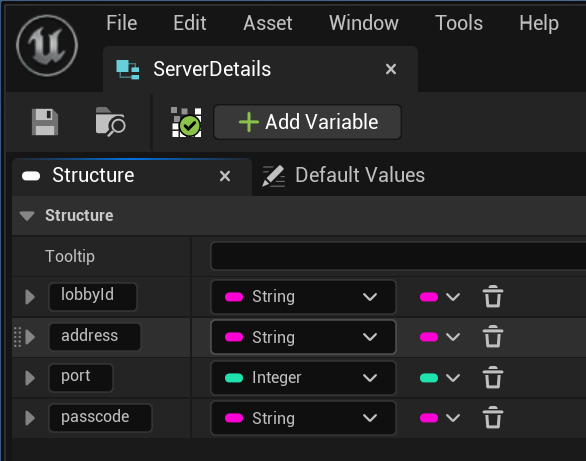
The parsing of the JSON message to the server details object looks like example below.
Technically, you would only require the server IP and port to connect, but brainCloud also generates a passcode for the user.
On the server, you can then manually use the lobby id, the player’s Id and passcode to make sure they should be allowed to join the server.
The “Connect to Server” function takes in the Server Details object and runs the “Execute console Command” using the server IP address and port.
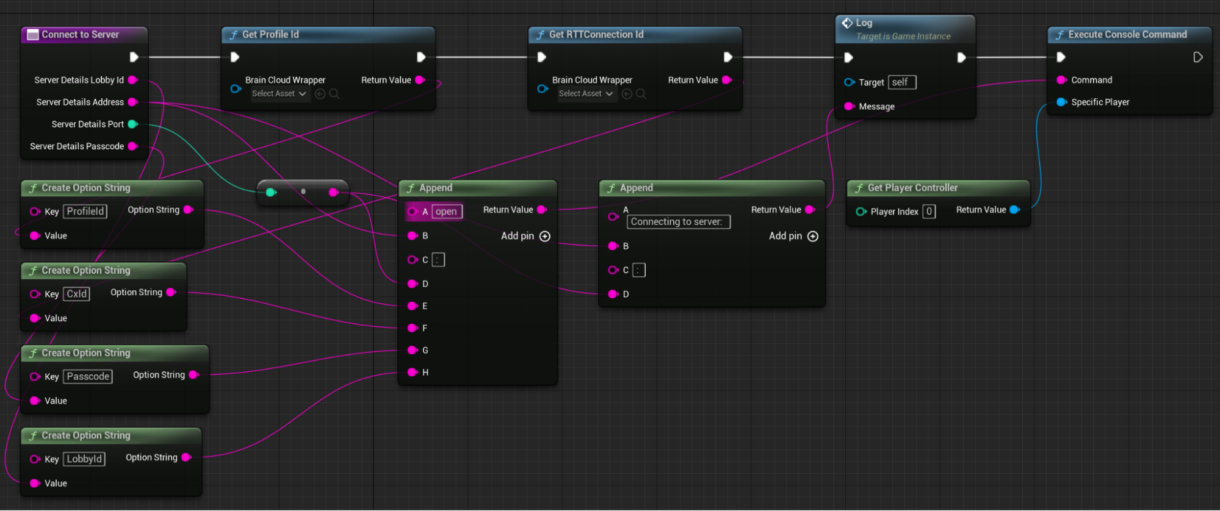
Here, we also construct an Option string which we append to the end of the Open command.
These strings come in the format of “?key=value”.
We add the player’s profile id, connection id, lobby passcode and lobby id.
This is an easy way of providing player details to the server on connection. The final command will look like this:
open 52.19.222.104:7777?ProfileId=27546945-134d-43b0-843c-2d1a7e6ea97b?CxId=14561:27546944-134d-43b0-843c-2d1a7e6ea97b:mobo1nrqo3aa6cmb7csvtscn5u?Passcode=d7586c?LobbyId=14561:HubWorld:23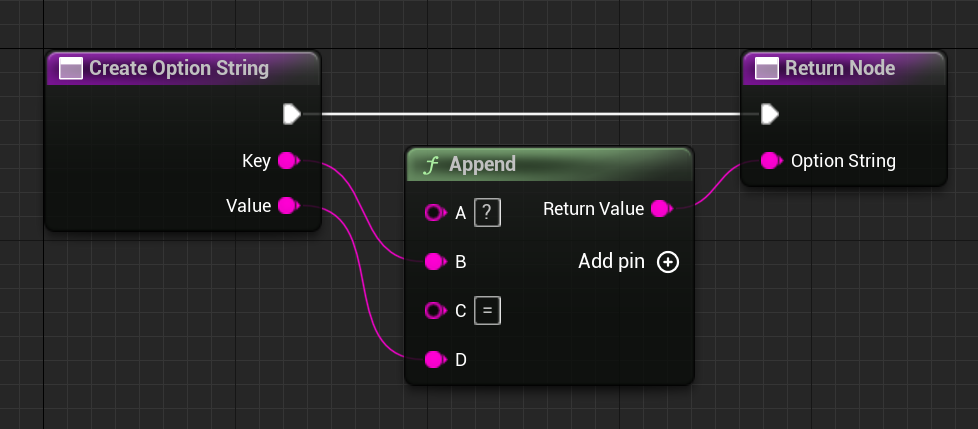
Lastly, we use the “Find or Create Lobby” function to let our players join a lobby.
We look for any currently running lobby with a specific lobby name and if none are found, we start a new one.
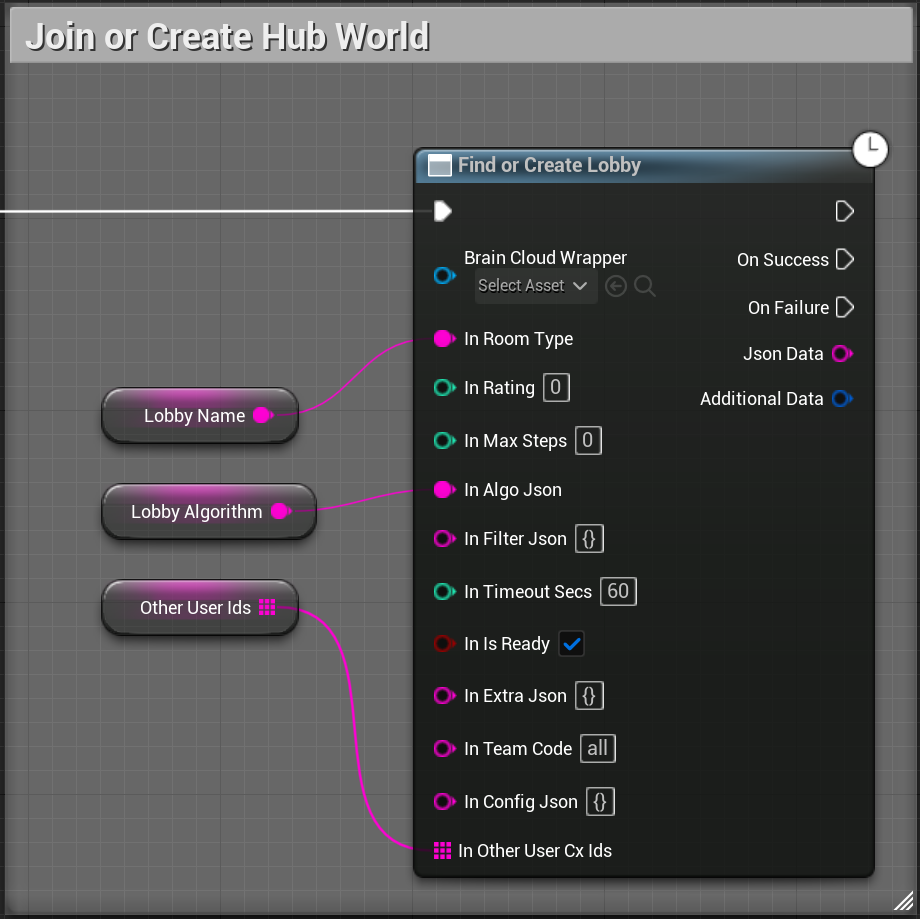
We’ve kept our request as simple as possible since we don’t have any complex matchmaking requirements.
But you can customise your matchmaking algorithm and its searching behaviour if you need to.
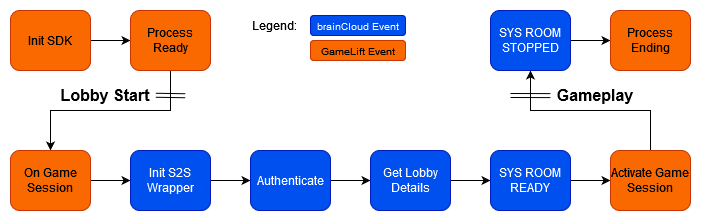
Server Flow
The high-level overview of the Server flow looks like this:
- We initialise the GameLift Server SDK
- We register GameLift callbacks
- OnStartGameSession
- OnHealthCheck
- OnTerminate
- We call ProcessReady to inform Gamelift that the server process is ready to host game sessions
- brainCloud starts a game session with GameLift when a lobby is ready to launch
- Our server initialises the brainCloud S2S wrapper with the details provided by the game session GameProperties
- We authenticate with brainCloud
- We grab the data related to the Lobby we are hosting
- We inform brainCloud that we are ready to let players join
- We inform GameLift that the Game Session is active
- Gameplay happens
- We inform brainCloud that the server is shutting down
- We inform GameLift that the process is ending
- The server shuts down
Installing To brainCloud S2S Library
There is one last installation step required to fully integrate our dedicated server.
The brainCloud S2S library differs from the Client plugin and needs to be installed separately. The S2S library allows our dedicated server to call brainCloud APIs authenticated as a server rather than a client. This unlocks various API calls that clients do not have access to which are needed to successfully run a brainCloud lobby room on our dedicated server.
Installing the S2S library is very straightforward. You will find the brainCloud Github repository here.
Download the repo as a zip and extract the files on your PC.
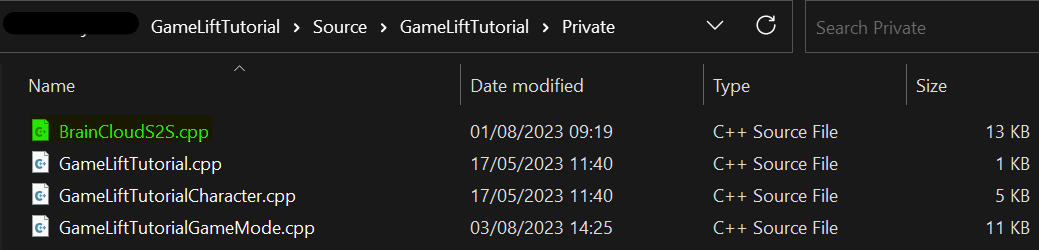
Add the BrainCloudS2S.cpp and BrainCloudS2S.h to your project’s Source folder where the rest of your scripts are.

GameLiftTutorialGameMode Files
The GameMode files are too large to show in full here, but you can find the full version of them on the support repo we supply for these tutorials here.
We will be covering the most important changes and updates in snippets below.
S2S Calls
ImportantWe have discussed a lot of topics so far, and introduced you to various frontend and backend products, services and packages.
At this point it is important to clarify some terminology for the following section to avoid confusion.
Instances – GameLift Concept
These are the actual EC2 virtual servers that are running for a given fleet. You can set them as on-demand or spot instances and what instance type the fleet will use (for example c5-large).
Processes – GameLift Concept
You can think of processes like multiple parallel instances of your server executable running on the same instance. This is just like if you open your game exe file multiple times on your own machine but in our case we are running the server executables.
An instance can host multiple processes at once (for example 1 instance can run 3 custom server processes). You can configure these by increasing the concurrent processes count in the launch configuration or by listing multiple launch configurations.
Processes are launched automatically on instance launch and are recycled by the GameLift service when they terminate at the end of a game session.
Game Sessions – GameLift Concept
When a game session is created, GameLift selects an available process on the target fleet that is ready to host it. That process receives a notification from GameLift, prepares itself for players and then notifies GameLift that the game session is active. Players can now join this server. The relationship of available processes to active game sessions the usual metric used to auto-scale instance capacity
Player Sessions – GameLift Concept
A player session is a representation of a player’s connection to a game session. Player sessions are used to track and manage individual player interactions with the game server instances hosted on the GameLift service. However, since we are using brainCloud these are not used in our flow.
Lobby- brainCloud Concept
A lobby in brainCloud is used to gather participants in preparation for a multi-user experience. In our case, we use lobbies with the ability to join in-progress sessions. This means that the lobby will not be disbanded on game start and player can join if it has space and is still running
Room – brainCloud Concept
A room in brainCloud is a multiplayer server. brainCloud provides their own docker image based hosting solution, but we are using the built in GameLift integration version instead. Rooms are essentially the brainCloud version of GameLift sessions.
Rooms are given all lobby data upon start. Thus they have access to the list of members, team allotments, the static lobby config, and dynamic lobby settings data
First, we need to run brainCloud callbacks in the tick function. This allows the server to receive responses to our S2S calls asynchronously.
void AGameLiftTutorialGameMode::Tick(float DeltaSeconds)
{
   Super::Tick(DeltaSeconds);
#if WITH_GAMELIFT
   // We need to run the Server to server callbacks with the BrainCloud sdk
   if (brainCloudReady == false)
     return;
   if (pS2S.IsValid())
     pS2S->runCallbacks();
#endif
}
When our server receives an OnGameSession callback from the GameLift service we need to initialise the brainCloud server-to-server wrapper.
When we create a brainCloud lobby with the client Find or Create Lobby call, our lobby is configured to launch instantly.
Under the hood, brainCloud then creates a game session with GameLift, and provides connection details to brainCloud in the game session’s game properties.
Game Properties are key-value pair metadata that live on the GameLift game sessions.
This means our server has all of the information needed to communicate to brainCloud.
if (brainCloudReady == false)
{
   // Set the required BrainCloud details we received from the GameLift game session GameProperties
   UE_LOG(BrainCloud, Warning, TEXT("Creating Server to Server wrapper..."));
   pS2S = MakeShareable(new UBrainCloudS2S(appId, serverName, serverSecret, "https://api.braincloudservers.com/s2sdispatcher", true));
   pS2S->setLogEnabled(true);
}

brainCloudReady = true;

// authenticate with BrainCloud
UE_LOG(BrainCloud, Warning, TEXT("Authenticating..."));
pS2S->authenticate();
UE_LOG(BrainCloud, Warning, TEXT("Authenticated successfully"));

// Request the data associated with the lobby that will be hosted on the server
pS2S->request(
   "{\"service\":\"lobby\",\"operation\":\"GET_LOBBY_DATA\",\"data\":{\"lobbyId\":\"" + lobbyId + "\"}}", [this](const FString& result)
   {
      UE_LOG(BrainCloud, Warning, TEXT("BrainCloud - GET_LOBBY_DATA - %s"), *result);
      // Once we have received the lobby data, we can notify BrainCloud that the room is ready and players are allowed to join
      pS2S->request("{\"service\":\"lobby\",\"operation\":\"SYS_ROOM_READY\",\"data\":{\"lobbyId\":\"" + lobbyId + "\"}}", nullptr);
   });
We create the shareable UBrainCloudS2S instance with the appId, serverName and server secret we received from the game properties. We can then authenticate with brainCloud so we can make additional API calls.
Now that we have authenticated our server against brainCloud, we need to prep the server for the upcoming game session we are about to host.
We call GET_LOBBY_DATA to retrieve all of the information about the lobby we are about to host.
Note
Lobby data contains lots of useful data regarding the lobby we are looking to host.It contains the static Lobby config data we configured in the brainCloud portal as well as dynamic lobby settings that can be set by the client on lobby creation. It also contains information about the lobby members and the team allotments.
After we gather the Lobby data, we call SYS_ROOM_READY.
This tells brainCloud that the server has made any necessary preparations to host the game and is ready to let players join.
This call will trigger brainCloud to notify all players in the lobby that the match is starting and send them their server connection details (IP & port).
We also use the SYS_ROOM_STOPPED call to notify brainCloud that our server is shutting down. This can happen for a couple of reasons.
- All players disconnect from the server.
- GameLift asks us to terminate the process.
Note
GameLift can ask for process termination in a few different scenarios:
– The server process consistently reports unhealthy.
– The instance running the process is being terminated.
This can happen as part of a capacity scale-down event or in response to Spot Instance interruption
void AGameLiftTutorialGameMode::ShutDownBrainCloud() const
{
   // Make sure to notify BrainCloud that a give lobby is stopped
   if (brainCloudReady == false) return;

   pS2S->request("{\"service\":\"lobby\",\"operation\":\"SYS_ROOM_STOPPED\",\"data\":{\"lobbyId\":\"" + lobbyId + "\"}}", nullptr);
}
Empty Server Timeout
Something to note is that our brainCloud Lobbies and our GameLift processes are set up in a way that requires us to recycle our provisioned server processes.
This means that when all players leave a server and enough time passes, we terminate the server process. GameLift can then restart that process and a new game session can be hosted on it.
In order for us to know that the “empty-session” period has elapsed we use a simple timer that ticks every second if a game session has started and no players are present on the server.
When we reach the timeout threshold (10 seconds in our case), we shut down the lobby then terminate the game session and finally the server process itself.
void AGameLiftTutorialGameMode::CheckDisconnectedPlayers()
{
   // If we aren't in an active game session, we don't need to worry about disconnected players
   if (gameSessionStarted == false) return;

   // If there aren't any players connected, count up the timeout timer. If the timer reaches the threshold, call the Timeout func
   if (playerCount <= 0)
   {
      if (timerCounter >= secondsToShutDownEmptyServer)
      {
         EmptyServerTimeout();
      }

      UE_LOG(GameMode, Log, TEXT("No players connected, shutting down game session in: %d"), secondsToShutDownEmptyServer-timerCounter);
      timerCounter++;
   }
   else
   {
      // There are players on the server, reset the timer
      timerCounter = 0;
   }
}
We track server player count in the GameModeBase overridden OnPostLogin and Logout functions.
Note
For your final dedicated server, you will want to verify your players when they connect. brainCloud makes this easy by providing every player in the lobby with a passcode. On the server, all you need to do is check the client provided passcode against one provided by brainCloud. If they do not match, refuse the connection.To get a specific players passcode using the S2S library, you can use SysGetLobbyMember
Finished at last!
Now that we have all of the components in place, we can repackage our client and server.
Upload the new server to GameLift and make sure that the Queue brainCloud uses to place players is using pointing to the new fleet.
Launch your game client and you will automatically be connected to a hub world server.
Creating a new World
If no existing lobby is found, brainCloud will create a new one for you and other players.
This lobby will automatically launch a new game session on GameLift.
The client will receive the server’s IP and port and join it automatically.
In the gif below you can see the player launch a new lobby and then join a server hosted on port 7779 which is empty.
Joining a World in Progress
If there is already a Lobby in progress that has free space, you’ll automatically join it.
This lobby will stay available until the last player leaves and it is completely empty.
In the example gif below, you can see that a server at port 7777 was returned that already had three other players connected to it.
The World Is Your Oyster!
From here on, you can expand on the basics we’ve covered and make a fun and engaging multiplayer experience.
Summary
Hopefully this series of tutorials has helped you familiarise yourself with GameLift and the power that comes with it.
It was a long journey to get here, we know, but GameLift is a terrific service and very easy to use once you get it set up.
Keep an eye out on our Knowledge Hub and join us on LinkedIn for upcoming tutorials about UE5, GameLift and Multiplayer Servers.