App Tidy-up
Retool components can be moved, resized and even copied and pasted between containers and apps. When developing a real app, most of the UI could be mocked-up with JS queries that return dummy data to avoid making changes after a server integration.
Now that the basic functionalities have been implemented, we can go through all the components and give them appropriate labels and text to guide and help the user.
We can preview how the app will look and behave for the end user by clicking on ‘Toggle preview mode’ in the top right corner.
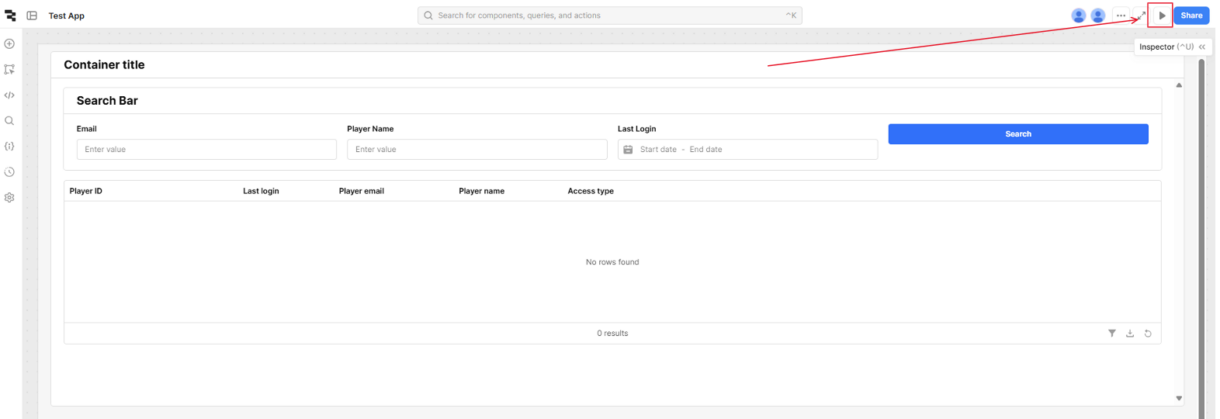
Some things to improve the main app are:
- Add a tooltip and suitable title.
- Resize the search bar components.
- Reformat the date input.
- Set the default date range to be the previous day.
- Add clear buttons to the inputs.
Note
You need to toggle out of preview mode to make changes. Closing the panels on either side of the dashboard will make the appearance more like the preview.
Adding Tooltips & Titles
All components have a range of interaction and appearance properties to improve the user experience. They can also be assigned tooltips to help them interact with the app or inform them of its limitations.
For example, date range does not filter to the level of hours or less when querying the database. However if they query for one day, the results can be further filtered using the table toolbar.
Click on ‘Last login’ and under ‘Add-ons’, add a tooltip with the following text.
To filter results by time, use the 'Filter' tool at the bottom right of the table.Finally, change the main container title text to ‘Player Management Dashboard’
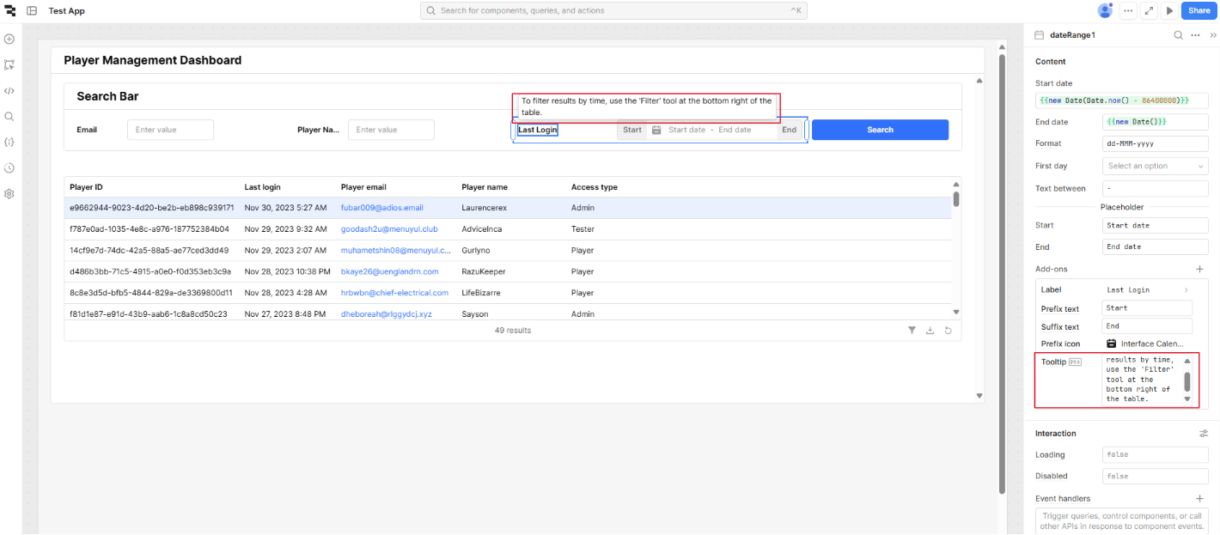
There are more improvements to be made such as pagination and modules but they will be dealt with in subsequent sections of this tutorial series.
Before we finish the tidy up we also want to make it easier for a new developer to understand the current structure and make more changes and extensions.
We can look at the structure of our app using the ‘Component tree’ panel.
Up to now, we have been using the default names for the components. Because these names are used as references in the queries, an app can become difficult to manage and debug if non-descriptive defaults are used so it is important to implement a naming convention.
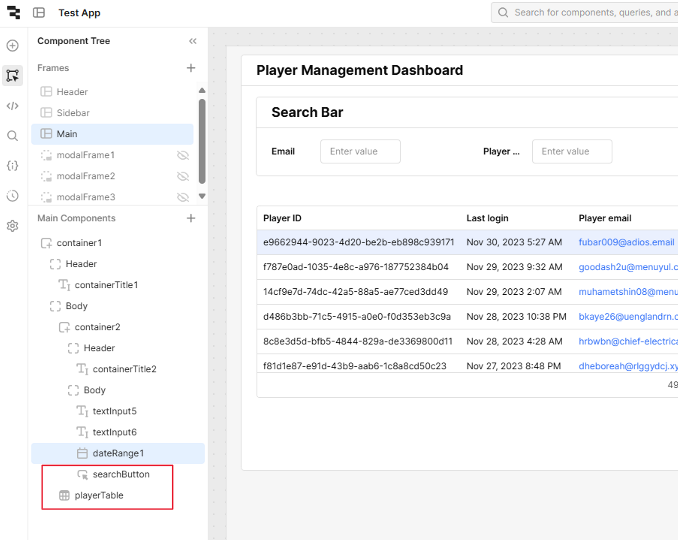
Looking at the component tree, we can tell that there is a table of players and a button that searches, but not much else beyond the types of components used. A good naming convention will indicate both its function and/or type of data it is dealing with, for example:
playerNameSearchTxt
playerEmailSearchTxt
loginDateRng
mainContainer
mainContainerTitle
searchContainer
searchContainerTitle

confirmDeletePlayerModal
updatePlayerForm
loginDate
playerEmail
playerName
accessTypeSelect
updatePlayerButton

confirmDeletePlayerModal
deletePlayerText
deletePlayerButton
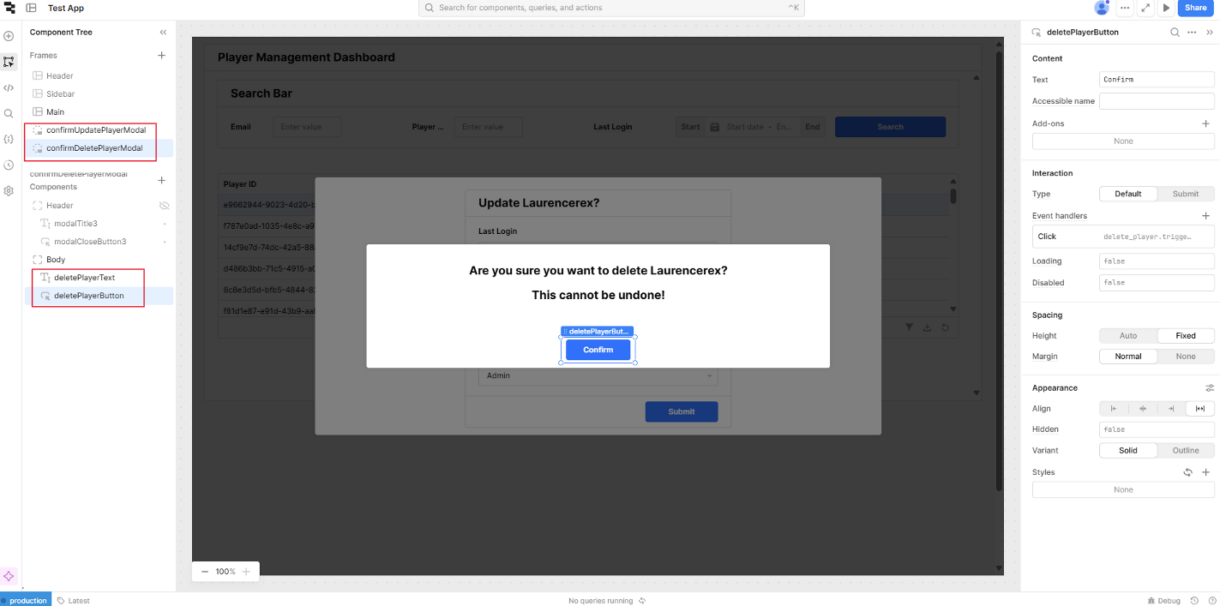
A very useful aspect of Retool is that we can change the component names in the tree and all references to it in both queries and component code will be updated so we don’t have to worry about breaking the app. If changing a name will cause issues (such as renaming a query) Retool provides a warning and tells you where the reference is so it can be updated manually.

Resizing Components
In this case the input components look ok when developing the app but when the panels are closed they appear too large. So, we reduced the text inputs to a width of two columns and left-justify the labels. The search button was reduced to one column and the date range to four, as a size of two made it difficult to see the values.
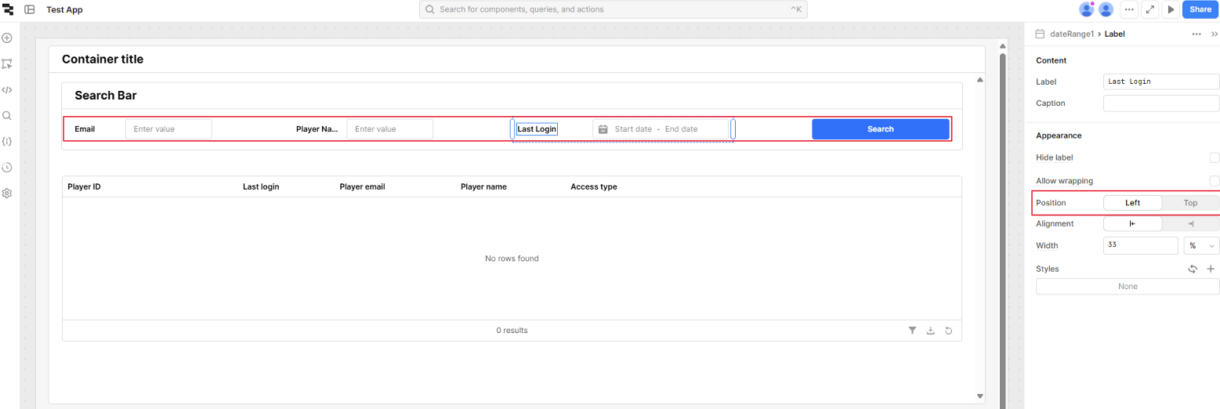
Default Date Format
Clicking the date range and opening the UI inspector panel, there are a set of properties to customize the component to our needs as shown below.
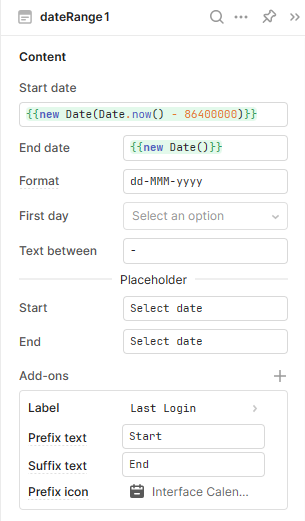
Here we have set the default start date to be yesterday and end date to be today. This would be suitable for the case of viewing daily reports.
We have also changed the date formatting to the standard dd-MM-yyyy.
{{ new Date(Date.now() - 86400000 )}}{{ new Date() }}dd-MMM-yyyyClear Inputs
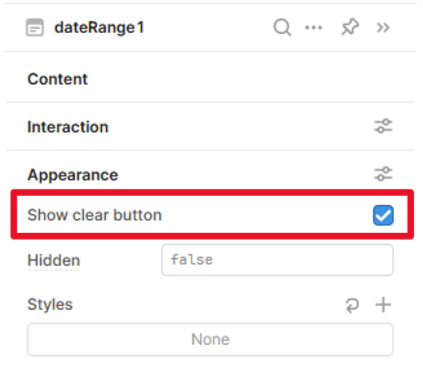
At the bottom of the inspector under ‘Appearance’, we enabled the ‘clear’ button so the user can quickly search without filtering.
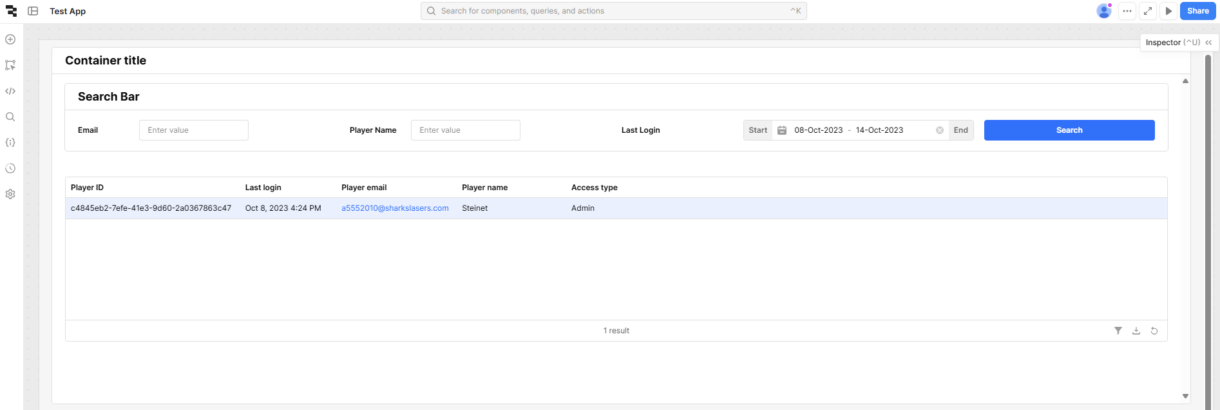
Now the app looks tidier and there is space available in the search bar for additional options. Note, a date range had to be selected to return a player record.
Modal Formatting
Returning to preview mode, we will inspect the modals.

Now that we have reorganised the components to look better visually, we can work on some further improvements to make the app safer to use by admins.
- Resize the modals to a more appropriate size.
- Hide the container header and footer.
- Change the form title to ‘Update <PLAYER_NAME>?’
- Make ‘Player email’ read-only.
- Add read-only ‘Last Login’ to the form.
- Change text of button in delete modal to ‘Confirm.
Return to edit mode, select the update modal and open the inspector panel. We need to set the following values on 1) the modal frame/container and 2).
1) The modal frame/container
- Size the form component to the middle ten columns of the modal frame
- Set the Appearance -> Overflow to ‘Hidden’
- Set the header and footer addons to ‘false’.
2) The form component
- Change the form title text to the snippet below.
- Click on ‘Player email’. Under ‘Interaction’, under ‘Advanced’, set ‘read only’ to ‘true’.
- Add a ‘Last login’ Date component to the form.
- Change the ‘Form data key’ to ‘last_login’.
- Set the date component to read-only
#### Update {{ playerTable.selectedRow.player_name }}?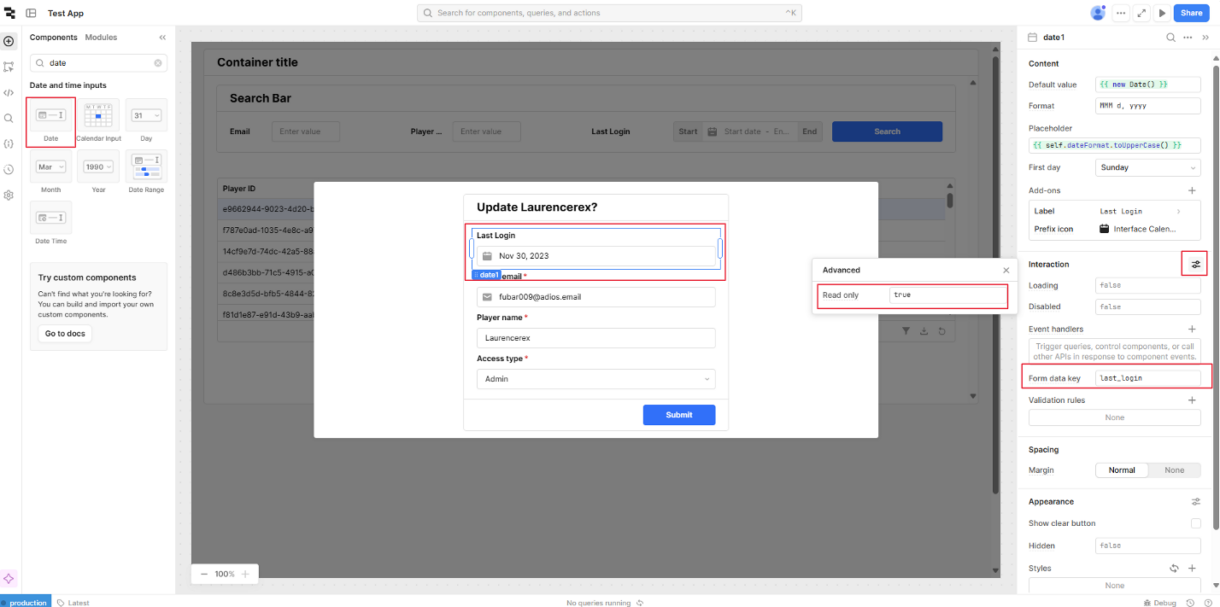
Note, even though last login was added to the form it is display-only as it was not added to the actual query.
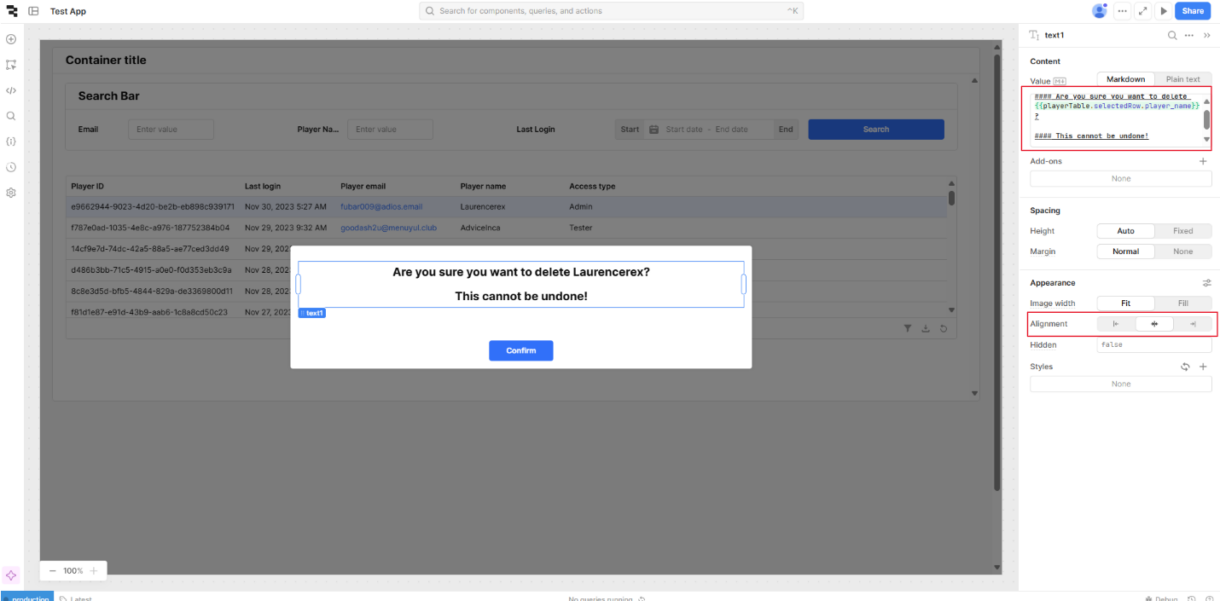
We will next reform the ‘confirm delete player modal’.
- Set the header and footer add-on to ‘false’
- Move the components until you are satisfied with the size.
- Center-justify the text component and change its content to the following:
#### Are you sure you want to delete {{playerTable.selectedRow.player_name}}?

#### This cannot be undone!
Component Name Convention
Before we finish the tidy up we also want to make it easier for a new developer to understand the current structure and make more changes and extensions.
We can look at the structure of our app using the ‘Component tree’ panel.
Up to now, we have been using the default names for the components. Because these names are used as references in the queries, an app can become difficult to manage and debug if non-descriptive defaults are used so it is important to implement a naming convention.
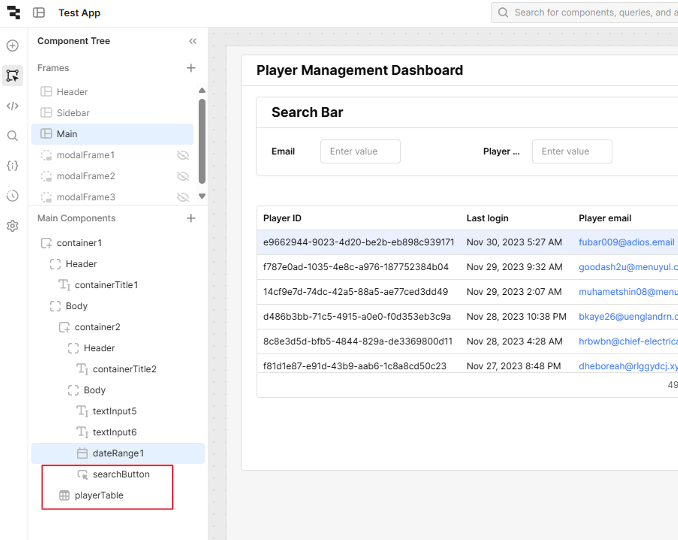
playerNameSearchTxt
playerEmailSearchTxt
loginDateRng
mainContainer
mainContainerTitle
searchContainer
searchContainerTitle

confirmDeletePlayerModal
updatePlayerForm
loginDate
playerEmail
playerName
accessTypeSelect
updatePlayerButton

confirmDeletePlayerModal
deletePlayerText
deletePlayerButton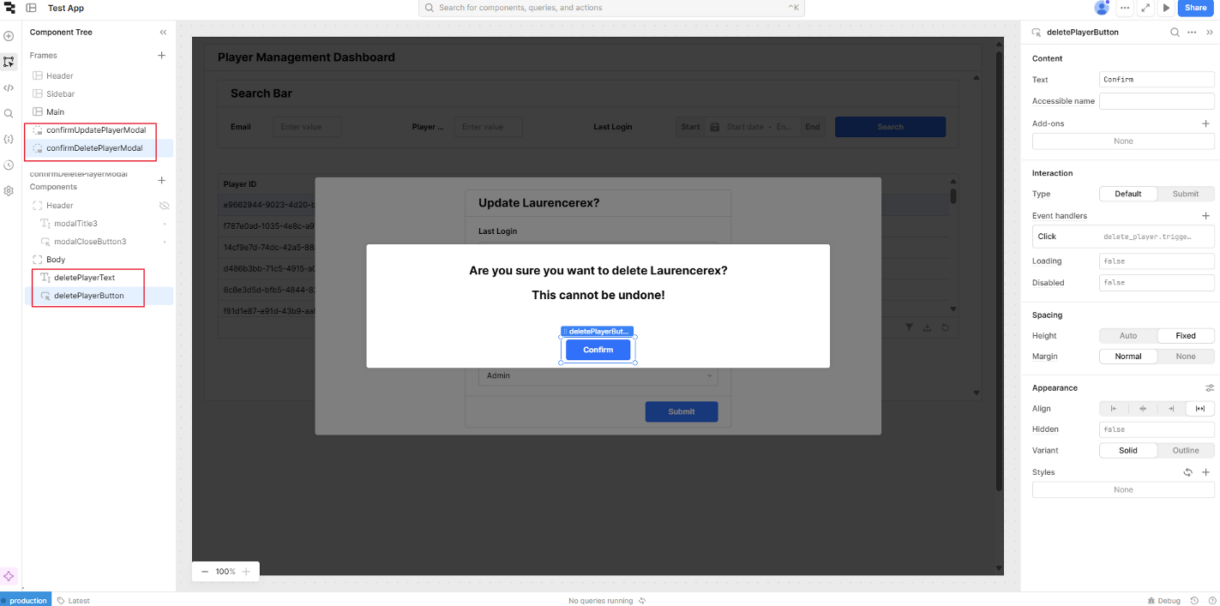

Summary
We have implemented a basic application for managing player accounts. Lets summarize what has been achieved before moving on to Retools’ more advanced features.
- Imported a dataset into the Retool database.
- Make a request to the database to display a list of records.
- Developed a CRUD interface to the database using modals.
- Developed search and filter functionalities.
- Made the application ready to be handed off to another developer.
Some things to note at this stage.
- Our dataset is located in the Retool database. A real application would have an integration with an external data source. Retool has out-of-the box features for this but much of the UI development can be achieved with this mock dataset.
- Retool offers more advanced UI customizations on their business plan. This tutorial is aimed to demonstrate basic Retool features and so does not implement best-practice UI/UX features.
From here, you can proceed to the next section dealing with Retools more advanced features.
