Adding, Updating & Deleting Data
Adding Player Records
In this section we are going to look at adding a new button to your dashboard so that you can create new players. This is not a realistic example, as this type of dashboard would be used to read player data.
New players would be created from your app or clients.
However, this still serves as a good example of how to use modals to generate and manipulate data in your table and will also allow you to easily add more players to your own example so you can test your data.
To add a new player, we use a form component in a modal.
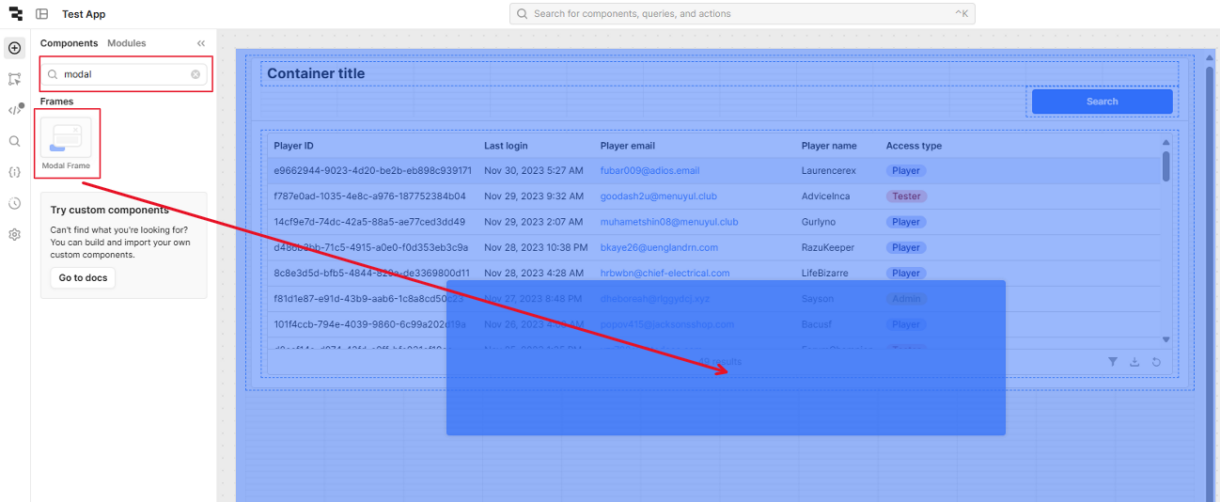
Add the modal button next to the ‘Search’ button. You can do this by clicking on the (+) icon on the far-left options menu, searching for ‘Modal’ and then dragging the button into your main editor window.
This is the same process as we did when adding the search button. It is now visible in the component tree tab.
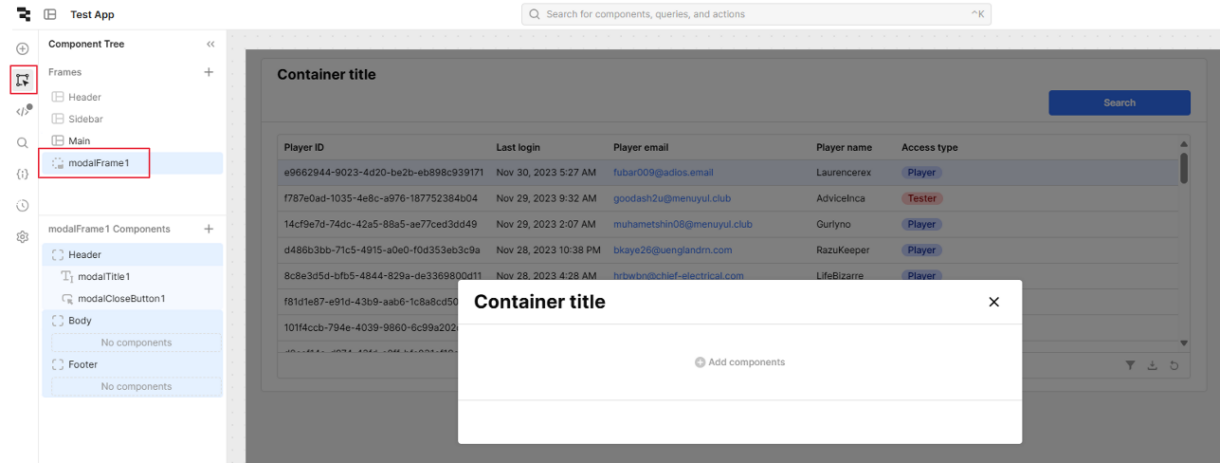
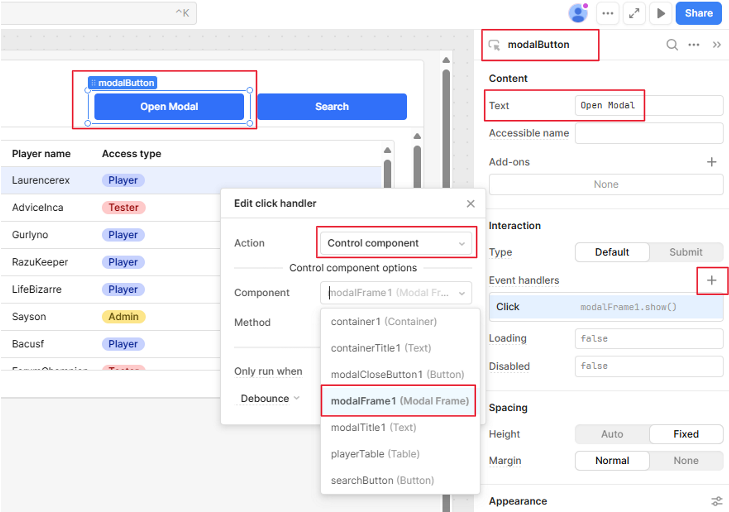
To control opening the modal, add an additional button next to ‘Search’. Clicking on the new button, rename it to ‘modalButton’ and change the text to ‘Open Modal’. Then to link it, click the ‘+’ next to ‘Event Handlers’. Select the action type ‘Control Component’ and select the added ‘modalFrame1’ component.
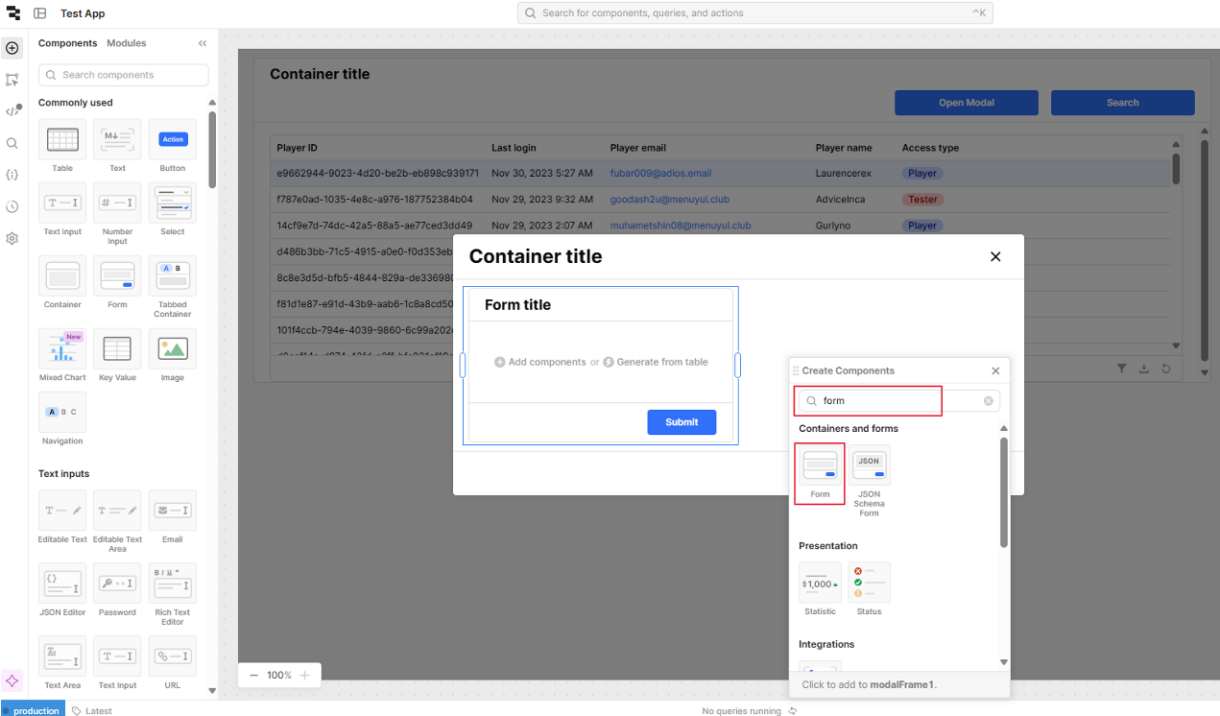
Click on the new button to open the modal and click ‘Add components’. Search for ‘Form’ and click to add.
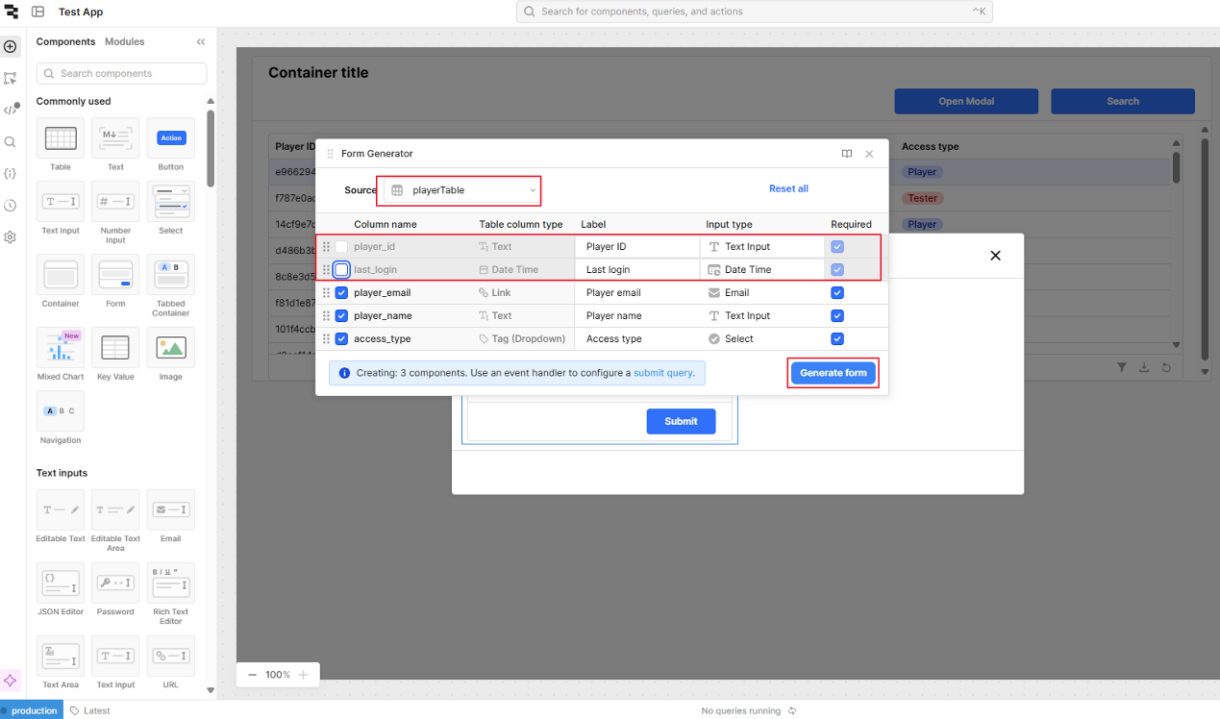
Click ‘Generate form’ and check that the source is our players table. We will deselect the ‘player_id’ and ‘last_login’ fields as they will be generated by the database and the game client, respectively.
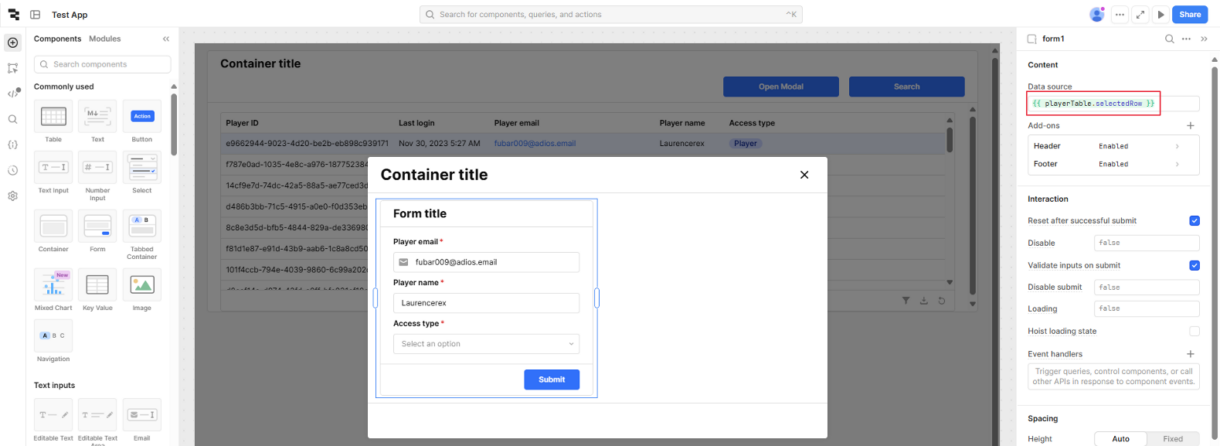
Retool has automatically populated the form with data from the selected row of the table. This will be useful in the next section when we are updating existing players, but as we are creating a new player record, we will remove this data source and leave the form empty. To do this, click the form and clear the ‘Data source’ field on the top right.
To add a new record, we need to set up another resource query that will insert data from the form fields. We can call the query ‘create_player’ and write the SQL query to perform the insert.
INSERT INTO players (player_id, player_name, player_email, access_type, created_date, level, xp)
VALUES (
  {{ uuid.v1()}},
  {{ form1.data.player_name }},
  {{ form1.data.player_email }},
  {{ form1.data.access_type }},
  {{ new Date(Date.now()) }}, 1, 0
)
The values inside the curly braces reference the form input fields which are validated so you will be unable to submit the form without adding values.
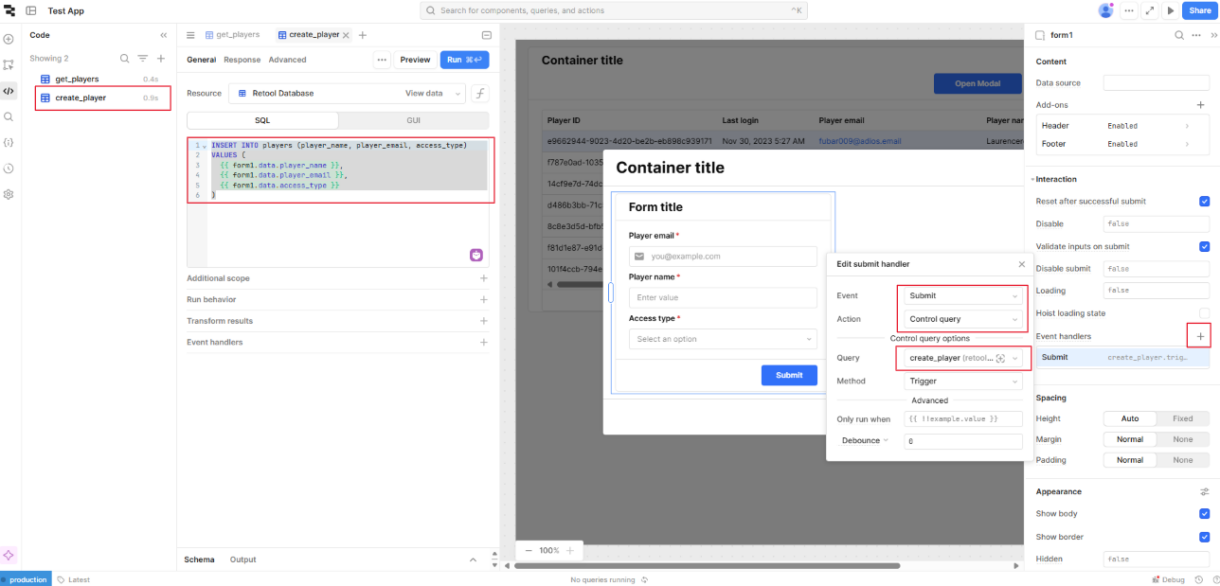
To trigger our create_player query, we need to add an event handler to the form that links to the query. Click on the form and under Interactions, click the ‘+’ next to ‘Event handlers’. If you have the query selected, Retool will auto populate the details, but check that they are as shown.
Before creating a player, the ‘Access Type’ selector options need to be updated to match the database values. Click on the component and change the default options to the following:
Value	Label
player	Player
tester	Tester
admin	Admin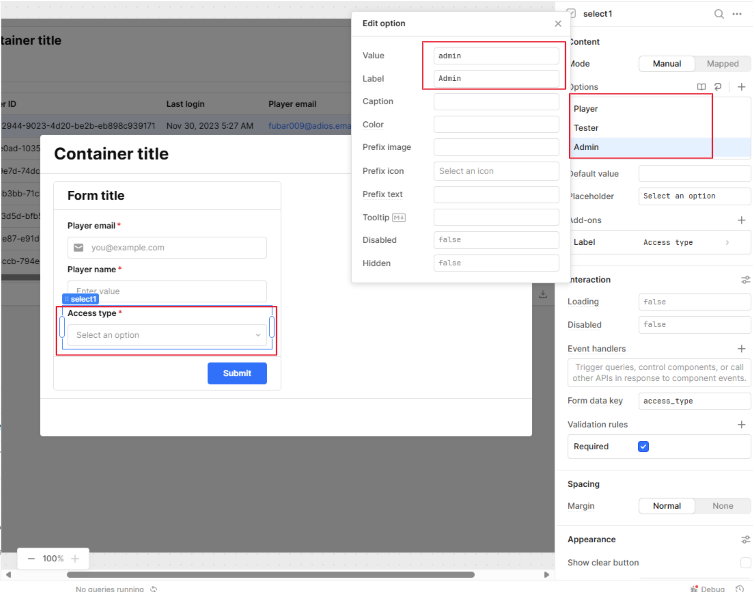
Now a player can be created. First, note that clicking ‘Submit’ with empty fields demonstrates the built-in form validation. Add the following to the fields and click ‘Submit’ again.
test@email.com 'test create player' Tester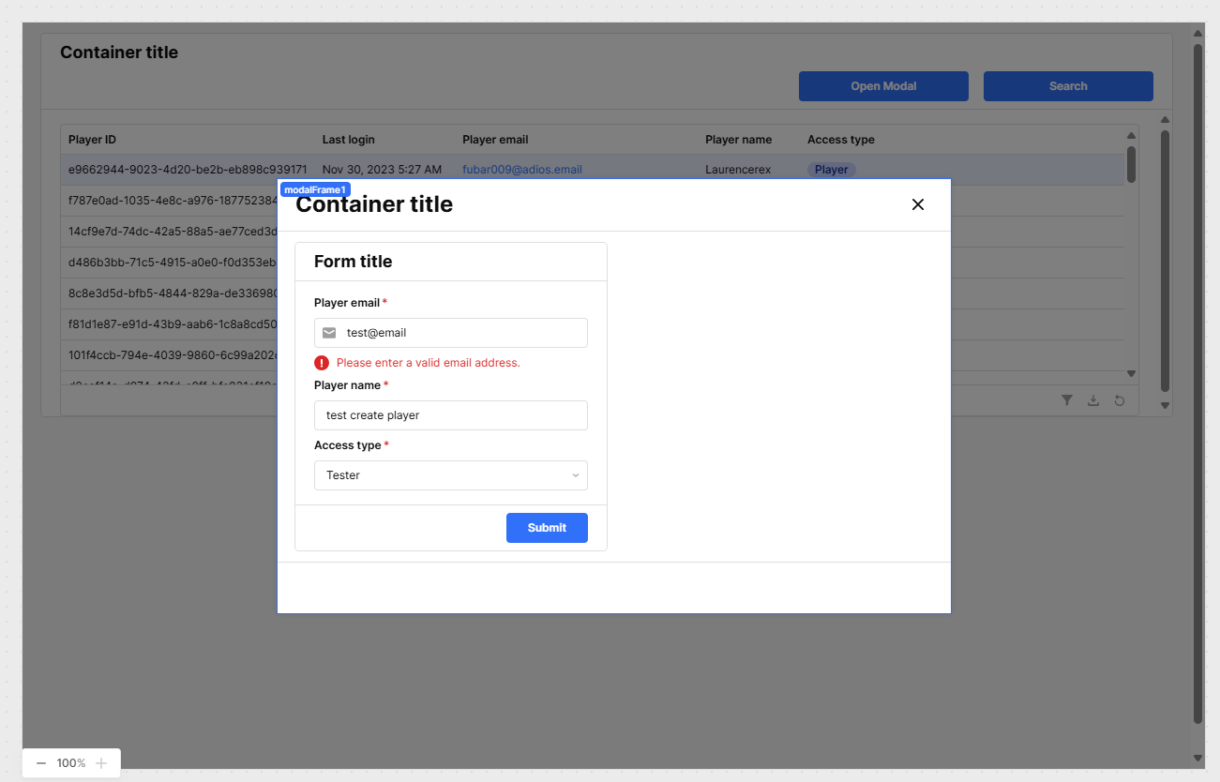
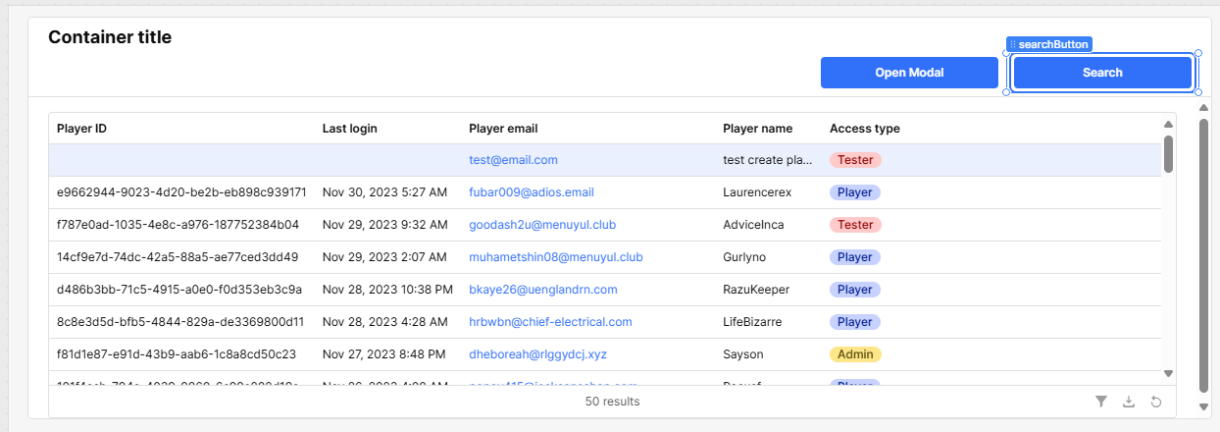
Once you have submitted the form, exit the modal by clicking outside it and then click the search button. You will see your new player record with an auto-generated id and create date.
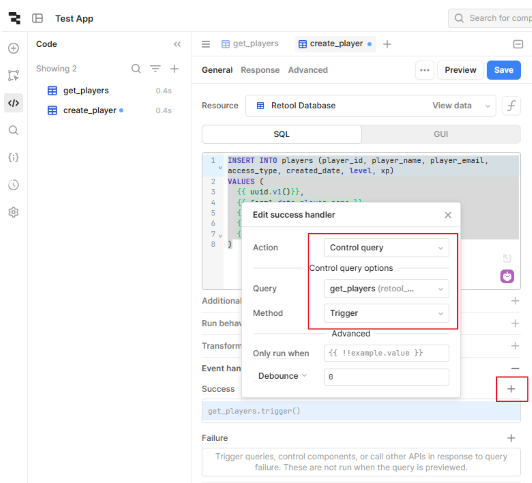
We can also add some additional functionality that will automatically refresh the table if a new player is added. Go to the ‘createPlayer’ query and add a ‘Success’ event handler to control and close the modal component.
We can also to add a handler to trigger ‘getPlayers’ so that the table is automatically updated after the player is created.
Updating Player Records
In this section we will look at how you can select player accounts and update their records in the database.
For your game, your database will be external to the Retool database we are using for this example, as this section serves to demonstrate.
To update a player record, we will use the form component for data input and the modal component to hide the form until as we did for adding new players.
Add another button from the components menu and drag it next to the previous button. Set the text to ‘Update Player’.
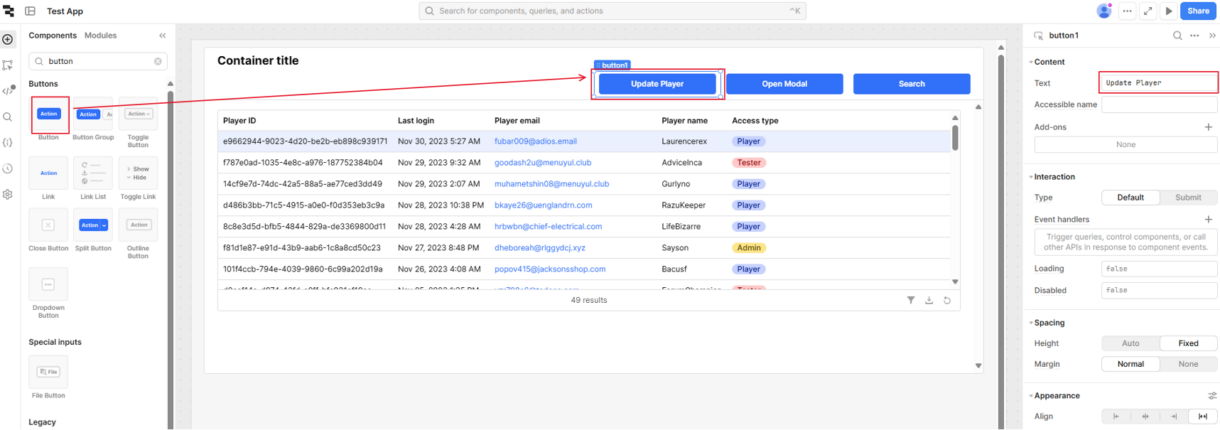
Add another modal component. Note from the component tree that this is called ‘modalFrame2’
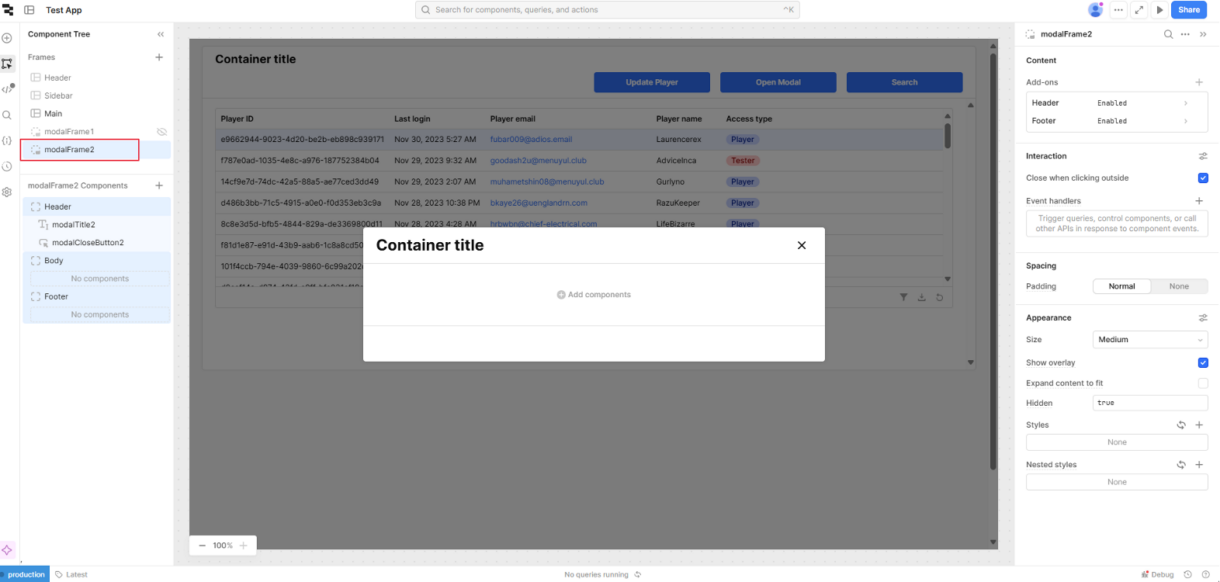
As previously, add a form component and disable the ‘player_id’ and ‘last_login’ fields.
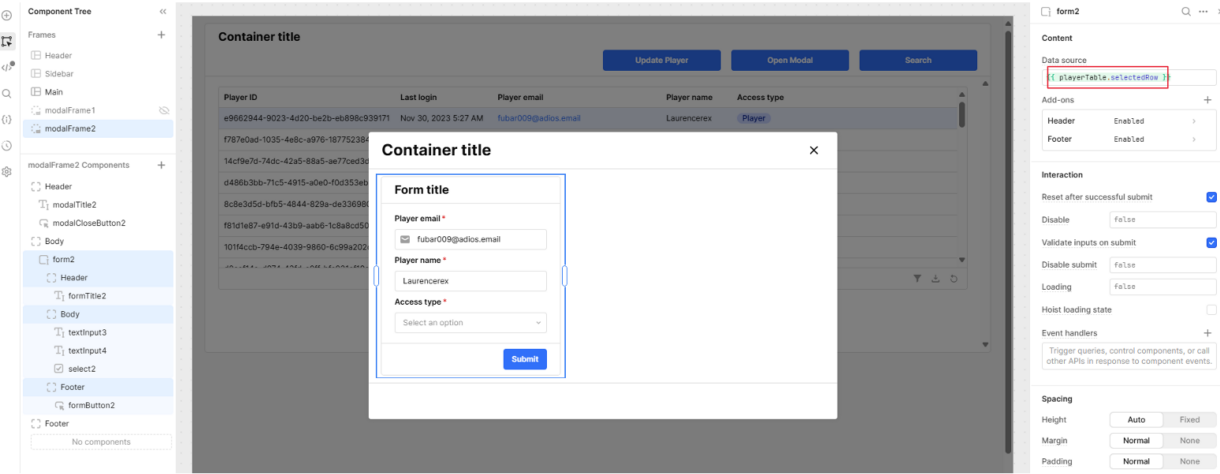
After generating the form, set the Data Source to ‘playerTable.selectedRow’. Add the Access Type options as previously. The Default Value option of the Access Type selector to this.
{{ playerTable.selectedRow.access_type.toLowerCase() }}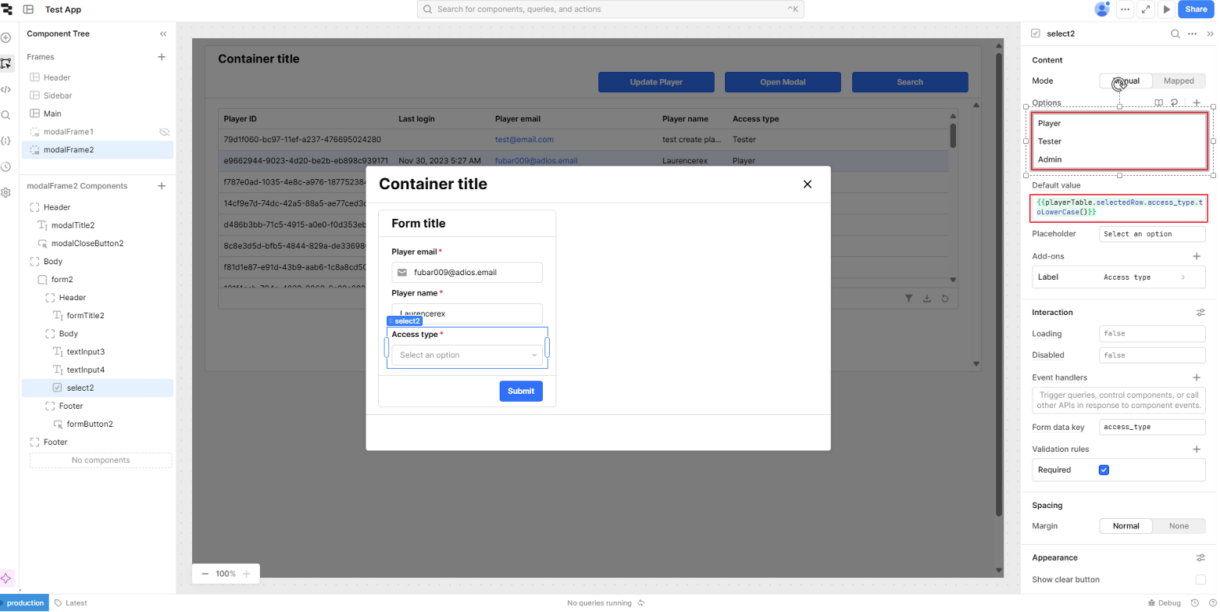
It is still not displaying because Retool is treating the field as a ‘Tag’ type and auto-capitalizing the first letter of what is returned in the query. To fix this issue, we will change the table column format to ‘String’.
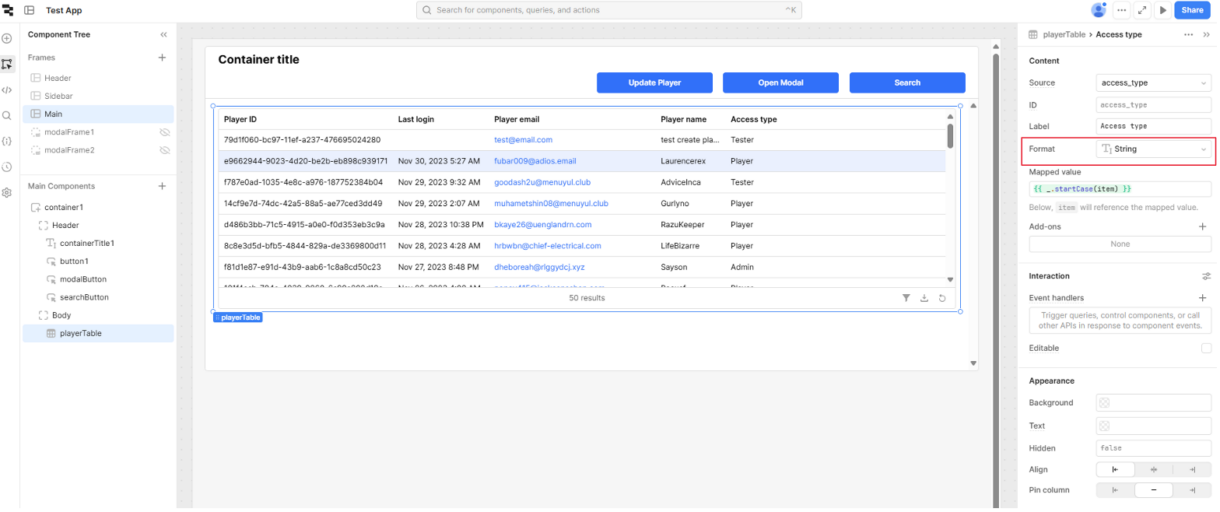
Finally, we also need to set the ‘Form data key’ field to ‘access_type_val’ so that the option is selected. Note, the ‘Update Player’ button has not been linked up to the modal yet, but it can be opened by double-clicking on ‘modalFrame2’ in the component tree.
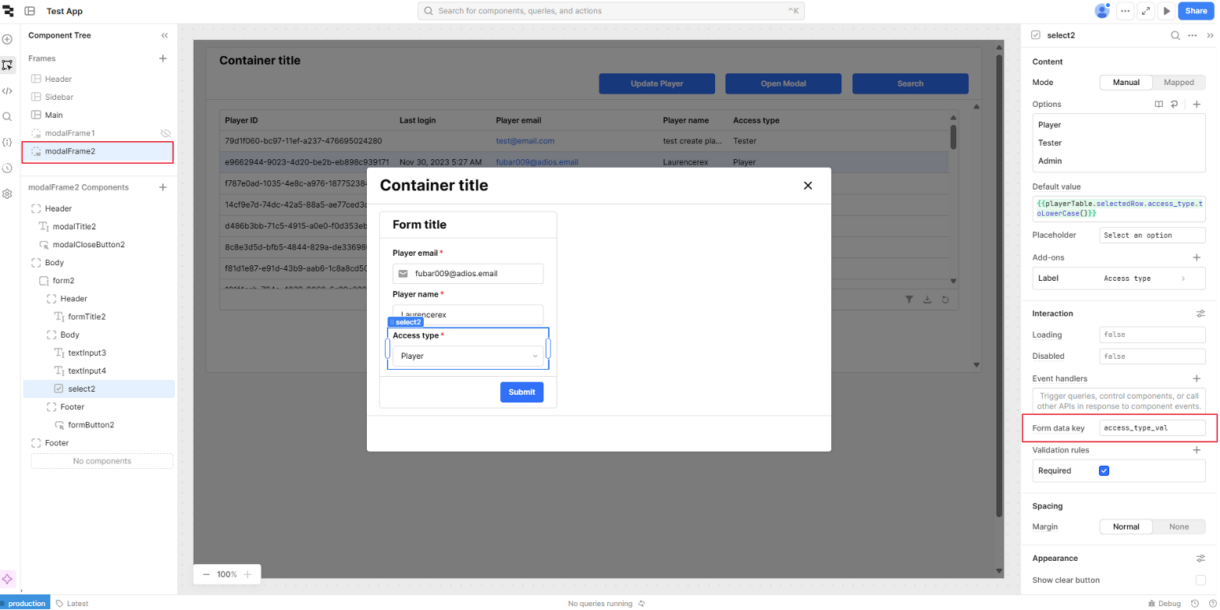
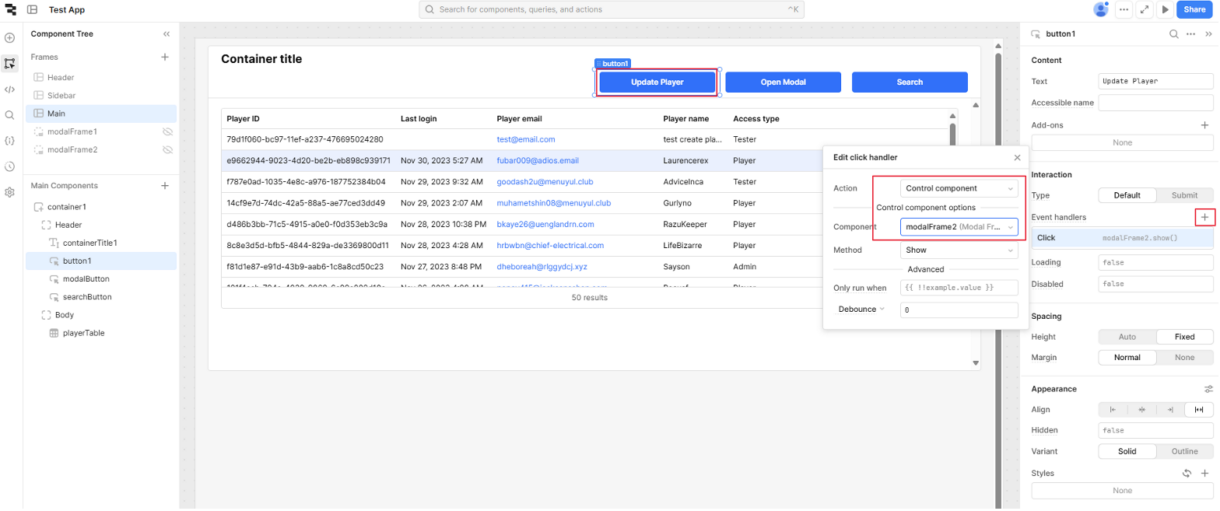
{{ access_type_val }}The button can be linked to the modal by adding an event handler as with the previous button.
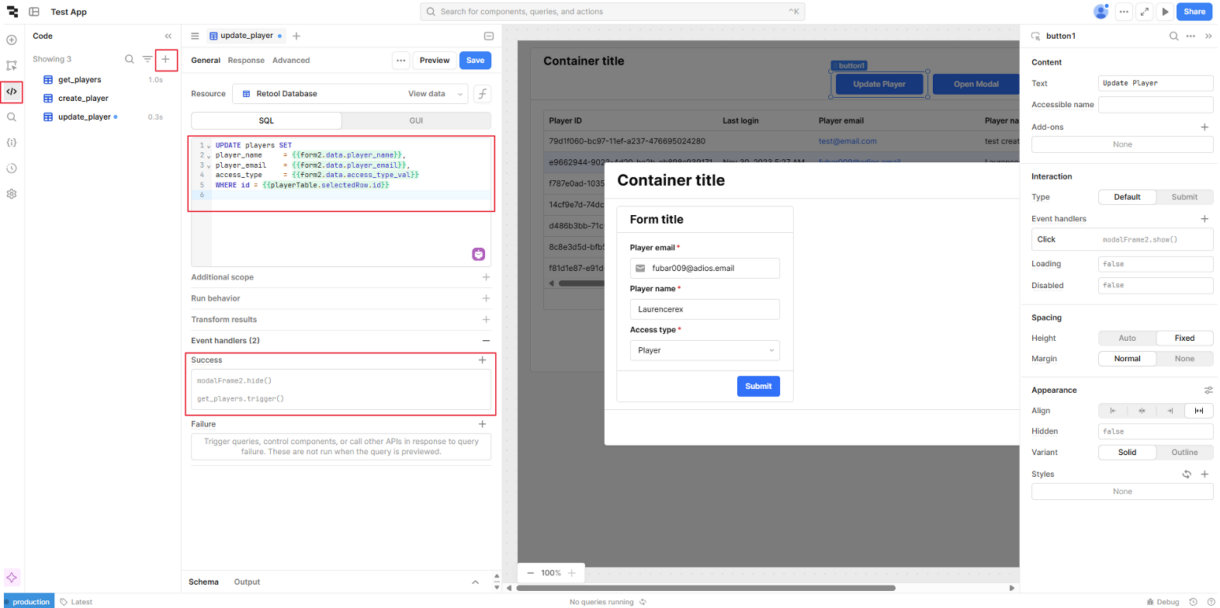
To perform the update, create a new query ‘update_player’ and add the following SQL. Note, we also added two Success event handlers to hide ‘modalFrame2’ when it has executed and to get the player list again with the updated value.
UPDATE players SET
player_name 	= {{ form2.data.player_name }},
player_email 	= {{ form2.data.player_email }},
access_type 	= {{ form2.data.access_type_val }}
WHERE player_id = {{ playerTable.selectedRow.player_id }}
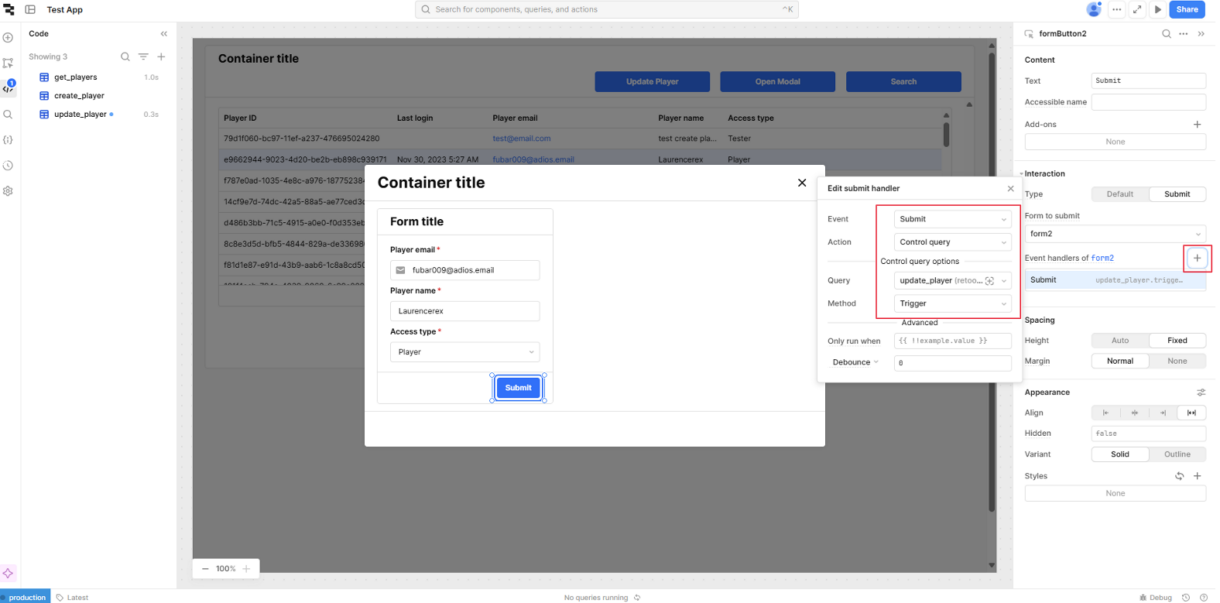
Now, to hook the update query to the form submission, click the form and open the component inspector. Add an event handler and Retool should auto-fill the fields to trigger the update query on clicking ‘Submit’
To test the update query, ensure that a row in the players table has been selected and click the ‘Open Modal’ button. Change the ‘Access type’ field to a different value and click ‘Submit’.
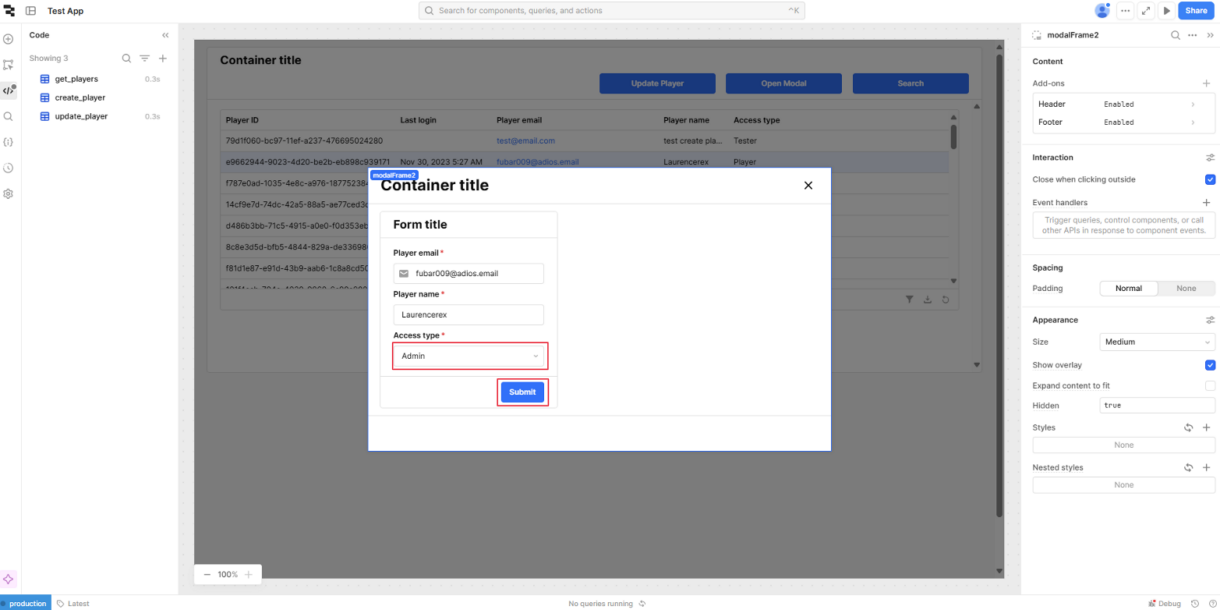
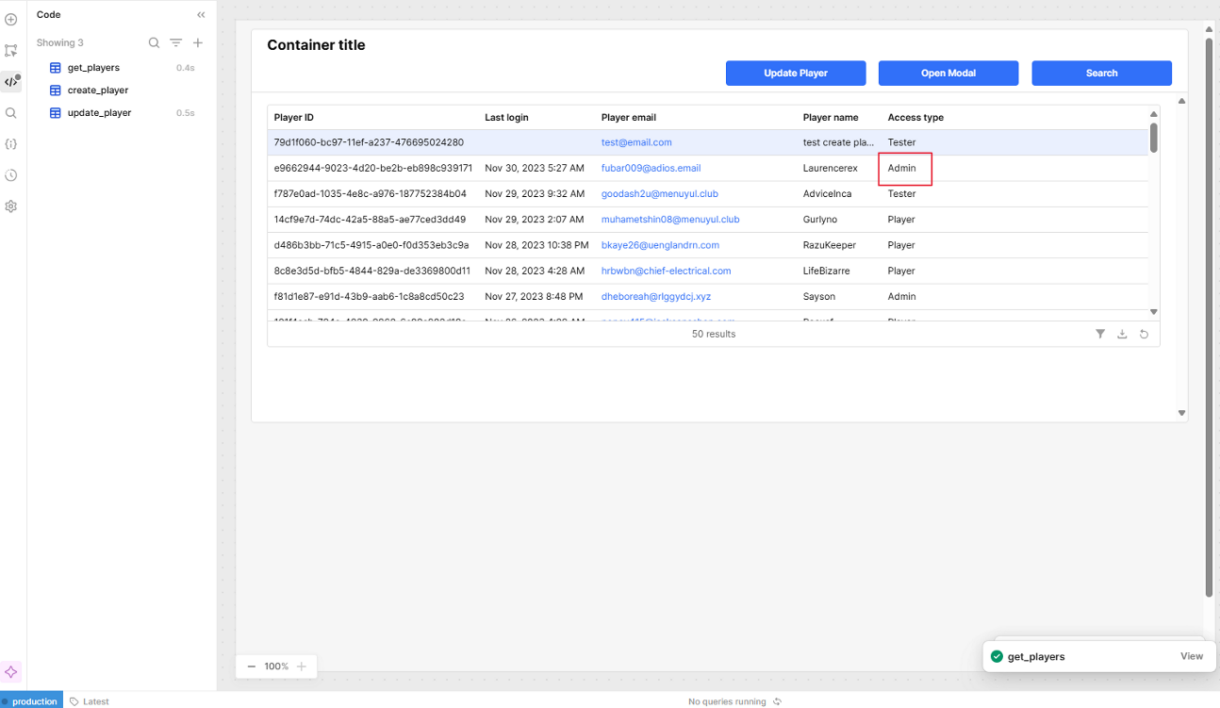
After the form is submitted, the player list will be refreshed and the select player access type has been updated.
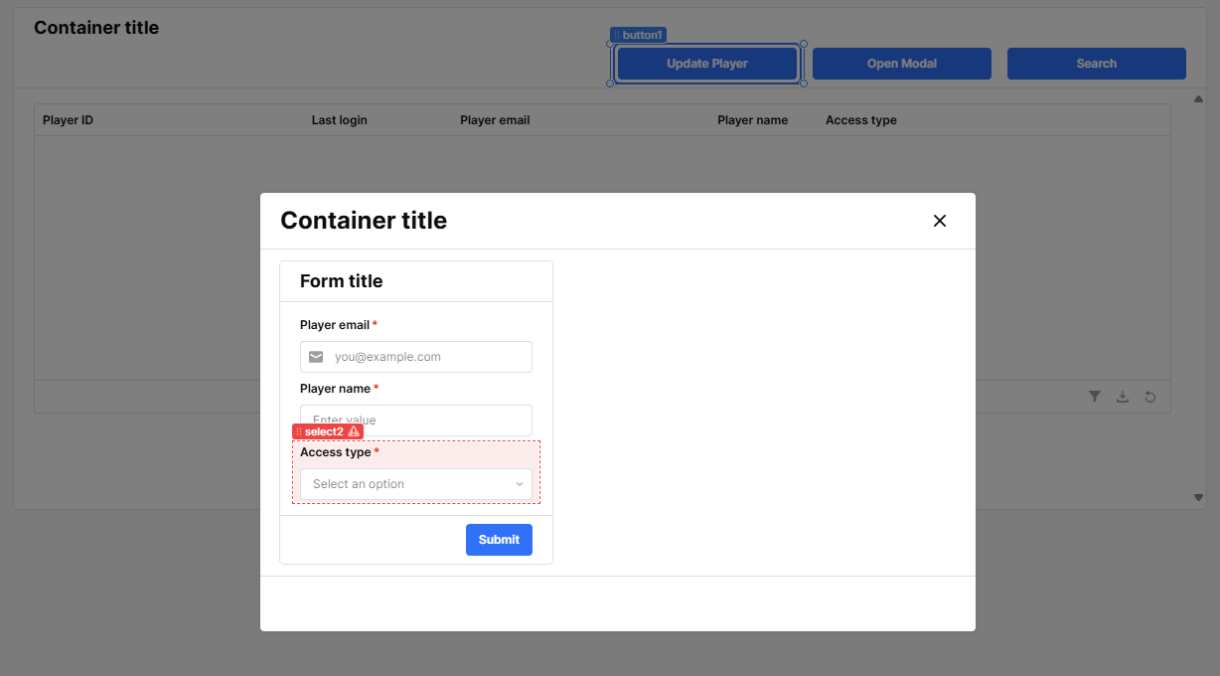
There is one last thing we need to fix.If we refresh the page (after pressing ctrl+s to ensure our progress is saved!), you will see that the modal can be opened when there is no data in the table and the form fields are empty.
To prevent this, we can go to the modals advanced interaction options and add the following code to the ‘disabled when try field’.
{{ !playerTable.selectedRow }}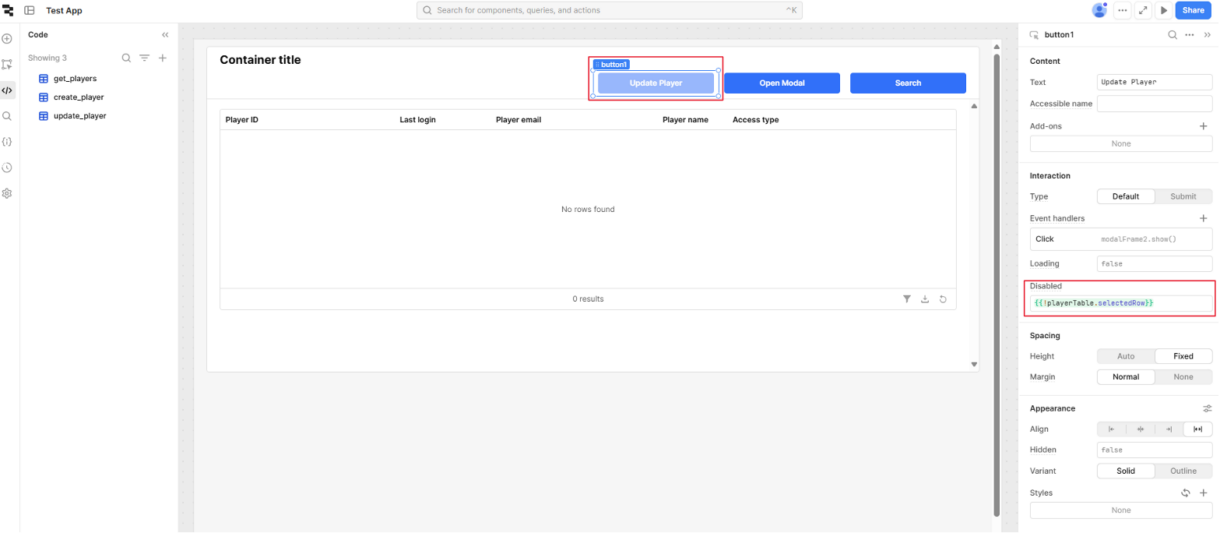
Now the user will have to search for players and select a row before they can update the data.
Deleting Player Records
In this section we will look at adding functionality for deleting players. This is a standard requirement from many social platforms due to GDPR regulations.
The set up steps here are similar to the steps we went through when adding and updating a player so we will quickly walk through the steps instead of going through them again with screenshots. Please refer back to previous sections for examples of where to find these components in the Retool menus.
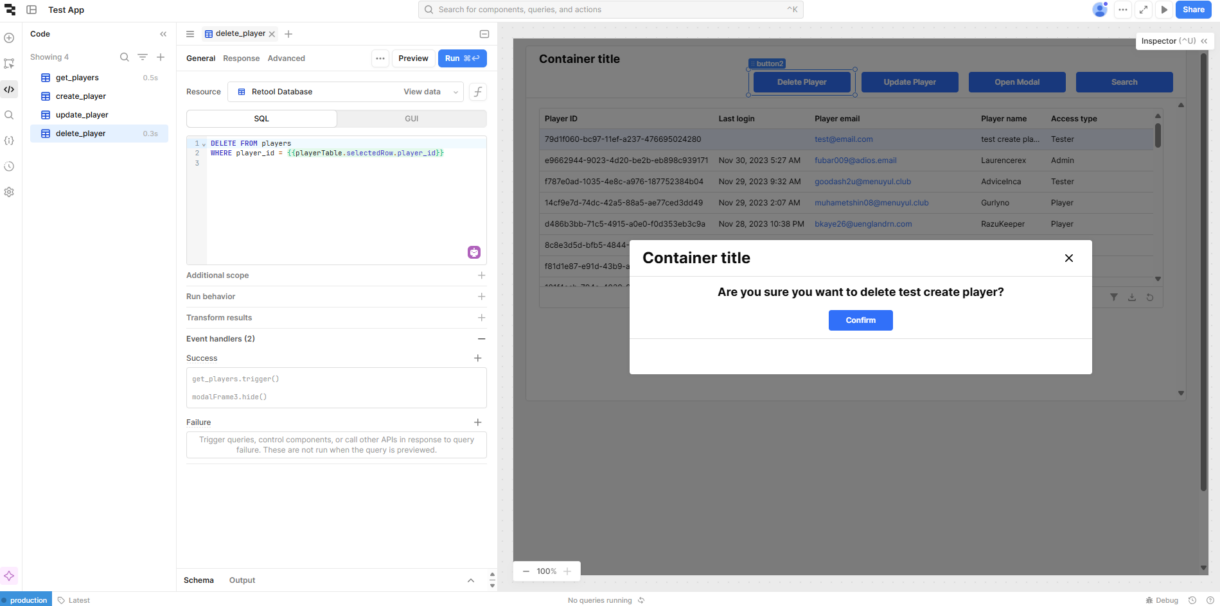
- Create a new query called ‘delete_player’.
- Add the following SQL:
DELETE FROM players
WHERE player_id = {{ playerTable.selectedRow.player_id }}
- Add a new button next to ‘Update Player’.
- Change the button text to ‘Delete Player’.
- Add a new modal frame.
- Open the modal and add a button and text component.
- Add the following to the text component.
#### Are you sure you want to delete {{ playerTable.selectedRow.player_name }}?- Change the button text to ‘Confirm’
- Add an event handler to the button to trigger ‘delete_player’ on click.
- Add success event handlers to ‘delete_player’ to close the modal and call ‘get_players’
Test the new functionality by deleting a player and noting that the ‘results’ at the bottom of the table is reduced by one.
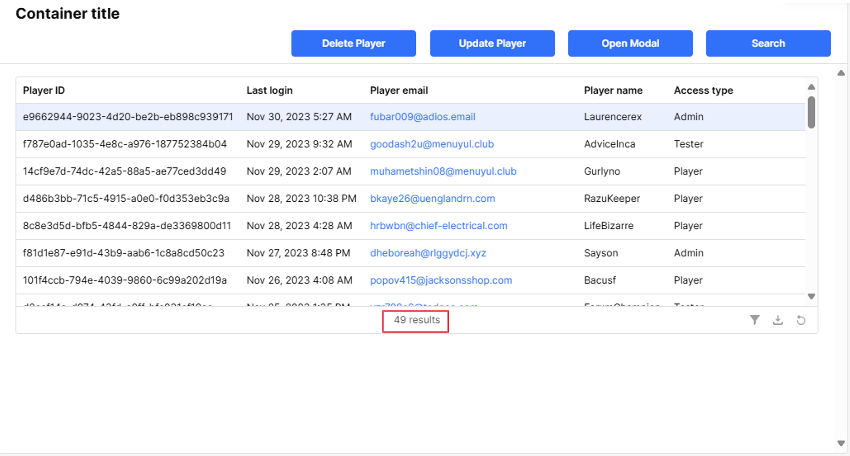
As we intend to add more components to search and filter, we want to avoid cluttering the app with buttons. We can hide the buttons and use ‘row-actions’ in the table to open the modals.
This will also prevent the modals being opened without a row being selected.
To achieve this, add an ‘Action’ to the table with a ‘Control component’ event handler that triggers the ‘Show’ method of the update player modal, named ‘modalFrame2’.
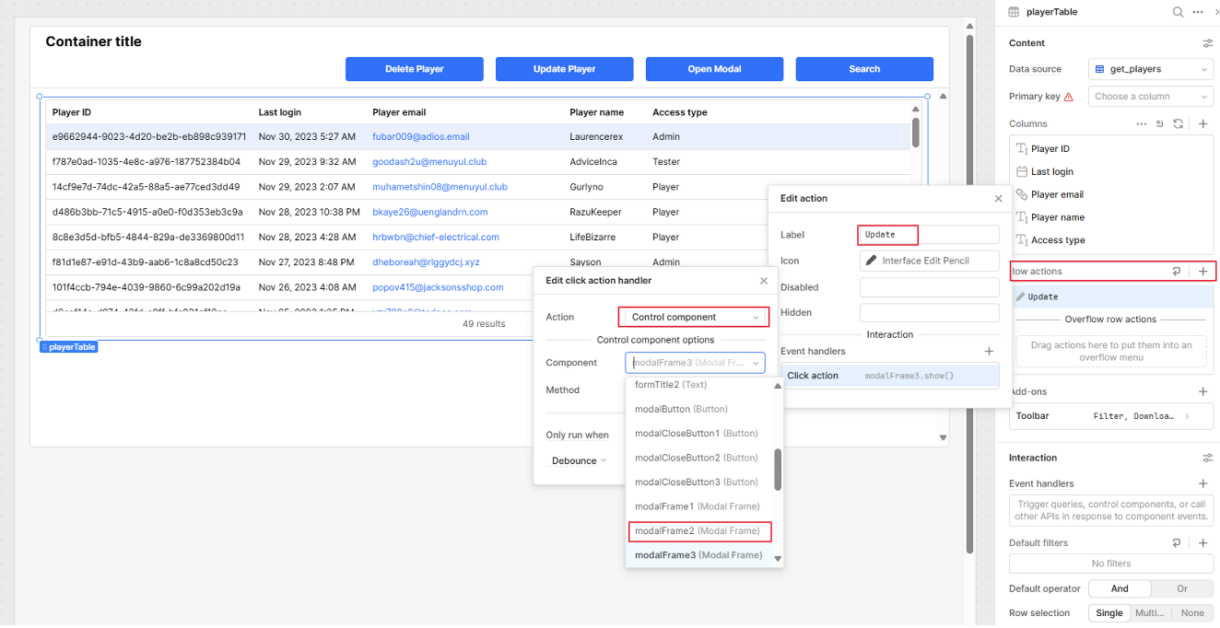
This action will now open the modal with the form populated with the row data.
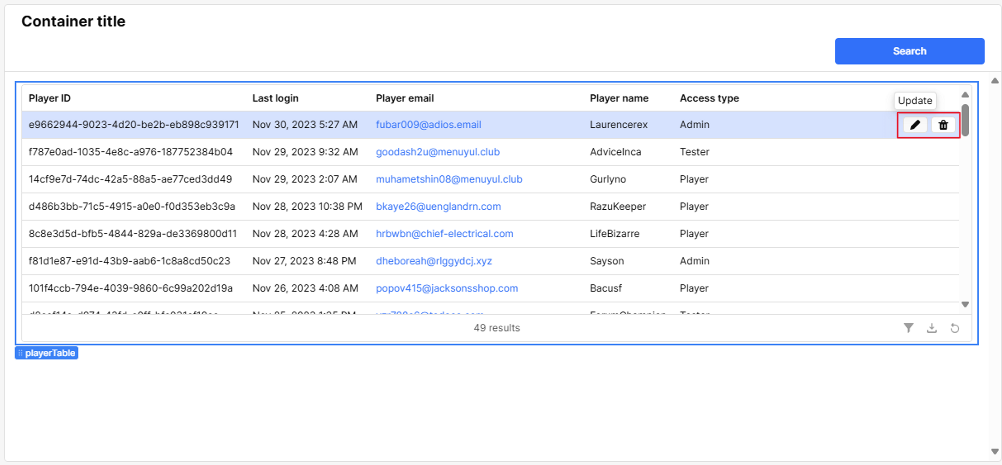
In the same way, we can add a ‘Delete’ action to the table, opening ‘modalFrame3’.
With these row actions added, the three buttons which opened the modals can be deleted.
Summary
Now the app is able to add, update and delete player records.
From here you can add UI components to search for and filter player records.
