Serverless Sockets With GameLift
1 – [Introduction] Introduction
GameLift is a server hosting and scaling product by Amazon Web Services. It is an excellent product and provides vast flexibility and control over your server fleets, however it can be quite complicated to learn all of its components and there are certain aspects of how GameLift operates, and how we can connect our player to GameLift servers which we find can be unclear for some developers who are new to the service.
It is commonly misunderstood but GameLift itself does not handle authentication and connections. GameLift is really just a set of APIs that handles the state of your fleets, what sessions are running on what servers in the fleet, and if the fleet needs to scale up or down servers (add new ones to match capacity, or remove servers that have no-one playing on them).
GameLift requires you to put in place your own backend which will handle requests for session placement securely and reliably.
This tutorial outlines a solution for requesting connections to your GameLift fleets using a serverless socket solution.
There are alternative solutions to creating your own backend, if you don’t want to deploy something custom, however, many of our customers prefer to maintain ownership of their solution rather than being required to incorporate another 3rd party product.
You can see an example of how you could use brainCloud instead of a custom solution in another tutorial using UE5 + GameLift here. Nakama also has an out-of-the-box solution available here.
Why Use Sockets?
There are two alternatives to using sockets for session placement with GameLift.
Use the AWS CLI to communicate directly with GameLift.
This is not recommended! In order for your clients to communicate with GameLift using the CLI, you must expose AWS credentials in your client. If these credentials are found by anyone with malicious intent, they can use them to attack your fleets, scaling them up or down as they wish, or terminating instances.
Use a REST API to communicate with GameLift.
This would involve REST requests running serverless scripts (AWS Lambda) which will have limited permissions to request session placement from GameLift. The client would then poll the backend until a record of the session placement can be found.
The REST API approach is the most common custom-backend solution for GameLift, and is also discussed in AWS’s official documentation on integrating GameLift.
Using sockets is not much more advanced than this approach but it has one advantage.
Sockets allow us to send messages asynchronously. This means that once a socket-connection is established, we can set up our backend in such a way that when GameLift has a session ready for our player, the connection details are send to the player directly, without the need for excessive polling of your backend, which is adding unnecessary cost to backend design by sending requests and reading from the database, even when the connection information is not yet ready.
AWS API Gateway Sockets
Typically, if you wanted to set up a websocket server, you would have to think about the environment, the server-code, how to handle connections securely and how to scale your servers to meet demand. While AWS does have services which can help with those kinds of projects, we are going to use a much simpler solution; API Gateway Websockets.
Using serverless sockets takes a lot of the maintenance and configuration out of a custom-built socket server.
AWS Serverless Application Model
For this project we are also going to be using the AWS Serverless Application Model (SAM).
AWS SAM is a tool that allows us to develop serverless applications quickly from within our IDE and deploy our backends automatically. SAM projects are a combination of CloudFormation and Lambda functions which allow us keep all the AWS resources and settings within one project template, rather than having to set everything time up manually from the AWS dashboards.
AWS SAM seriously reduced development time for serverless applications on AWS and makes it very easy to debug and develop serverless code.
This series of tutorials assumes you are somewhat familiar with AWS GameLift set up already. If you want to look at how to set GameLift up yourself, or incorporate it into a project you can check out our series of tutorials here.
The next tutorial in this series will go through how the backend is going to work and what components will make up our infrastructure.
2 – [Infrastructure Design] Introduction
This is the second in a series of tutorials covering how to set up a GameLift backend using serverless websockets.
You can find a link to the previous page here, which covers some of the components being used and why serverless sockets are a good fit for our GameLift backend.
For this simple example, all our players are going to do is request session placement from GameLift.
This process is asynchronous from GameLift. This is because it might take some time for the GameLift fleet controllers to communicate with live instances to see if there is a session with an open slot. If there are no open slots, GameLift will need to start-up another instance and wait for the session to load. This can take some time.
When GameLift has a session ready for our player, it will trigger an event which will write those connection details to a database. In this example we will be using a DynamoDB table.Using DynamoDB Steams, we can have a Lambda function automatically execute and send the connection details from GameLift down the correct socket for the player.
Authentication
The first step in the flow will be authentication. Before we can open the socket, we need to authenticate the player.
For this we are going to use a Lambda Authorizer. This is a Lambda function that will be executed when the socket opens. Its sole purpose is to validate that the user has permission to connect to the GameLift backend.
We recommend using a 3rd party to authenticate your players whenever possible.
For example, if your players are playing on Epic or Steam, you will likely have those SDKs integrated into your client. Players running on those platforms can get an authentication token from the client and use that to establish the socket. The Lambda Authorizer function will take that token and validate it with Epic or Steam (for example) over REST before opening the socket.
Having a 3rd party as your authentication provider makes your backend more secure and avoids issues that you might encounter if there are any attacks on your backend. In these cases, the expensive infrastructure (Lambdas, GameLift and your Database) is protected by a service provider which is much more capable of handling these kinds of attacks.
GameLift Backend Diagram
Below you can see an architecture diagram of all the relevant components involved in this solution.
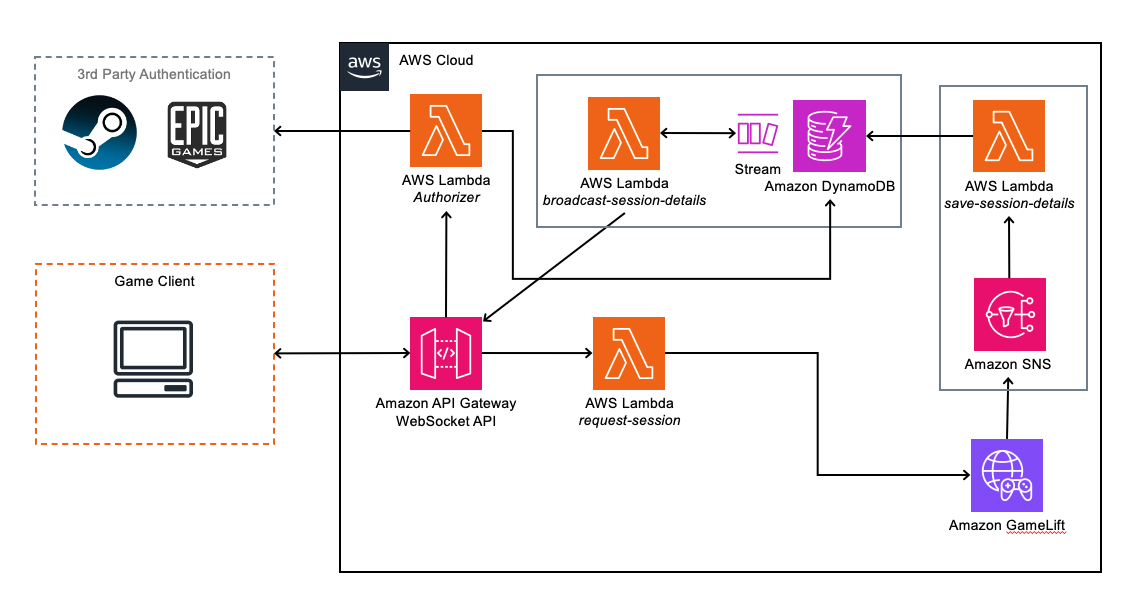
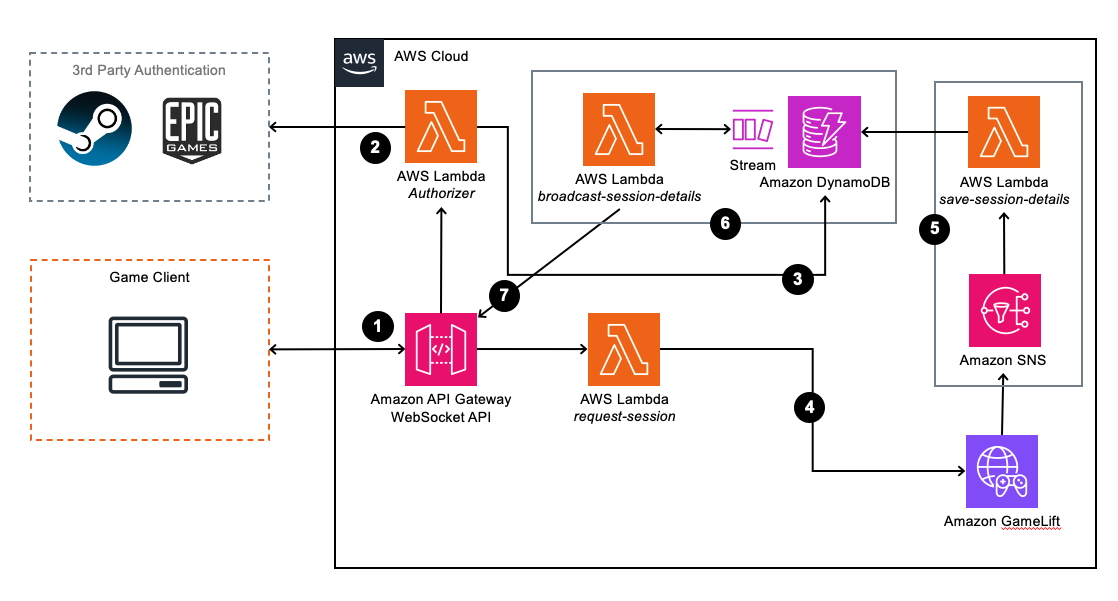
The connection flow is as follows:
- The Game Client opens a socket to the API Gateway WebSocket API.
- The socket will then invoke the Lambda Authorizer and open the socket if the Authorizer returns a valid response.
Note: API Gateway websockets actually return a socket connection URL specific to the user before the connection is established. You then use that connection URL to open the socket. - Once the player is authenticated and the socket is opened, the socket URL for this player is saved into a table in DynamoDB for future reference so we can send messages asynchronously to the correct player.
- The player can then make a request for them to be placed into a session.
This invokes a Lambda function which will communicate with GameLift and request a session. - Once GameLift places the player into a session, it triggers an SNS topic, which in turn triggers a Lambda function. Details of the session placement are provided to the Lambda function by SNS and these include the IP Address, Port and Auth-Token for the server that GameLift has placed the player into.
- This Lambda function writes the connection details to the DynamoDB table which triggers a Stream, invoking the next Lambda function.
- This Lambda function will then check the player ID for the new session placement info record and look-up the socket URL for that player in another DynamoDB table
Summary
In the next section of this tutorial, we are going to take a look at how to set up a simple SAM project which will include some of the basic features we need to get started with our GameLift backend.
3 – [SAM Project Initialisation] Introduction
This is the third in a series of tutorials covering how to set up a GameLift backend using serverless websockets.
You can find a link to the previous page here, which covers the GameLift backend flow and architecture.
In this tutorial we are going to set up the basics of our GameLift backend using AWS SAM.
Installing AWS SAM
The installation process for SAM is different depending on which OS you are using. You can check out installation instructions here to install it for your OS.
The main thing to ensure is that you can call the SAM CLI from your terminal.
You can test this using the command.
sam –version
Template Project Set Up
Next we are going to initialize our project. You will need to create a folder for your project and then open that folder in your IDE. We are using VS Code.
Open your terminal and enter the following command.
sam init --name 'gamelift-backend-example'This process will guide you through the setup steps of your SAM project, but you can supply the CLI command with all the parameters you need in one line. Check the docs here for that flow.
Choose the following options when prompted:
- Choose “AWS Quick Start Templates” (1)
- Choose “Hello World Example” (1)
- Choose “N” for the package type (we are going to use NodeJS)
- Choose Nodejs18.x (13) as the runtime
- Choose Zip (1) as the package type
- Choose “Hello World Example TypeScript” (2) as your starter template
- Choose “N” for enabling ray-tracing
- Choose “N” for enabling CloudWatch Application Insights
- Choose “Y” for structured logging in your Lambda functions
You will then see a summary of your application settings in the terminal.
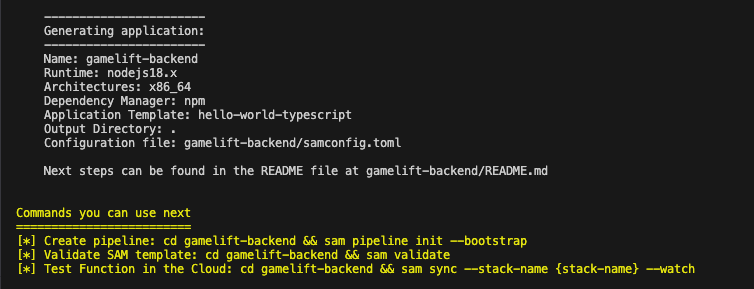
And you will also now see some folders and files generated in your folder.
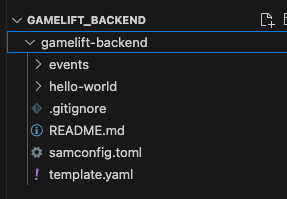
If you open up the “hello-world” folder, you will see a TypeScript file called “app.ts”. This is the main Lambda function for our template project.
Building Our Template Project
First we need to build our project.
Before building you will need to ‘cd’ into the folder that SAM generated. In our case we called our project “gamelift_backend” so that is the name of the folder we need to be in, in order to build our project.
You can then enter the following command in your terminal.
sam buildThis process shouldn’t take more than a minute for this template project. You should see a notification that the build succeeded.

One of the nice features of AWS SAM is that we can test our code locally before we deploy it. In order to do this you will need Docker installed on your machine.
To test your function locally, simply run the command.
sam local invokeYou should see a log of the “hello world” response.

Deploying To AWS
Now that we know our function works, we can deploy it to AWS.
Deploying to AWS is another simple command, however, if we do not specify the region we are going to deploy to, AWS SAM will deploy to the default region. If you want to specify the region you are deploying your stack to you can either specify this in the deployment command (example below), or you can edit the samconfig.toml file in the root of your project.
Under the line [default.deploy.parameters] add the region.

If you make the change to your samconfig.toml file, you will need to build the project again so you can use the command.
sam build; sam deploy(You can use “sam deploy –region ‘eu-west-1’ otherwise).
You can see a list of region codes here.
The deployment will take some time and you will be first prompted to confirm that you want to deploy your stack.
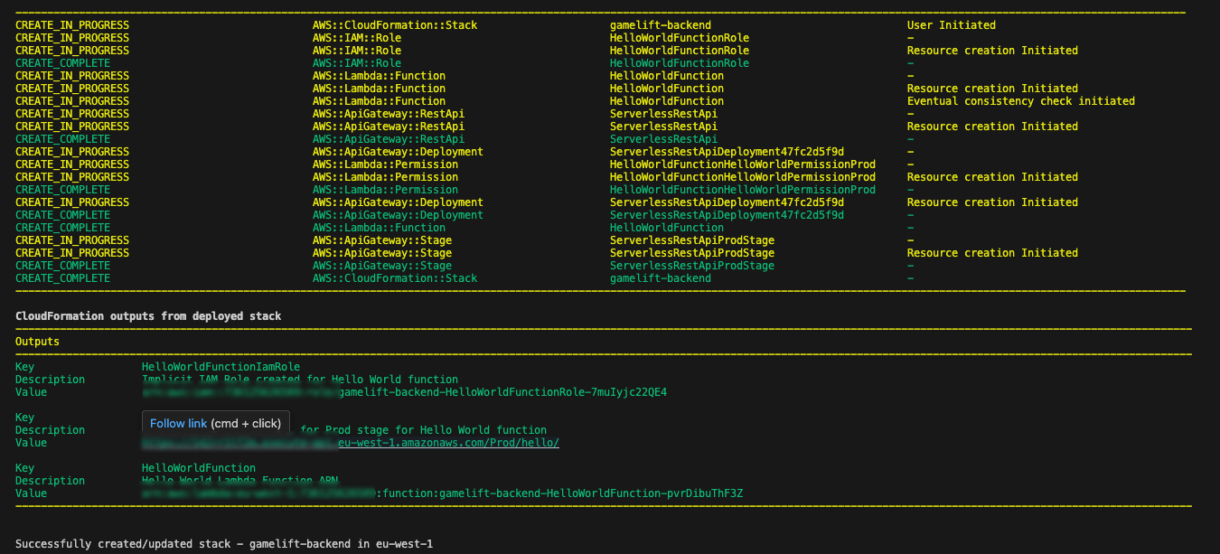
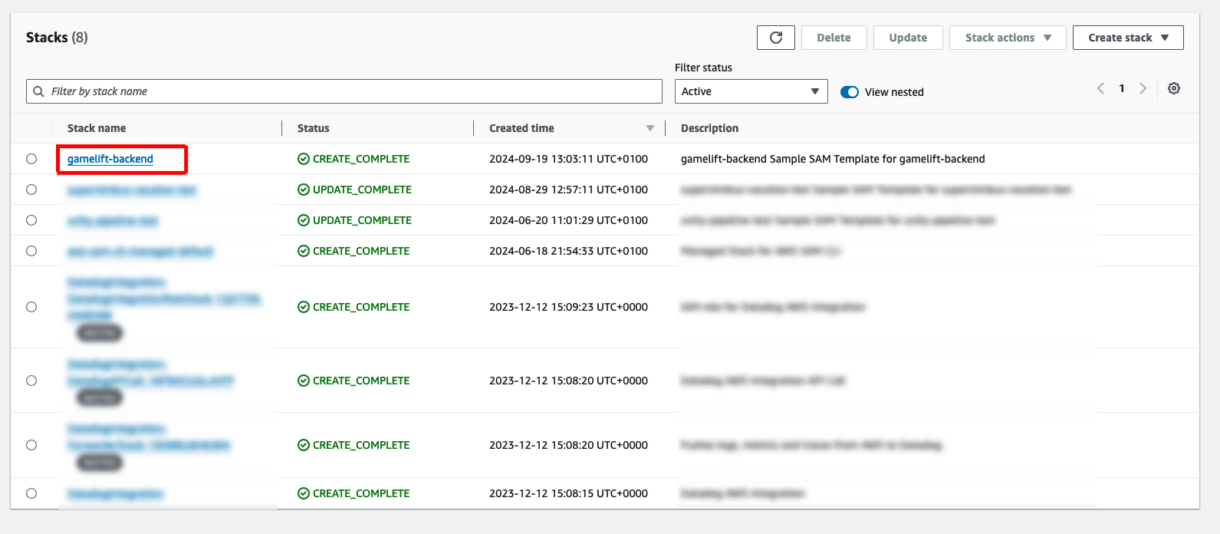
You can also check out your stack from the AWS Dashboard.
Go to the CloudFormation dashboard and you will see your stack deployed.
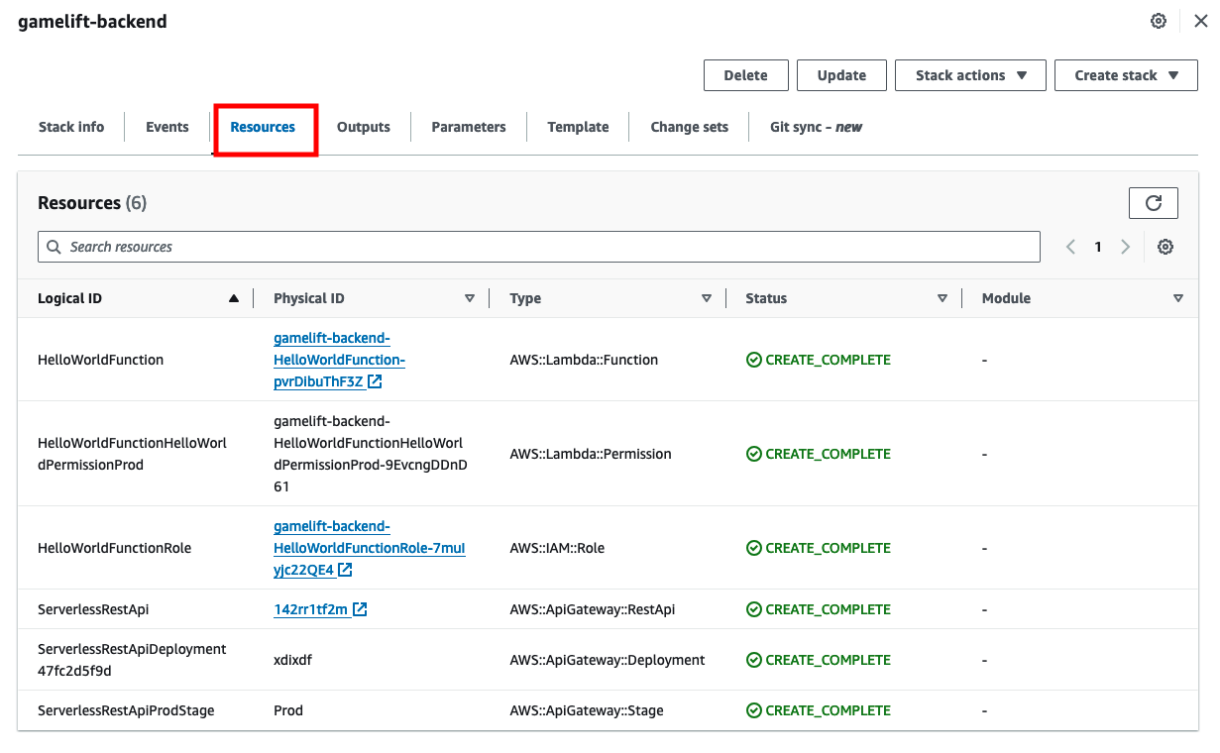
Clicking on your stack, you can go to the Resources tab and see all of the components that have been deployed.
Testing Deployment
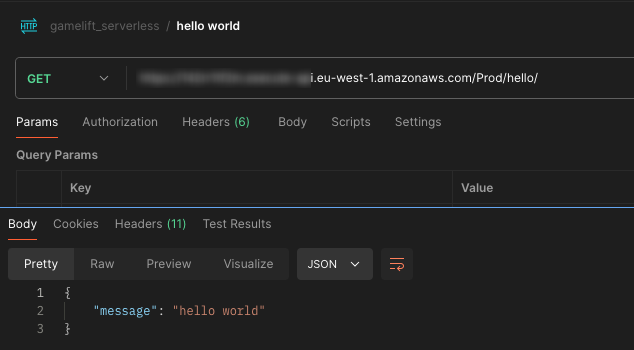
Now we also test that our endpoint is working using the HelloWorldApi URL that was printed at the end of the deployment process in the terminal.

You can stick this into your browser directly if you want, or you can use something like Postman to keep track of your endpoints.
You should see your “hello world” response from the endpoint.
Summary
In the next section of this tutorial, we are going to take a look at modifying this template project to deploy the resources we need specifically for this backend. This example has just been a short introduction to the AWS SAM Typescript set up project, but we need to make a lot of changes to this project before we are complete. Remember that you can always restore your project to this point if you ever want to restart the tutorial, or create a new REST API project from scratch.
4 – [Websocket Connect] Introduction
This is the fourth in a series of tutorials covering how to set up a GameLift backend using serverless websockets.
You can find a link to the previous page here, which covers setting up a basic AWS SAM template project
In this tutorial we are going to add some components to our deployment so we can start to link together the flow for connecting to our websocket application and recording connection details into a DynamoDB table.
Project Layout
To begin with we want to change the layout of our project’s folder structure. We will create a folder called “src” in the root directory of our project. Currently this is called “hello-world”, so we can change the “hello-world” folder to “src”. Here we will put scripts for all our websocket functions in future.
Change the name of the script currently called “app.ts” to “connect.ts”, and inside that script where it returns “hello world”, you can change that message to something like “Connected Successfully”.
Note
If you want, you can still keep this hello-world example in your project for testing. All you need to do is duplicate the app.ts function, leave it as it is, and name the duplicate to connect.ts.
We will also have this function log out the event details for now, just for debugging. Add some console logs to the top of the function.
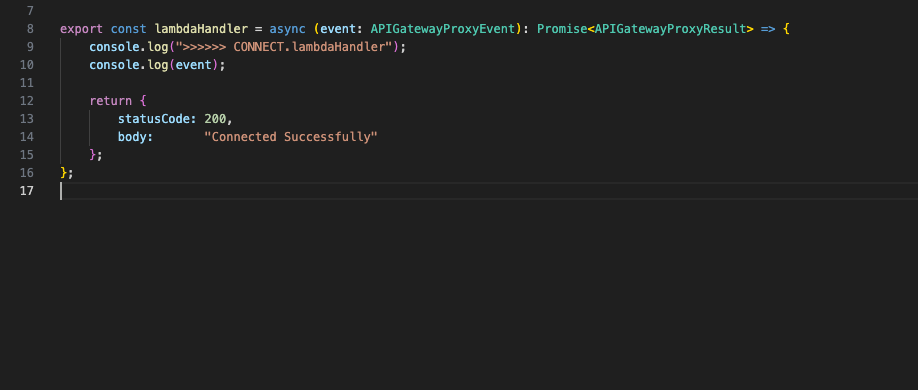
Next, we are going to hook up a new websocket connection request to this Lambda function.
We won’t go into the basics of websockets in this tutorial but there are a few required “routes” which are needed in order for our websocket API to work. The “Connect” route is one of them, mimicking the connection upgrade of a regular socket from HTTP to Websockets, so we will need to create that first in order to test our websockets out.
Before we start handling any custom-code we will be modifying our deployment template so we will look at how that is put together below.
Template YAML
The template.yml script in the root of your project.
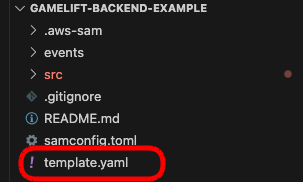
This template yml controls all the resources we deploy to our AWS stack.
You will currently see that this template is handling your HelloWorldFunction resource.
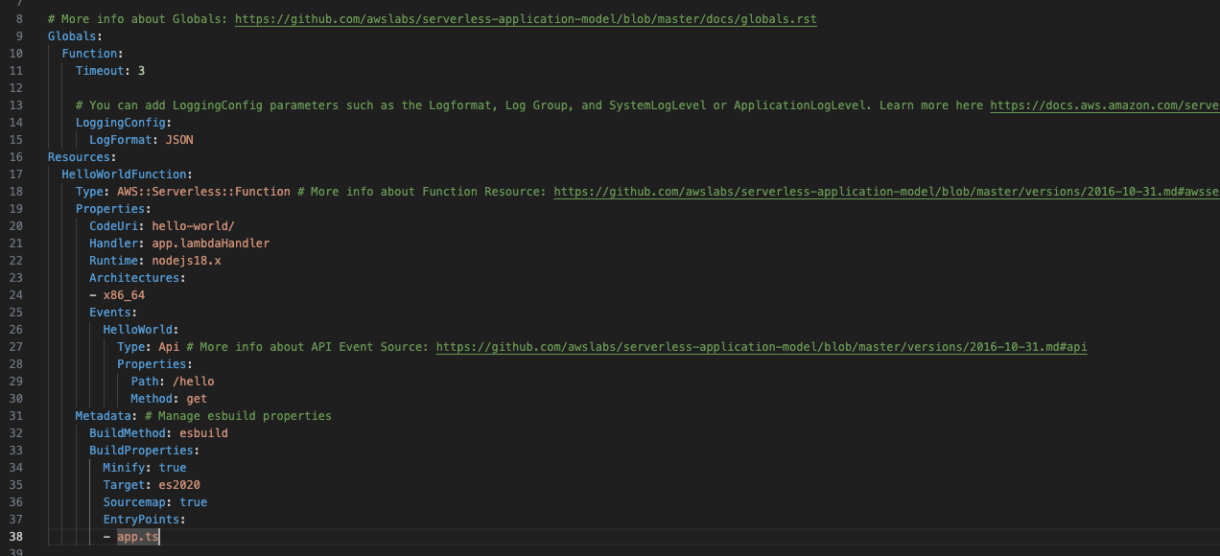
To begin with, we don’t need this Hello World function anymore, but you can choose not to delete it if you want to test anything later.
You can delete the “HelloWorldFunction” tag, and everything beneath it.
If you want, you can still keep this hello-world example in your project for testing. All you need to do is duplicate the app.ts function, leave it as it is, and name the duplicate to connect.ts
Note
Copy-pasting yml examples into the template.yml script can cause the yml to be malformed. Usually this is due to indentation being wrong. When you paste a new example into your template.yml double-check indentation and try building your project to see if there are any errors. If the project builds successfully, the template.yml should be correct.
1 – Adding Parameters
Before we start to add new resources to the stack, we are going to add some useful attributes which will save us time later and allow us to put better structure on the stack.
We need to add some parameters to our stack. These are going to be used as references throughout our template and will save us having to repeatedly type the same attributes for our resources over and over again. We define the parameters once and then use them again and again.
We will add some basic parameters for the game-name, stage and the name of the API.
Add the following yml to the top of the file, just below the “Description” tag and above the “Globals” tag.
Parameters:
 Game:
   Type:     String
   Default:  SomeAwesomeGame
 Stage:
   Type:     String
   Default:  Development
   AllowedValues:
     - Development
     - Staging
     - Production
 ApiName:
   Type:     String
   Default:  WebsocketApi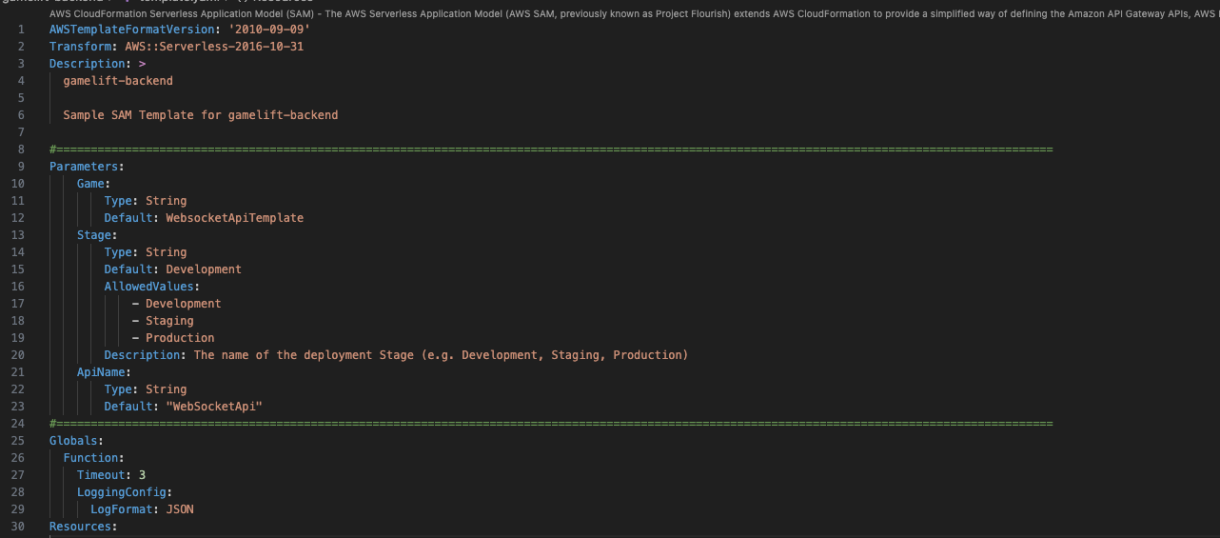
2 – Adding Global Settings
Next, we are going to add some global settings to our stack. These allow us to state in the template that all resources of a certain type have standard settings and once again, saves us from typing out settings for those resources, over and over again throughout our template.
For this example we are going to have a handful of Lambda functions we need to deploy. If we don’t define global-settings for those Lambda functions, we would need to define settings for each Lambda function individually.
Add the following template below the “Globals:” tag.
Globals:
 Function:
   Runtime: nodejs18.x
   AutoPublishAlias: !Ref Stage
   Timeout: 10
   Environment:
       Variables:
           GAME: !Ref Game
           STAGE: !Ref Stage
           REGION: !Ref AWS::Region
   Tags:
       game: !Ref Game
       stage: !Ref Stage
       region: !Ref AWS::Region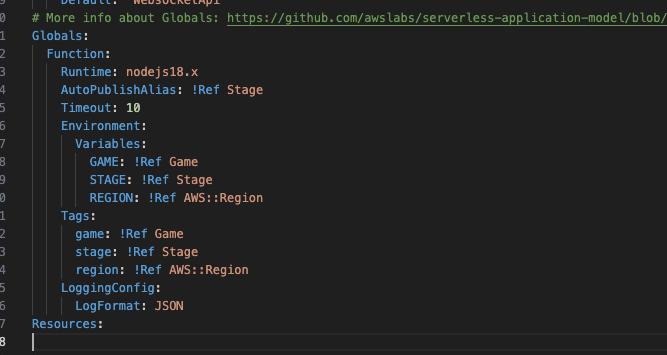
There isn’t much out of the ordinary here, the Environment tag is used to pass details about the stack into the function in case we need it during operation (as we execute code) and the Tags are used to “tag” AWS resources based on this project in case of issues or to investigate billing for resources used in this stack.
There are however, 2 important settings in the above config:
- AutoPublishAlias
This ensures that when we update the stack, the new stack will always point at the new code which has been deployed. - Timeout
This is the timeout of the Lambda function.
This will become important later when we incorporate authentication later. The ‘10’ here is 10 seconds, but this can be extended. The longer your Lambda function executes for, the more it will cost and the more concurrent Lambda functions will need to be initialized in order to meet scaling requirements.
3 – Websocket Components
Now we are ready to start creating some simple websocket components.
There are a number of new resources needed to set up these websockets, and they can be confusing for anyone new or unfamiliar with CloudFormation so we will go through each of them here.
4 – Websocket API
The first resource we need is the actual websocket API. We define this inside the Resources tag and this will become a reference to all of the other components comprising our websocket API.
WebSocketApi:
   Type: AWS::ApiGatewayV2::Api
   Properties:
     Name: !Join ["-", [!Ref Game, !Ref ApiName, !Ref Stage]]
     ProtocolType: WEBSOCKET
     RouteSelectionExpression: $request.body.route
     Tags:
       game:   !Ref Game
       stage:  !Ref Stage
       region: !Ref AWS::Region
 WebSocketApiDeployment:
   Type: AWS::ApiGatewayV2::Deployment
   DeletionPolicy: Retain
   DependsOn:
     - ConnectRoute
   Properties:
     ApiId: !Ref WebSocketApi
WebSocketApiStage:
Type: AWS::ApiGatewayV2::Stage
Properties:
StageName: !Ref Stage
DeploymentId: !Ref WebSocketApiDeployment
ApiId: !Ref WebSocketApi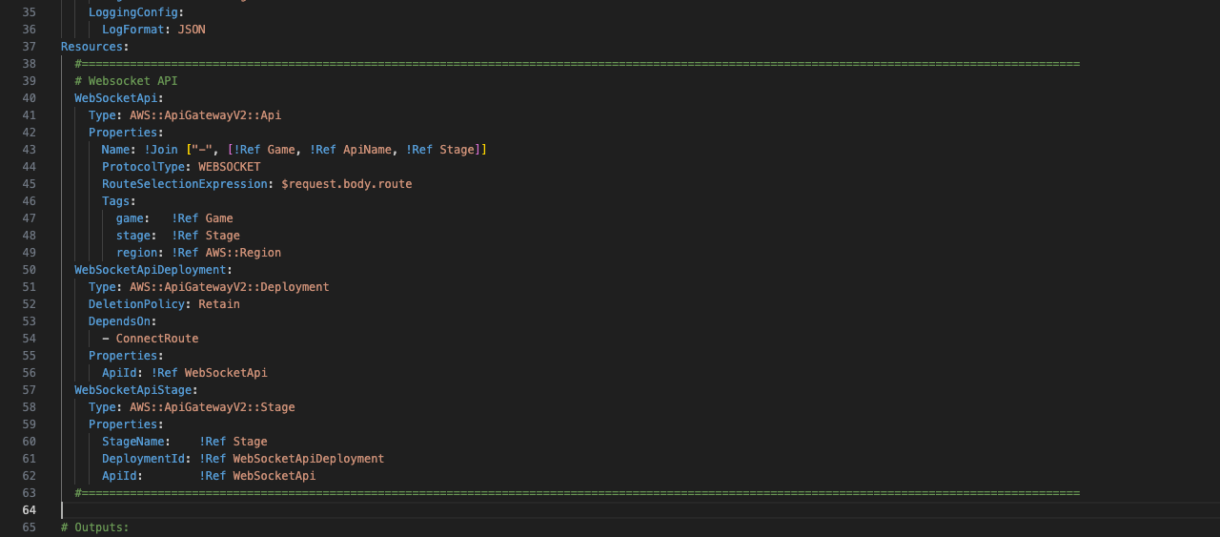
You can see here that the name of the resource is going to be the game-name, api-name and stage together, separated by dashes.
We need to define a WebSocketApiDeployment resource. This is going to let our websocket api know which connection routes are valid for this websocket.
We also need a WebSocketApiStage as all API Gateway resources come with a defined stage (in our case, development, staging or production). The resource links for connecting to our websocket will be different depending on the stage, so we define this here, and you can see they inherit their stage from the Stage parameter we created earlier.
Now we have the basic resource ready, we need to start defining some essential components for this websocket API. We will go through each of these resources and explain what they are doing.
5 – Routes
We need to define some routes. These are going to direct the API to the appropriate resource (our Lambda functions).
To begin with, we are only going to create the ConnectionRoute resource as we need this before any of our other routes will work for this websocket.
Add the following tags below the WebsocketApi template in the Resources tag.
ConnectRoute:
   Type: AWS::ApiGatewayV2::Route
   Properties:
       ApiId: !Ref WebSocketApi
       RouteKey: $connect
       Target: !Join ["/", ["integrations", !Ref ConnectInteg]]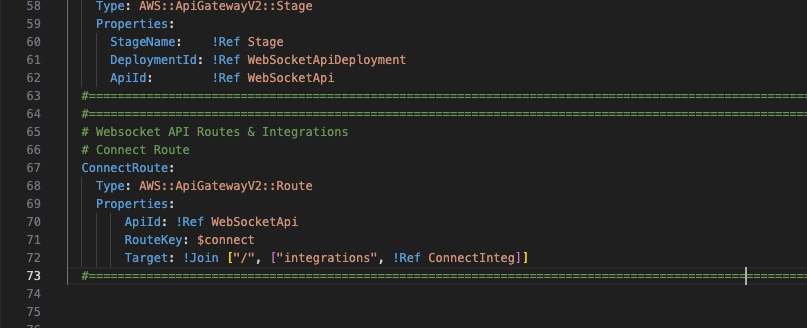
6 – Integration Type
Next we need to add an integration type. This will let our websocket API know what kind of resources we are integrating with (Lambda function, 3rd party service, endpoint, etc).
The value we need to use is “AWS_PROXY” which lets the API know that we are integrating with a Lambda function.
Add the following yml below the ConnectionRoute template.
ConnectInteg:
   Type: AWS::ApiGatewayV2::Integration
   Properties:
       ApiId: !Ref WebSocketApi
       IntegrationType: AWS_PROXY
       IntegrationUri: !Sub
arn:aws:apigateway:${AWS::Region}:lambda:path/2015-03-31/functions/${ConnectFunction.Alias}/invocations
7 – Lambda Functions
Now that we have the websocket route pointing at a Lambda function integration, we can hook up a Lambda function to our websocket route.
Add the following just before the ConnectInteg template.
 ConnectFunction:
   Type: AWS::Serverless::Function
   Properties:
     Handler: connect.lambdaHandler
     CodeUri: src/
   Metadata: # Manage esbuild properties
     BuildMethod: esbuild
     BuildProperties:
       Minify: true
       Target: "es2020"
       Sourcemap: true
       EntryPoints:
       - connect.ts
8 – Lambda Permissions
Next we need to add permissions for this Lambda function.
This permission is going to allow our websocket API to execute the Lambda function.
You can add this just below the ConnectFunction template.
 ConnectFunctionPermission:
   Type: AWS::Lambda::Permission
   DependsOn:
     - WebSocketApi
   Properties:
     Action: lambda:InvokeFunction
     FunctionName: !Ref ConnectFunction.Alias
     Principal: apigateway.amazonaws.com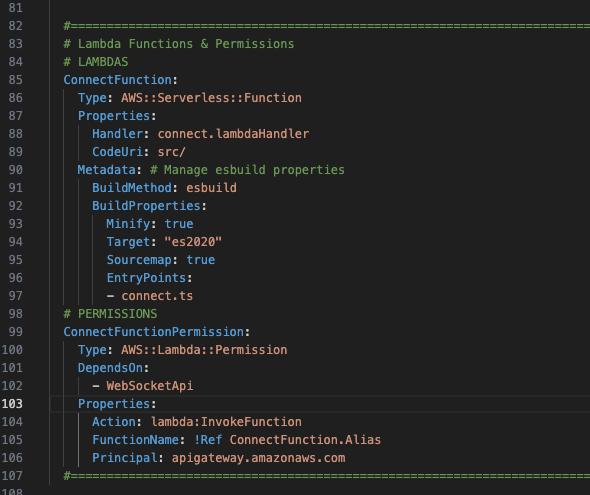
Outputs
In the previous example, the Output tag was designed to output information about the REST stack. We need to change this to output details of our websocket stack.
Replace the output with the following…
Outputs:
 WebsocketApiId:
   Description: "Websocket API Id"
   Value: !GetAtt WebSocketApi.ApiId
 WebsocketStageEndpoint:
   Description: "The websocket endpoint to connect to"
   Value:
     !Join [
         "",
         [
             "wss://",
             !Ref WebSocketApi,
             ".execute-api.",
             !Ref "AWS::Region",
             ".amazonaws.com/",
             !Ref "WebSocketApiStage",
             "/",
         ],
     ]
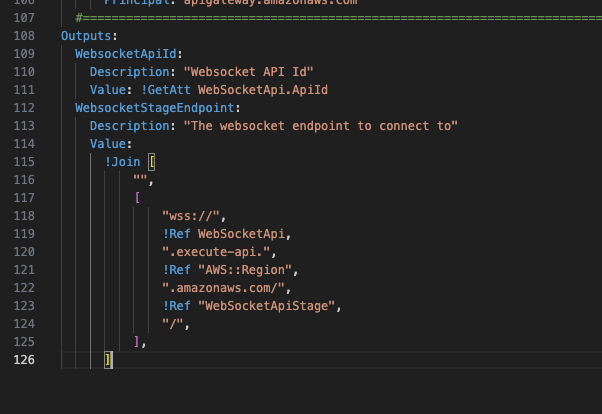
You can now build your project and it should complete without any issues.
Running the “sam local invoke” command will also execute the connect function and you will see some logs in your terminal.

Deploy Websockets
Now that we know our project is working locally, we can deploy it to AWS using the command “sam deploy”. You will see the new resources that are being added before you confirm the deployment.

Once you see that the resources have been deployed successfully, you can log into your AWS account and go to the CloudFormation dashboard to view your stack.
You’ll also see in the terminal that there was a websocket endpoint printed for this project. We can use that to test the websocket now.

Find an online websocket tester like PieHost, enter the URL into the application and click on Connect.
You should get a message saying the websocket has been successfully established.

Debugging Issues
Now let’s take a look at the logs for our Lambda function. In case there are any errors from this test, looking into the logs will help you fix any issues.
In the CloudFormation dashboard, click on your stack and then select the “Resources” tab.
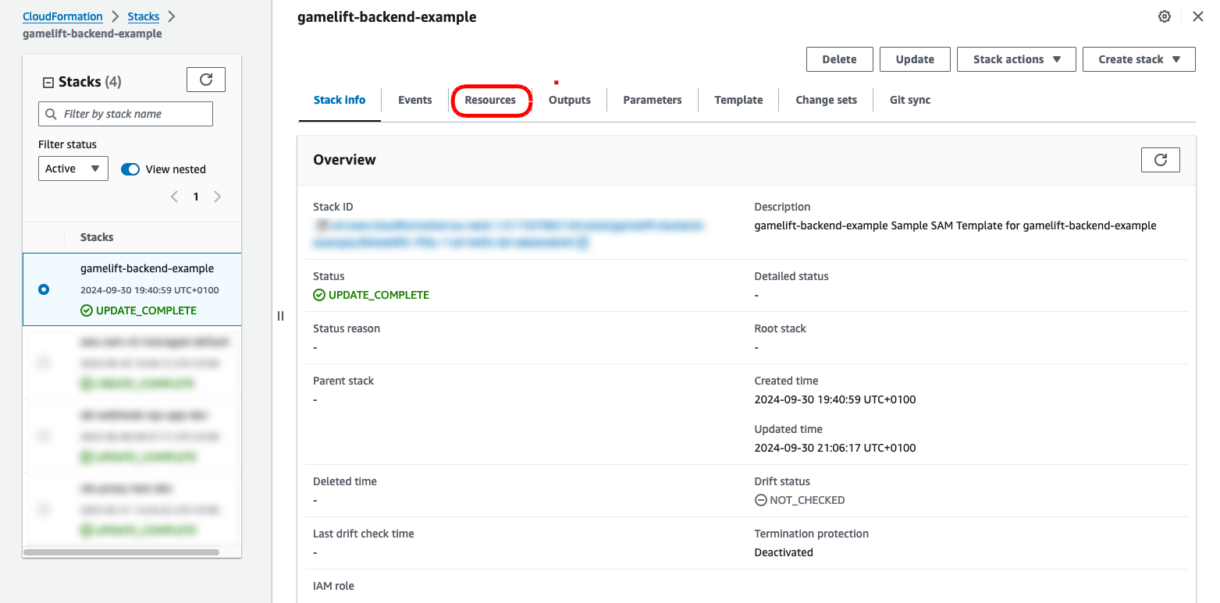
Click on the ConnectFunction Physical ID link. This will open a page with the Lambda’s settings. Click on the Monitor tab.

Now click on the “View CloudWatch logs” button.

This will open a page showing our CloudWatch log streams. Click on the latest stream. You should see our log at the top of the connect script, along with the event context.
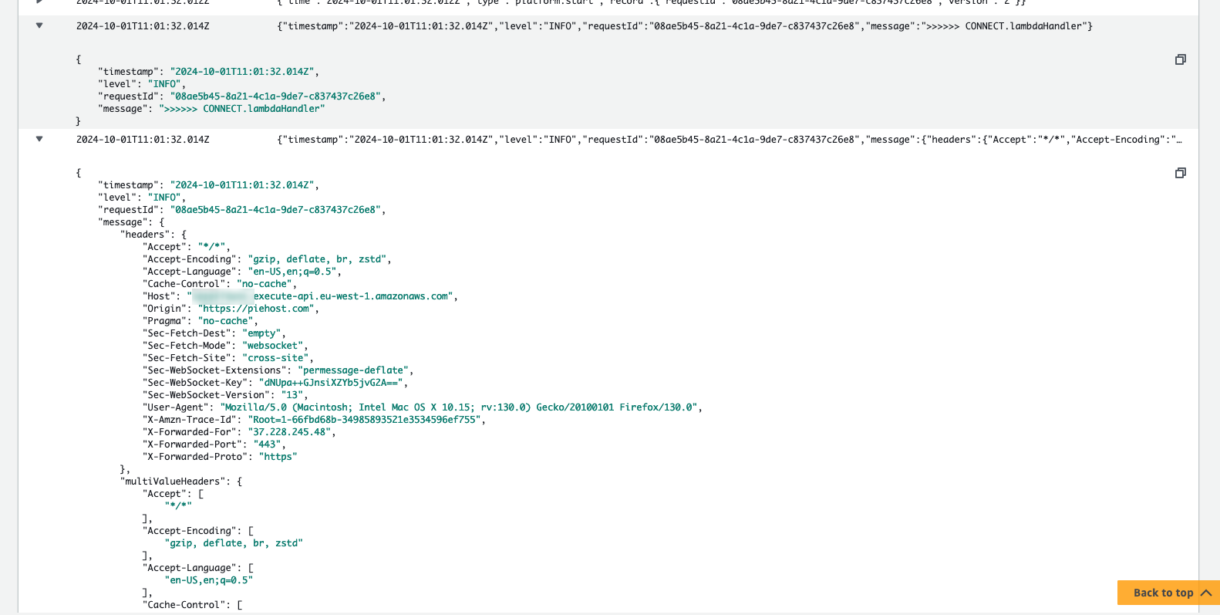
Any errors should also be visible in these logs.
Now our connection handler is working, we need to start adding code to it for handling and storing player connections. We can still make a reasonably functional API without needing to store these connection details, but without knowing connection details, we will not be able send messages asynchronously to players when their GameLift session details are ready. This is the most powerful part of this GameLift backend solution; removing the need for polling the backend for connection details is cutting down on a lot of API calls and cost.
Adding The Connections Table
Before we start adding any code to our connection Lambda function, we need to deploy a new DynamoDB table.
AWS DynamoDB is a managed noSQL database and has a lot of advantages for the application we are looking at for this example. There are alternatives, but since we are working within the AWS ecosystem, DynamoDB is a good solution for our needs.
To make things easier to handle in our code, we don’t want to hard-code our connections table’s name, but luckily, we can reference any global parameters in our template.yml file, when any Lambda in our project is executed. So let’s add that table name there. Under the Globals tag, for all functions, add a new environment variable as below.
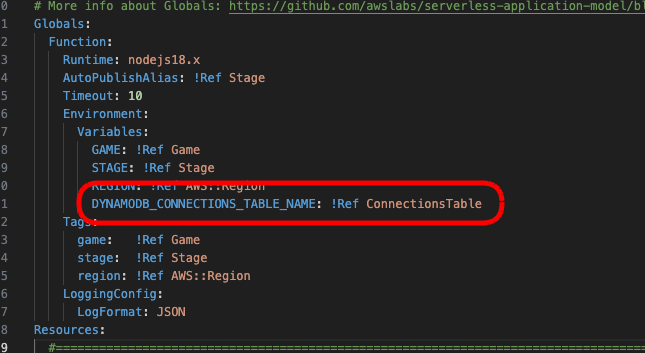
To deploy a new DynamoDB table, add a new table to the Resources tag in your template.yml script. You can add this at the bottom of the file, just above the Outputs tag.
ConnectionsTable:
   Type: AWS::DynamoDB::Table
   Properties:
     AttributeDefinitions:
       - AttributeName: playerId
         AttributeType: S
       - AttributeName: connectionId
         AttributeType: S
     KeySchema:
       - AttributeName: connectionId
         KeyType: HASH           # HASH allows DynamoDB to partition keys
     BillingMode: PAY_PER_REQUEST
     GlobalSecondaryIndexes:
       - IndexName: ConnectionIdIndex
         Projection:
           ProjectionType: ALL
         KeySchema:
           - AttributeName: connectionId
             KeyType: HASH
     TimeToLiveSpecification:
       Enabled: true
       AttributeName: expireAt
     Tags:
       - Key: game
         Value: !Ref Game
       - Key: stage
         Value: !Ref Stage
       - Key: region
         Value: !Ref AWS::Region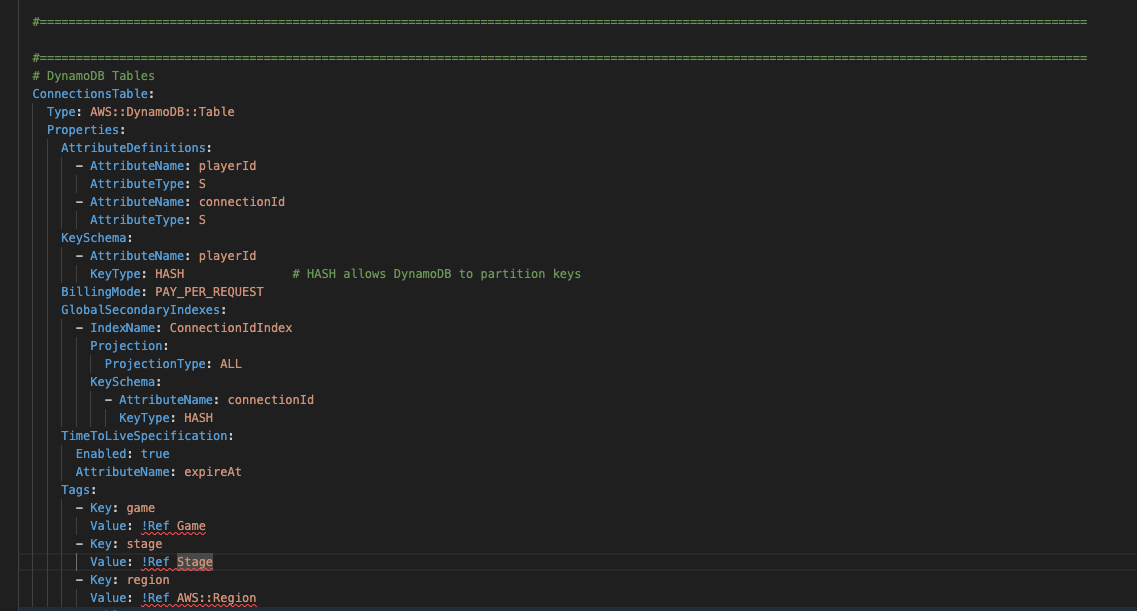
Let’s take a quick look at what we have defined here for our Table:
- AttributeDefinitions
These are any attributes of the table data that are included in the schema or indexes that we will need to use later. Because this is noSQL we don’t need to define all attributes, but we do need to define anything used as an index here. - KeySchema
This denotes the attribute that becomes the primary key in the table. In order words, whatever key you are going to be looking up directly (not using a search query) should be used here.
When we send requests to the backend, we will always have context of the connection ID so its easy to load players by connectionId, however, most often we will want to find players by their player ID, as other players don’t know each other’s connection ID but they will know each other’s player ID. So we will make this the primary index as it makes it easy (more efficient) for us to look up a player or delete a connection in the table. - BillingMode
Billing Mode is a little hard to explain in brief, but it is very important. There is a summary of how this works here. For now, we are going to use PAY_PER_REQUEST as it is the simplest option, however, SuperNimbus always advises our customers to perform load-tests on their backends and play around with provisioned capacity to find the perfect point for performance and cost. This can only be found by load-testing and/or live usage of the backend API. - GlobalSecondaryIndexes
This is including the connectionId field as an additional field in the data-schema that can be used as an index. For this example, it will allow us to search the table for player connection details. We will use this later for sending messages and GameLift connection info to players. - TimeToLiveSpecification
At the end of this tutorial, we are going to store every connection established by our websocket API in our connections table. Without some mechanism for removing old connections, our table would grow over time costing us money and consuming resources and slowing down the connections table.
TTLs allow us to automatically expire connection details. This is typical of a regular websocket server, which might hold connection details from a few hours to a few days so sessions cannot be of infinite duration.
expireAt will be the key for our TTL, so whatever timestamp (Unix Epoch) we add to that field will represent the date we wish the document (with Dynamo we call these Items) to be deleted at. DynamoDB will take care of this for us without any extra code or infrastructure.
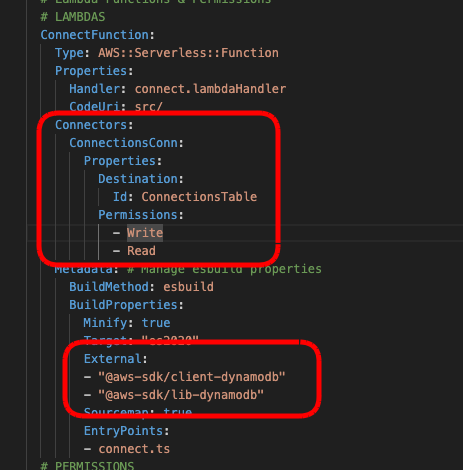
Next, we need to give our ConnectionFunction permission to access our ConnectionsTable.
We will add this to the ConnectionFunction settings. We are also going to add some dependencies to the Metadata tag for our ConnectFunction which will allow Typescript to include the libraries we need later for communication with DynamoDB.
Note
We have given our ConnectFunction read and write access to our DynamoDB table. For out example, we only need it to write connection details to the table from this function, but to make it easier for you to customize and debug your scripts, we are adding the read-permissions to this Lambda function so you can play around with the Dynamo table yourself.Once your backend is working as designed, you should consider removing read-permission if you don’t need it. You may see examples later on in these tutorials where this permissions is removed or where other Lambda function have reduced permissions. We want to deploy this table, so you can run the “sam build; sam deploy;” command again and wait for the stack to be deployed.
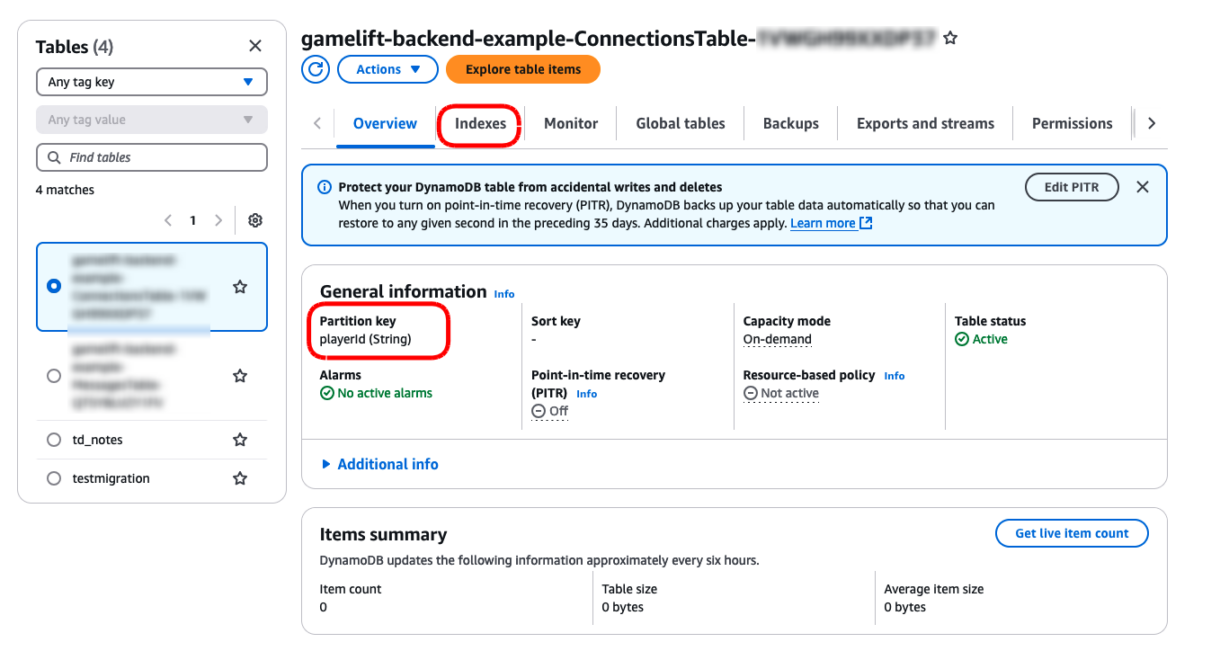
Once deployed, if you go back to the Resources tab of your stack in the CloudFormation dashboard of your AWS account, you will see the new table listed in the resources list. Clicking on the Physical ID link will open a new page with your DynamoDB table’s configuration and settings. You can also see the secondary indexes by clicking on the Indexes tab.
Local DynamoDB Setup
This step is not required but it is very handy to be able to debug your table items locally in order to test your code.
Setting up a local DynamoDB instance can be done in two ways:
- Using Docker and the AWS CLI
- Using AWS noSQL Workbench
We won’t go into the setup for this local instance in this tutorial, but it is important to find the correct connection URL for your local instance as we will be using it later to point the client at the local database or the deployed database.
Saving Connection Details
Now we want to have our ConnectFunction save the player’s connection details.
First we are going to add a configuration script. This will be used for config parameters as we build out the project. For this example we created a “utils” folder inside the “src” folder and added a script called config.ts.
For now, there are 3 parameters we need in this script.
export const Config: any = {
   Headers: {
       PLAYER_ID_HEADER:       "X-Player-Id"
   },
   DynamoDB: {
       ConnectionsTable : {
           TableName:              process.env.DYNAMODB_CONNECTIONS_TABLE_NAME,
           ConnectionIndexName:    "ConnectionIdIndex",
           PrimaryKeyName:         "playerId",
           ConnectionKeyName:      "connectionId",
           TTLDuration:            180000 // 24hrs for final project // 86400000 // 3mins for testing
       },
   }
}
The header will be important later when we establish connection details. We are just adding this now so we don’t have to go back to this script later.
The first value in the ConnectionsTable object is the name of the connections table so we can pass that into our DynamoDB APIs.
The other fields allow us to reference the indexes and keys we’ve set up so that we dont have to hard-code them each time we use them.
The TTL duration for our connection records. For testing, we’ve set this to 3 minutes, but the second value of 24hrs is what we would use in the final configuration. Setting the TTL to 3 mins allows us to see if the TTL is working immediately.
In the same “utils” folder, create a new script called dynamo.ts.
Add the following code to that script.
import {
   DynamoDBClient,
   BatchGetItemCommand,
   GetItemCommand
} from "@aws-sdk/client-dynamodb";
import {
   DynamoDBDocumentClient,
   DeleteCommand,
   PutCommand,
   QueryCommand,
   TranslateConfig,
} from "@aws-sdk/lib-dynamodb";


const translateConfig: TranslateConfig = {
   marshallOptions: {
       convertClassInstanceToMap: true,
   },
};
// We need to check if we are running a live version of DynamoDB or a local one //
// The AWS_SAM_LOCAL environment variable can let us know this //
const isLocal: boolean = process.env.AWS_SAM_LOCAL;
const client: DynamoDBClient = new DynamoDBClient({
   region:     process.env.REGION,
   endpoint:   isLocal ? "http://docker.for.mac.localhost:8000/" : undefined,
   logger:     console         // << remove for prod
});


const dynamo: DynamoDBDocumentClient = DynamoDBDocumentClient.from(client, translateConfig);


export interface DBConnectionRecordItem {
   playerId: string;
   [key: string]: any;
}


export class DynamoHelper {


/**
    * Adds an item to the Table without creating a record if one already exists
    * @param tableItem     - the document you want to add to the table
    * @param tableName     - the name of the table
    * @returns {boolean} true, if the connection item was saved to the Table
    */
   static async PutItem(tableItem: any, tableName: string): Promise<boolean> {
       // console.log({ item: tableItem, table: tableName }, "DynamoHelper: PutItem: arguments");
       const command = new PutCommand({
           TableName: tableName,
           Item: tableItem,
       });

       try {
           const response: any = await dynamo.send(command);
           //console.log({ response }, "putItem: response");
           console.log("DynamoHelper: PutItem: success");
           return true;

       } catch (err) {
           console.error({ err }, "DynamoHelper: PutItem: error ");
           return false;
       }
   }
Important
This code will work fine on the live database, but you need to replace the tag <LOCAL_DYNAMO_URL> with the URL used for your system. This depends on your local Dynamo set up and the OS you are using. There is an article discussing which URL to use here in case you get a connection-refused error.
The script above is very simple, we are setting up a new DynamoDB client and if the Lambda function is executed locally, we will pass in the route for the local table. We then define what a document in this Table looks like with the DBConnectionRecordItem interface and then the PutItem function simply takes one of these DBConnectionRecordItem objects and attempts to place it in the table.
Note
You can comment back in those console logs if you require further logging. There is also a param passed into the new DynamoClient object which provides extra logging. You might not want that for your production code so you can remove that later once you get your project working.
Now we can go back to our connect.ts script and gather the details from the player required for the connections table.
Then we will grab the name of our connections table and create a new DBConnectionRecordItem object.
If the PutItem function returns ‘false’ indicating we had an error trying to save the connection details to the table, we will return a 500 code letting the API know there was an error.
import { APIGatewayProxyEvent, APIGatewayProxyResult } from 'aws-lambda';
import { dummyRequestBody } from './utils/dummyRequestBody';
import { Config } from './utils/config';
import { DBConnectionRecordItem, DynamoHelper } from './utils/dynamo';


export const lambdaHandler = async (event: APIGatewayProxyEvent): Promise<APIGatewayProxyResult> => {
   // console.log(event);                                                 // << for testing, comment out of prod code //
   // [1] - Create structure for connection details for DynamoDB //
   const newConnectionItem: DBConnectionRecordItem = {
       playerId:       event.headers[Config.Headers.PLAYER_ID_HEADER], // << primary key
       connectionId:   event.requestContext.connectionId,              // << secondary index
       stage:          event.requestContext.stage,
       domain:         event.requestContext.domainName,
       // we could turn this into a helper function in future perhaps //
       expireAt:       ((new Date().getTime()+Config.DynamoDB.ConnectionsTable.TTLDuration)/1000)
   }
   //console.log(newConnectionItem);
   // >> validate connection details here return error and log if there is a problem //


   // [2] - Save details to DynamoDB //
   if(!await DynamoHelper.PutItem(newConnectionItem, Config.DynamoDB.ConnectionsTable.TableName)){
       console.error("failed to update player connection");
       return { statusCode: 500, body: "Failed To Update Player Connection" };
   }


   return {
       statusCode: 200,
       body:       "Connected Successfully"
   };
};
We have added a note to the code where you may perform additional validation on the connection details if required. We do encourage this validation, but for the sake of brevity we will skip this step for this example.
Deploy these changes using the following command.
sam build; sam deploy;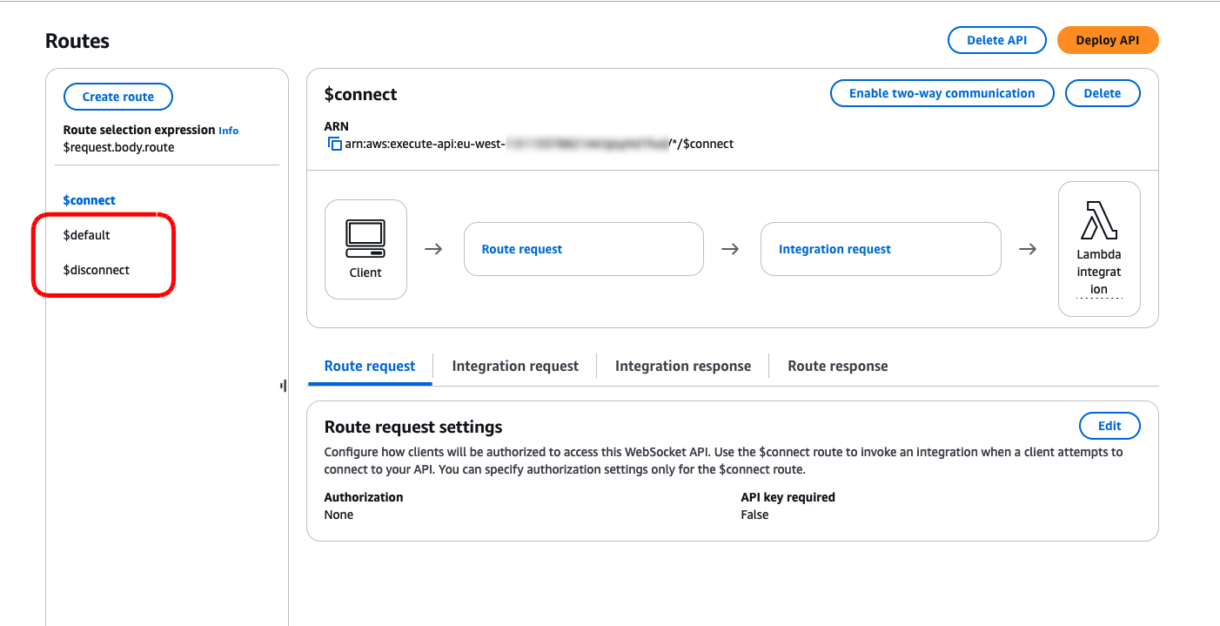
You can also run this locally, but you will need to provide some dummy data so that the ‘event’ object has details for the headers, and request context. You can get this from the CloudWatch log streams and paste the dummy data in directly, something like this…
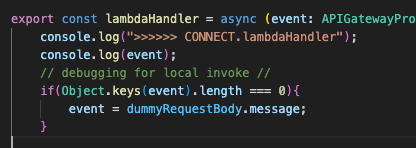
Once those changes are deployed, we are ready to test the websocket connection again.
To test this, we need to provide the websocket with a custom-header. If we exclude the header, then there will be no playerId field for the DynamoDB table record.
We suggest using Postman for testing this.
Stick the websocket URL into your Postman websocket example. Click on the headers tab and the header “X-Player-Id”. You can add any value here for the playerId. Click on the Connect button.
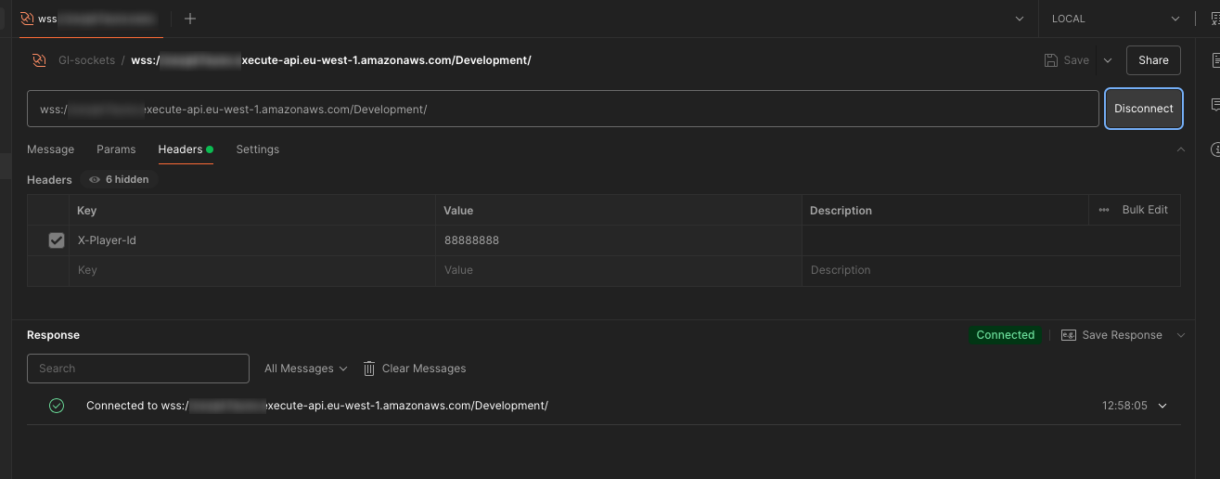
If the connection was successful, we can go back to our DynamoDB table in our AWS account and see the new record.
Click on the “Explore Table Item” button to view the items in your table.
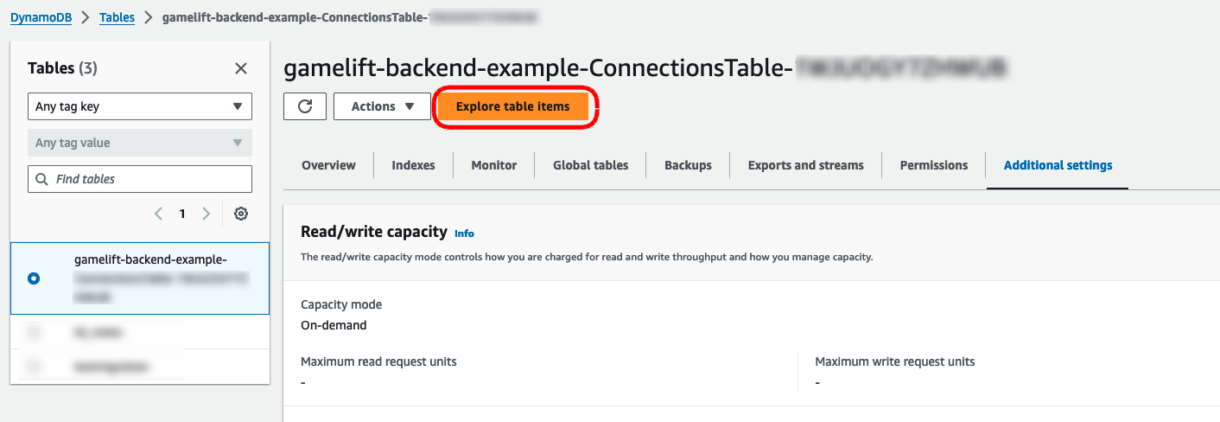
You will need the new item at the bottom of the page. Note that you can also see the expected expiry time of the item by clicking on the value in the expireAt column.
Now our expiry time is set to 3 minutes.
This doesn’t mean that the item will be removed from the table in exactly 3 minutes however. DynamoDB can take some time before removing expired items from the table. In some cases this can take several hours or up to a day, but you can expect that your table will expire in under an hour with the current set up.
Player IDs
Throughout this example, we will be passing in the player ID for the test-player in using this header. This is simulating a case where you are using an external authentication service to manage player IDs in your game and you do not need your backend to generate those IDs yourself.
An example of this would be where you are using Cognito, Nakama, Playfab, Accelbyte, brainCloud, etc, as your main backend.
We will discuss this more in a future section of this tutorial, as we can also use services like Epic Online Services, Steam, Meta, etc, for authentication, and in these case we pass a auth-token in our header, instead of the player ID. When we do this, we authenticate the token with that service and the service returns our player ID. This method is more secure, but takes longer to set up so we will cover it later.
The main thing to note is that, unless you want to modify this backend example to take on more custom workloads, the backend only needs to know the player ID once when the connection is made. That is then stored against a connection ID so that GameLift knows who to send connection details to.
Summary
In this section of the tutorial we set up an AWS SAM template for our websocket project, deployed the websocket along with a new DynamoDB table and started recording connection details for players in our table.
In the next section, we are going to take a look at some other required functionality for our websockets such as disconnection events and default routes for handling errors.
5 – [Adding Websocket Routes] Introduction
This is the fifth in a series of tutorials covering how to set up a GameLift backend using serverless websockets.
You can find a link to the previous tutorial here, which covers setting up the AWS SAM template project and connecting to the websocket.
In this tutorial we are going to take a look at some other required functionality our websocket project will need before we can start working on GameLift-specific features.
Default And Disconnect Routes
In the previous section we got our Connect route working and registering player connections to the Connections table.
Next we need to add two new routes $default and $disconnect.
The default route will not actually be used for anything specific in this project. Instead, if the user of the websocket API sends a request to the backend with a route that is not defined in our backend API, that request will be sent to the default route in order to return an error.
The disconnect, as you might expect, is triggered when the user disconnects the socket, or the socket is disconnected for some other reason (a timeout or error for example). In this route we will remove the player’s connection record from the Connections table.
1 – Adding New Scripts
The first thing we need to do is a new scripts for these routes. You can add them below where the connect.ts script was added. Paste an empty Lambda function handler into each script.
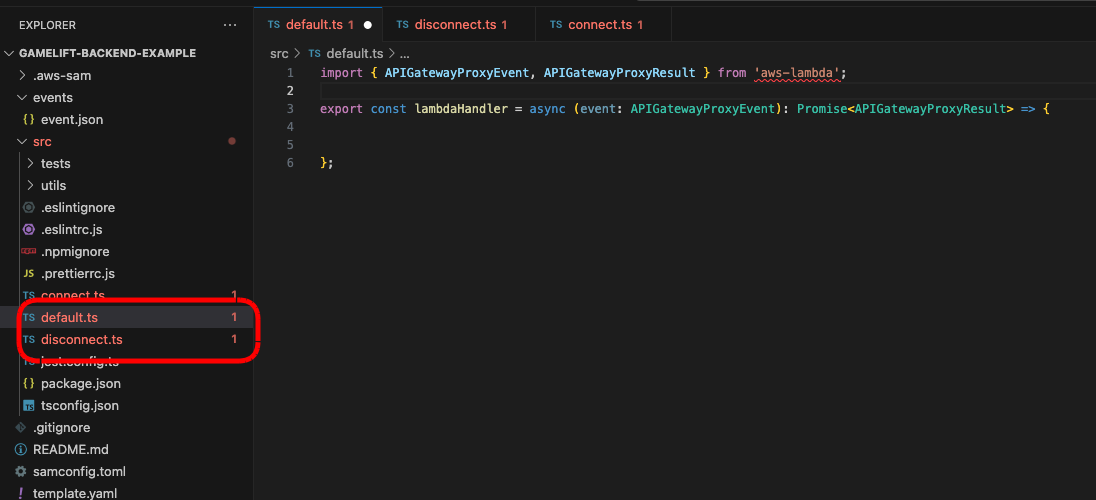
import { APIGatewayProxyEvent, APIGatewayProxyResult } from 'aws-lambda';
export const lambdaHandler = async (event: APIGatewayProxyEvent): Promise<APIGatewayProxyResult> => {
  console.log(event);


};
2 – Adding Routes & Resources
Next we need to go back to our template.yml file and add new resources and functions in for these routes. This will be very similar to what we already did for the Connect route, with the only difference being that our new default route will also need to have a response defined so that API Gateway knows how to return response data.
The first change is to the WebSocketApiDeployment resource. Add new routes as shown below.
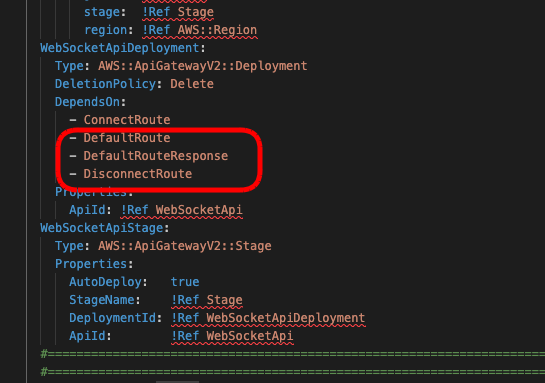
Next, underneath the ConnectRoute resource tag, add the new Routes for default and disconnect. These are almost the same as the ConnectRoute, with some changes to the names referenced in those resources.
DefaultRoute:
   Type: AWS::ApiGatewayV2::Route
   Properties:
     ApiId: !Ref WebSocketApi
     RouteKey: $default
     Target: !Join ["/", ["integrations", !Ref DefaultInteg]]
 DisconnectRoute:
   Type: AWS::ApiGatewayV2::Route
   Properties:
     ApiId: !Ref WebSocketApi
     RouteKey: $disconnect
     Target: !Join ["/", ["integrations", !Ref DisconnectInteg]]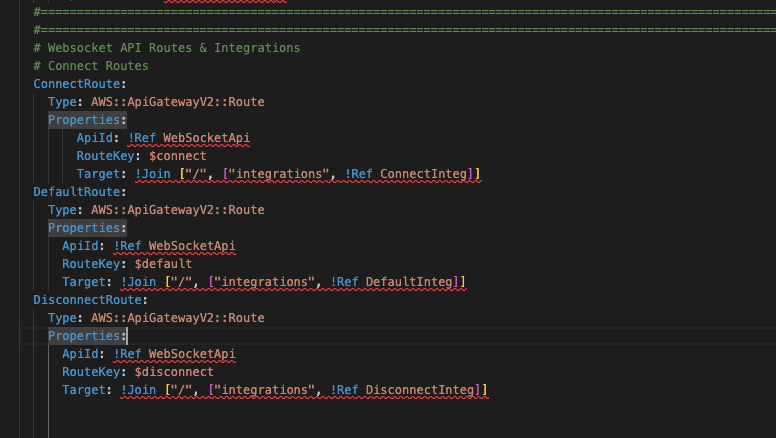
Next, we will add new integrations. Again, these are mostly the same as the ConnectInteg resources, with some references changed.
 DefaultInteg:
   Type: AWS::ApiGatewayV2::Integration
   Properties:
     ApiId: !Ref WebSocketApi
     IntegrationType: AWS_PROXY
     IntegrationUri: !Sub arn:aws:apigateway:${AWS::Region}:lambda:path/2015-03-31/functions/${DefaultFunction.Alias}/invocations
 DisconnectInteg:
   Type: AWS::ApiGatewayV2::Integration
   Properties:
     ApiId: !Ref WebSocketApi
     IntegrationType: AWS_PROXY
     IntegrationUri: !Sub arn:aws:apigateway:${AWS::Region}:lambda:path/2015-03-31/functions/${DisconnectFunction.Alias}/invocations
And we also have to add a RouteReponse resource, which we haven’t seen before. You can add this resource under the Integrations you just added.
 ## RESPONSES ##
 DefaultRouteResponse:
   Type: AWS::ApiGatewayV2::RouteResponse
   Properties:
     ApiId: !Ref WebSocketApi
     RouteId: !Ref DefaultRoute
     RouteResponseKey: $default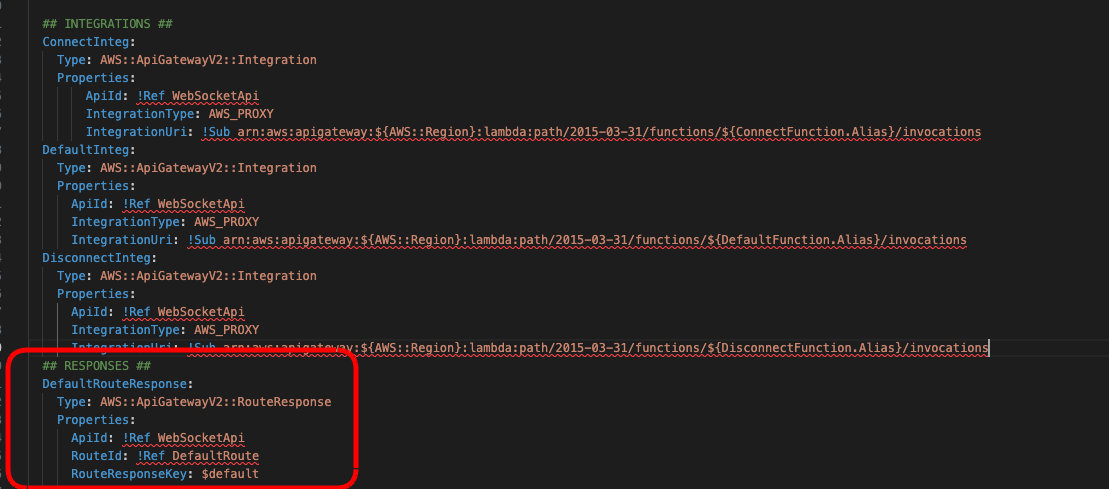
Now we can add Lambda functions for both of these new routes. Its important to take note of the name of the script you created earlier, in case you are using a different naming convention to this tutorial.
Add these resources below the ConnectionFunction resource.
Also note that the DefaultFunction does not need access to DynamoDB libraries for now so we didn’t add that to the Metadata.
 DefaultFunction:
   Type: AWS::Serverless::Function
   Properties:
     Handler: default.lambdaHandler
     CodeUri: src/
   Metadata: # Manage esbuild properties
     BuildMethod: esbuild
     BuildProperties:
       Minify: true
       Target: "es2020"
       Sourcemap: true
       EntryPoints:
       - default.ts
 DisconnectFunction:
   Type: AWS::Serverless::Function
   Properties:
     Handler: disconnect.lambdaHandler
     CodeUri: src/
   Connectors:
     ConnectionsConn:
       Properties:
         Destination:
           Id: ConnectionsTable
         Permissions:
           - Write
           - Read
   Metadata: # Manage esbuild properties
     BuildMethod: esbuild
     BuildProperties:
       Minify: true
       Target: "es2020"
       External:
       - "@aws-sdk/client-dynamodb"
       - "@aws-sdk/lib-dynamodb"
       Sourcemap: true
       EntryPoints:
       - disconnect.ts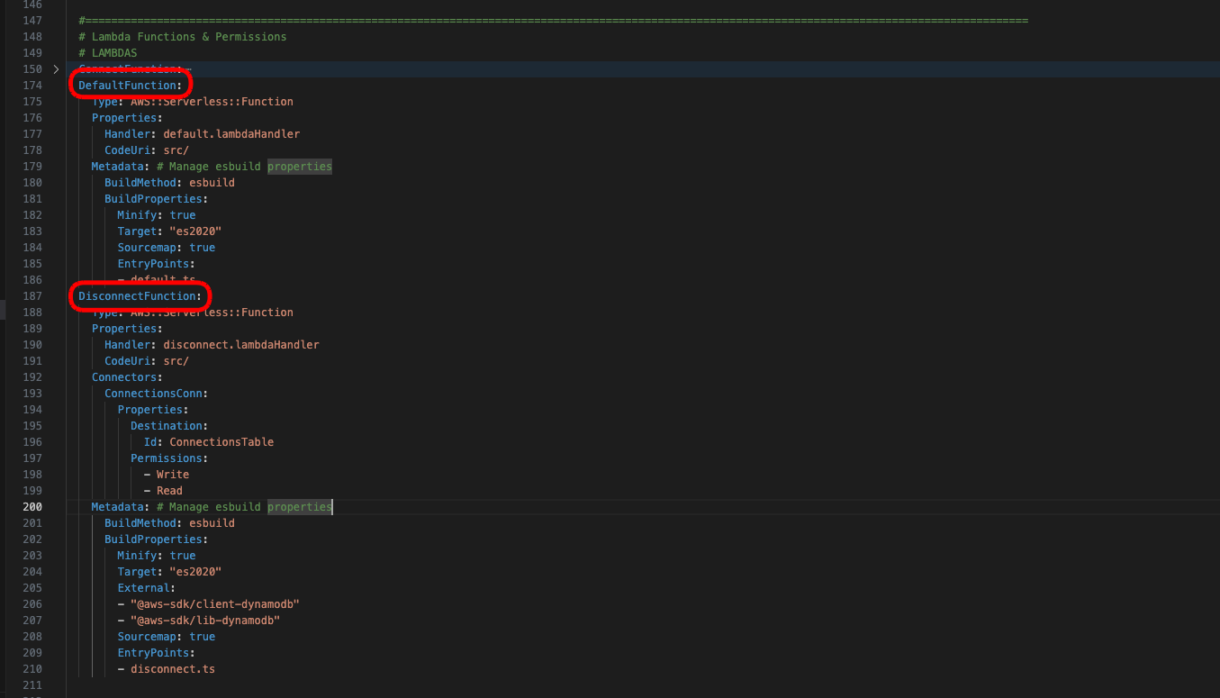
Note
The DisconnectFunction needs read and write permissions as we will need to find the connection record using the connectionId and then delete it using the playerId, as the playerId is the primary key.
And finally, we need to add permissions for those new Lambda functions. You can add these resources below the ConnectFunctionPermission resource.
DefaultFunctionPermission:
     Type: AWS::Lambda::Permission
     DependsOn:
       - WebSocketApi
     Properties:
       Action: lambda:InvokeFunction
       FunctionName: !Ref DefaultFunction.Alias
       Principal: apigateway.amazonaws.com
 DisconnectFunctionPermission:
   Type: AWS::Lambda::Permission
   DependsOn:
     - WebSocketApi
   Properties:
     Action: lambda:InvokeFunction
     FunctionName: !Ref DisconnectFunction.Alias
     Principal: apigateway.amazonaws.com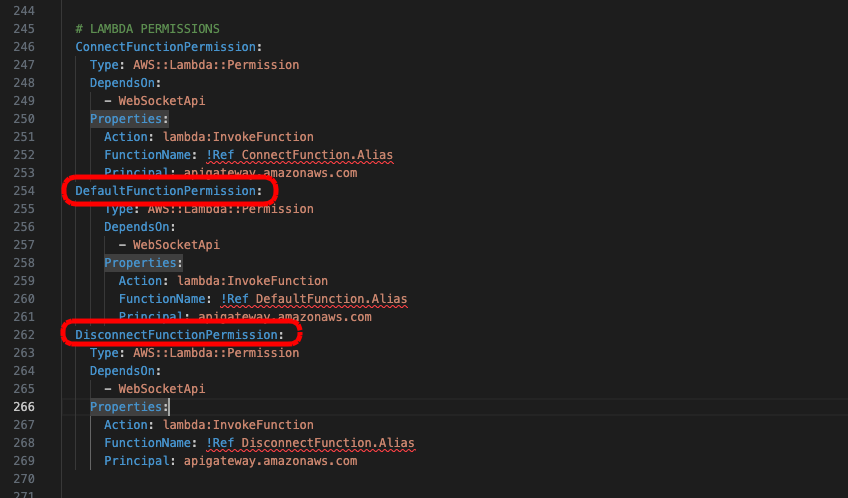
3 – Deploy & Testing
Now we can deploy these new resources by running the command. You should see your new routes appear in the API Gateway dashboard for this project.
sam build; sam deploy;
Now let’s test this in Postman.
After connecting to your websocket, add a message something like the following JSON and click the “Send” button.
{
   "route": "test1",
   "body" : {
       "test" : "1234"
   }
}
Send this message a few times and then disconnect the socket again by clicking on the “Disconnect” button.
Note
You will see some errors being returned from the default route. Ignore them for now, we will fix this in the next step.
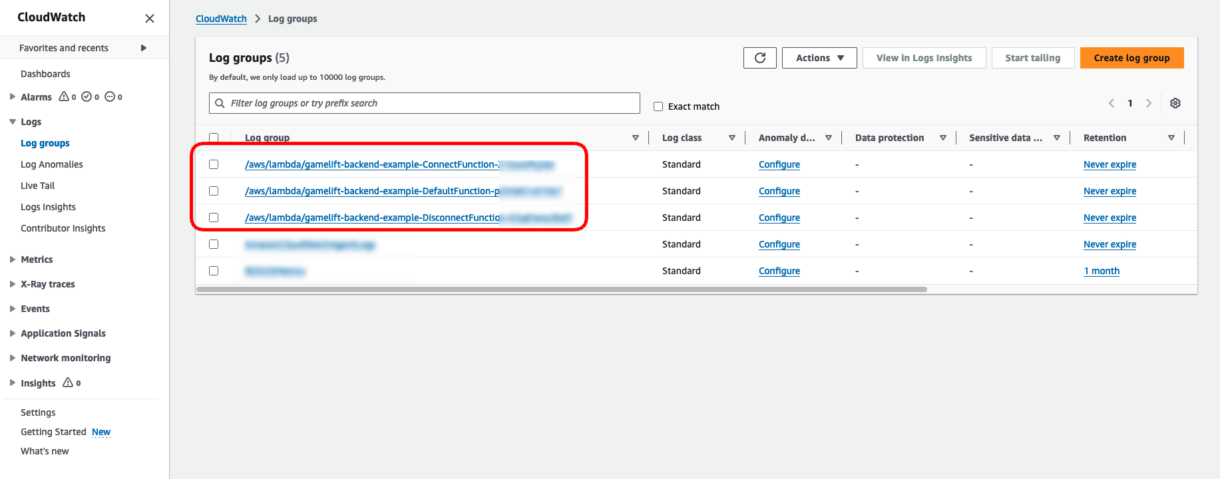
To confirm our routes are working as expected and raising our Lambda functions we will go to the CloudWatch dashboard in our AWS account. Click on the “Logs” menu on the left-hand side of the dashboard and then on “Log Groups”. You should see some log-groups there with the same names as your routes.
Note
It can take some time for log-groups to appear so if not all of them show up, wait a while and reload the page.
Check on the DefaultFunction log-group and select the most recent logs. You should see the console log from your Lambda script with level: INFO.
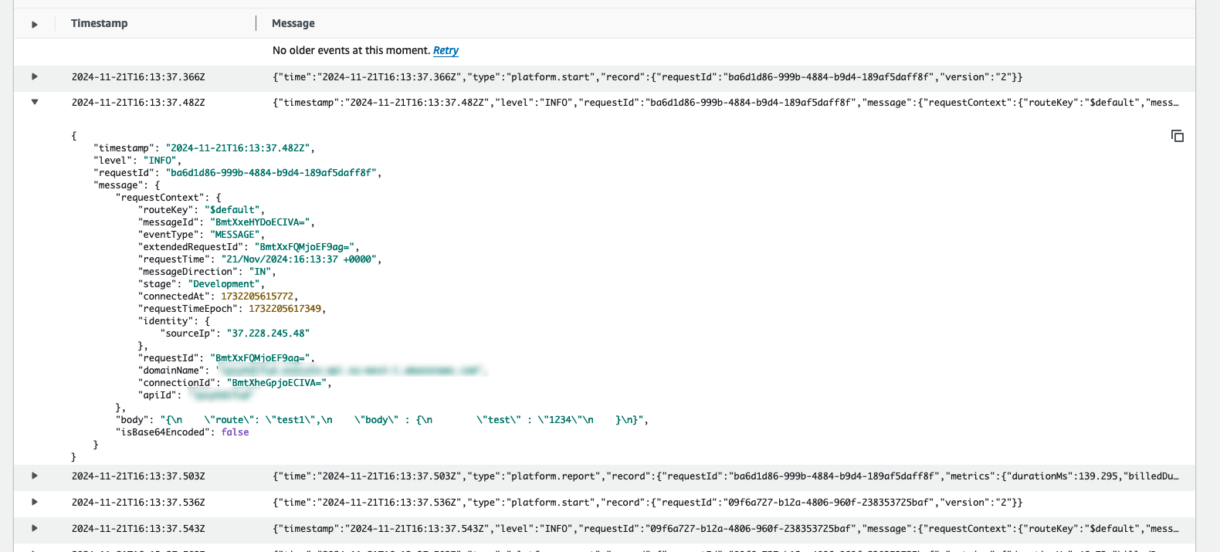
Do the same check for the DisconnectFunction log group and confirm that is also working as expected.s
4 – Default Route Response
We are going to need to add an error response to our default route so that user can be informed they are using an incorrect route.
To begin with, we will add a new script to our utils folder called “responseStructures.ts”.
Add the code below to this script. This code isn’t doing much at the moment, it is really just putting some structure on error responses based on the format the API requires from responses.
interface IResponseError {
   statusCode:     number,
   body:           string
}


export class ResponseError implements IResponseError {
   statusCode: number;
   body: string;
   constructor(_statusCode: number, _body: string){
       this.body = _body;
       this.statusCode = _statusCode;
   }
}
Next, in your default function script, we want to get the request name out of the payload, and then return a 404 “Not Found” error.
import { APIGatewayProxyEvent, APIGatewayProxyResult } from 'aws-lambda';
import { ResponseError } from './utils/responseStructures';


export const lambdaHandler = async (event: APIGatewayProxyEvent): Promise<APIGatewayProxyResult> => {
   //console.log(event);


   // [1] - We need the body of the request sent to the backend in JSON form //
   const requestBodyJSON: any = JSON.parse(event.body);
   // console.log(requestBodyJSON); // << for testing, comment out of prod code //


   // [2] - We need the request name for processing responses //
   const requestName: string = requestBodyJSON.route;


   // [3] - For the default route we want to return a generic error message //
   //          The only time the default script gets executed is when the incorrect route is send to the backend //
   return new ResponseError(404, `Route [${requestName}] Not Found`);


};
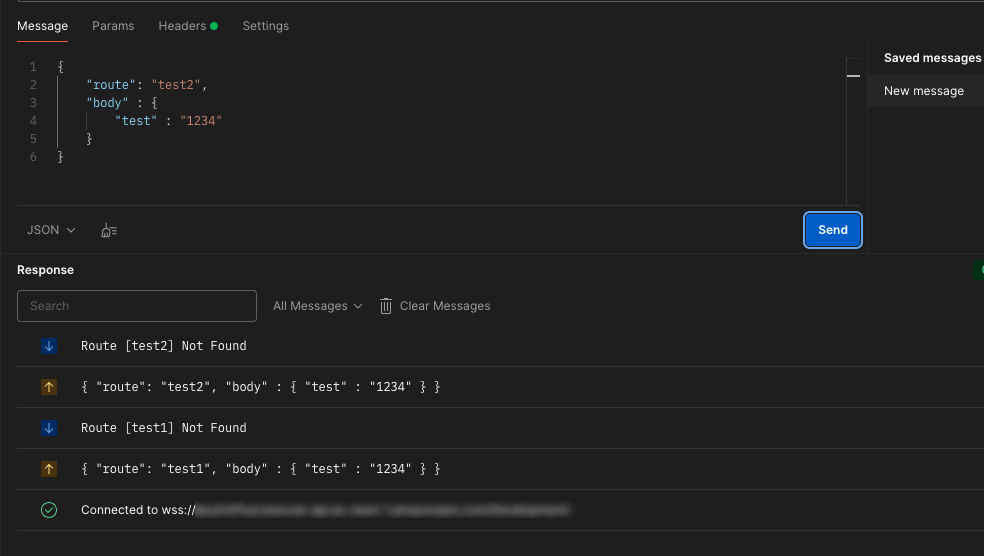
You can test this immediately by redeploying and calling any route from Postman. Since we don’t have any defined routes yet, all requests to the backend will be routed to the default route which will then return an error.
5 – Disconnect Function
Our disconnect function script will also be very simple. All it needs to do is delete the record in the DynamoDB table for the current player’s session.
We will add two new static functions to our DynamoHelper class.
   /**
    * Deletes an item with the given key from the table. Only works on primary keys.
    * @param primaryKeyValue   - The key of the item to be deleted
    * @param tableName         - The name of the table
    * @returns {boolean} true, if the item was deleted from the Table
    */
   static async DeleteItem(primaryKeyValue: string, primaryKeyName: string, tableName: string): Promise<boolean> {
       //console.log({ primaryKeyValue: primaryKeyValue, table: tableName }, "DynamoHelper: DeleteItem: arguments");
       const command = new DeleteCommand({
           TableName: tableName,
           Key: {
               [primaryKeyName] : primaryKeyValue
           }
       });


       try {
           const response: any = await dynamo.send(command);
           console.log("DynamoHelper: DeleteItem: success");
           return true;

       } catch (err) {
           console.error({ err }, "DynamoHelper: DeleteItem: error ");
           return false;
       }
   }


   /**
    * Queries the table for item(s) with the given secondary index
    * @param queryString           -   The string value you need to find
    * @param fieldName             -   the name of the field you are using to look up the value
    * @param secondaryIndexName    -   The name of the secondary index
    * @param tableName             -   The name of the table
    * @returns {any[]}             -   returns an array of documents or undefined if no documents were found returns an empty array
    */
   static async QuerySecondaryIndex(queryString: string, fieldName: string, secondaryIndexName: string, tableName: any): Promise<any[]> {
       const command = new QueryCommand({
           TableName: tableName,
           IndexName: secondaryIndexName,
           KeyConditionExpression: `#${fieldName} = :value`,
           ExpressionAttributeNames: {
             [`#${fieldName}`]: fieldName
           },
           ExpressionAttributeValues: {
             ":value": queryString
           }
       });


       try {
           const response: any = await dynamo.send(command);
           // console.log("DynamoHelper: QuerySecondaryIndex: success: "+JSON.stringify(response));
           if(response.Count > 0){
               return response.Items;
           }
           return [];

       } catch (err) {
           console.error({ err }, "DynamoHelper: QuerySecondaryIndex: error ");
           return [];
       }
   }
The first function is simply deleting the item with the given primary key. This is similar to the PutItem function. However, the QueryCommand is different due to how DynamoDB handles secondary keys and indexes.
Next we will add a new class for handling loading and deleting of player connection records and to make sure the structure of those DB items are formatted correctly.
Add a script called “playerConnectionRecords.ts” to the “utils” folder.
For now, this script will just define the structure of the DB item and load the record object based on either the player ID or the connection ID.
import { Config } from "./config";
import { DynamoHelper } from "./dynamo";


interface IPlayerConnectionRecord {
   expireAt:       number;
   connectionId:   string;
   stage:          string;
   domain:         string;
   playerId:       string;
}


export class PlayerConnectionRecord implements IPlayerConnectionRecord {
   readonly expireAt: number;
   readonly connectionId: string;
   readonly stage: string;
   readonly domain: string;
   readonly playerId: string;


   constructor(_dbItem: any){
       this.expireAt       = _dbItem.expireAt as number;
       this.connectionId   = _dbItem.connectionId as string;
       this.stage          = _dbItem.stage as string;
       this.domain         = _dbItem.domain as string;
       this.playerId       = _dbItem.playerId as string;
   }


   /**
    * Loads a player record from the database based on the playerId or connectionId
    * @param _playerId         {string} The playerId for the player
    * @param _connectionId     {string} The connectionId for the player
    * @returns                 {PlayerConnectionRecord}
    */
   static async LoadPlayerRecord(_playerId?: string, _connectionId?: string): Promise<PlayerConnectionRecord | undefined> {
       // console.log({ playerId: _playerId, connectionId: _connectionId }, "LoadPlayerRecord: arguments");


       // [1] - If we are loading the player using a playerId, this is the primary key so we can use the GetItem call from Dynamo //
       if(_playerId !== undefined){

           const playerDBRecrod: any = await DynamoHelper.GetItem(
               _playerId,
               Config.DynamoDB.ConnectionsTable.PrimaryKeyName,
               Config.DynamoDB.ConnectionsTable.TableName);


           if(playerDBRecrod !== undefined){
               return new PlayerConnectionRecord(playerDBRecrod);
           }
       }
       // [2] - If we are loading the player using the connectionId, then we need to query the secondary index //
       else if(_connectionId !== undefined){
           const playerDBRecrod: any = await DynamoHelper.QuerySecondaryIndex(
               _connectionId,
               Config.DynamoDB.ConnectionsTable.ConnectionKeyName,
               Config.DynamoDB.ConnectionsTable.ConnectionIndexName,
               Config.DynamoDB.ConnectionsTable.TableName);


           if(playerDBRecrod !== undefined && playerDBRecrod.length > 0){
               return new PlayerConnectionRecord(playerDBRecrod[0]);
           }
       }


       return undefined;
   }
}
And now in the disconnect script we can call this function. To keep things simple, we don’t need to check if the item actually was deleted in this function. Later, you might want to add this kind of error to another table, or even out to a CloudWatch log for monitoring.
import { APIGatewayProxyEvent, APIGatewayProxyResult } from 'aws-lambda';
import { Config } from './utils/config';
import { DynamoHelper } from './utils/dynamo';
import { PlayerConnectionRecord } from './utils/playerConnectionRecords';


export const lambdaHandler = async (event: APIGatewayProxyEvent): Promise<APIGatewayProxyResult> => {
   //console.log(event);                                                     // << for testing, comment out of prod code //


    const playerRecord: PlayerConnectionRecord | undefined = await PlayerConnectionRecord.LoadPlayerRecord(
        undefined,
        event.requestContext.connectionId
    );
   //          If the playerRecord wasnt found there there is nothing to delete so we dont have to worry   //
   //              we could log an error to the console so we can track these in our project               //
   if(playerRecord != undefined){
       // [3] - Delete the recod from the table based on the playerId //
       var playerId = playerRecord.playerId;
       var primaryKeyName = Config.DynamoDB.ConnectionsTable.PrimaryKeyName
       var tableName = Config.DynamoDB.ConnectionsTable.TableName
       if(!await DynamoHelper.DeleteItem(playerId, primaryKeyName, tableName)){
           console.error("Connections Table - failed to delete item with playerId: "+playerRecord.playerId);
       }
   }
};
Deploy your project again, and you can test this by going to the DynamoDB table in your AWS account and checking if the record is added when the socket makes a connection and then that it has been removed when the socket disconnects.
Summary
In this section of the tutorial we added the next two routes needed for our websocket application to function correctly.
In the next section, we are going to add a new, custom route, which will let us send messages asynchronously to other players.
6 – [SendMessage Route] Introduction
This is the sixth in a series of tutorials covering how to set up a GameLift backend AWS using serverless websockets.
You can find a link to the previous tutorial here, which covers setting up the AWS SAM template project and connecting to the websocket.
In this tutorial we are going to take a look at some further required functionality our websocket project will need before we can start working on GameLift-specific features. Before we move onto working with GameLift APIs, we want to make sure that we can send messages asynchronously to players who are connected to our backend.
1 – SendMessage Route
For this we are going to make a new, generic route, called SendMessage.
This route will take an array of player IDs, and a message string and it will deliver that message to all player IDs in that array asynchronously.
We can add this route to our template.yml in the same way we added the default and disconnect routes.
First add the route and response to the WebSocketApiDeployment resource.
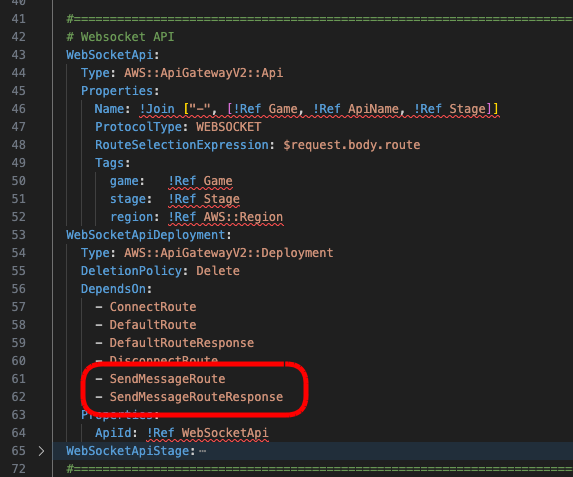
Next add the route below the default and disconnect route resources.
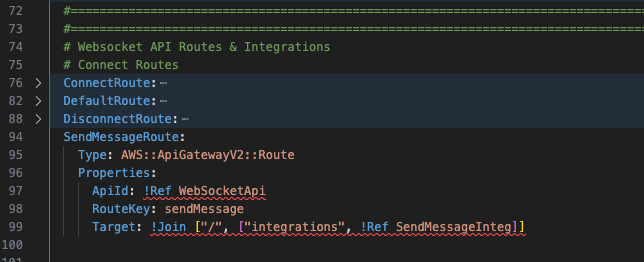
Next add the integration below the default and disconnect integrations.

And finally add the RouteResponse below the DefaultRouteResponse resource.

Now we can move on to setting up our new Lambda function.
Add a new Lambda function resource below the DisconnectFunction.
 SendMessageFunction:
   Type: AWS::Serverless::Function
   Properties:
     Handler: sendMessage.lambdaHandler
     CodeUri: src/
   Connectors:
     ConnectionsConn:
       Properties:
         Destination:
           Id: ConnectionsTable
         Permissions:
           - Read
     MessagesConn:
       Properties:
         Destination:
           Id: MessagesTable
         Permissions:
           - Write
   Metadata: # Manage esbuild properties
     BuildMethod: esbuild
     BuildProperties:
       Minify: true
       Target: "es2020"
       External:
       - "@aws-sdk/client-dynamodb"
       - "@aws-sdk/lib-dynamodb"
       Sourcemap: true
       EntryPoints:
       - sendMessage.ts
Note in the resource above we have added a new connection to the Connectors tag. This will be a new DynamoDB table we’ll also be adding shortly.
Now we will add a new permission for this function which you can add below the DisconnectFunctionPermission resource.
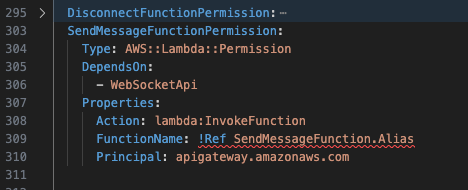
And finally, create a new script called sendMessage.ts in the root of your project and add a generic Lambda handler function into that script.
import { APIGatewayProxyEvent, APIGatewayProxyResult } from 'aws-lambda';


export const lambdaHandler = async (event: APIGatewayProxyEvent): Promise<APIGatewayProxyResult> => {
   console.log(event);
   return {
       statusCode: 200,
       body:   'Message(s) Sent'
   }


};
The SendMessage route and Lambda function are now set up, however, we cannot deploy until we set up the new MessagesTable with DynamoDB.
This table will be different from the ConnectionsTable however, so let’s take a look at this now.
2 – Messages Table
This table is going to store all messages that are sent to players. It will contain a message ID, unique to each message, the player ID who is going to receive the messages (we are calling this the recipient ID), the player ID of the player who sent the message (the sender ID), the message body, and an expiry time after which the messages are deleted from the table.
What is different for this table is that, any record saved to this table will trigger a DynamoDB Event which will invoke a Lambda function. In this Lambda function we will process the message and deliver it to the player.
Let’s set this up now.
As with the ConnectionsTable, we want to add a new global parameter to the template.yml which will let us reference the table name in our code.
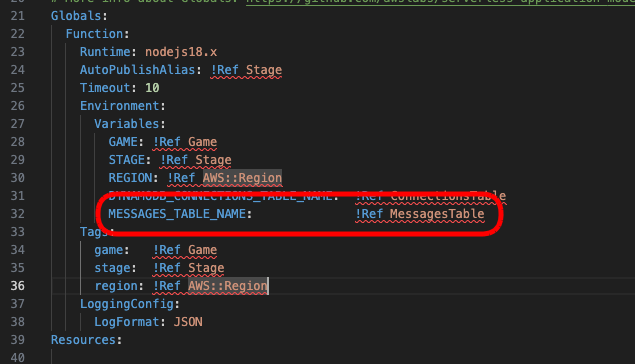
Next, we will add the Lambda function which the DynamoDB Events Stream will invoke. You can add this below the SendMessageFunction resource.
 OnMessageInsertedFunction:
   Type: AWS::Serverless::Function
   Properties:
     Handler: onMessageInserted.lambdaHandler
     CodeUri: src/
     Policies:
       - Statement:
         - Effect: Allow
           Action: execute-api:ManageConnections
           Resource: '*'
     Events:
       DynamoDBTrigger:
         Type: DynamoDB
         Properties:
           Stream: !GetAtt MessagesTable.StreamArn
           StartingPosition: LATEST
   Connectors:
     ConnectionsConn:
       Properties:
         Destination:
           Id: ConnectionsTable
         Permissions:
           - Read
   Metadata: # Manage esbuild properties
     BuildMethod: esbuild
     BuildProperties:
       Minify: true
       Target: "es2020"
       External:
       - "@aws-sdk/client-dynamodb"
       - "@aws-sdk/lib-dynamodb"
       - "@aws-sdk/client-apigatewaymanagementapi"
       Sourcemap: true
       EntryPoints:
       - onMessageInserted.ts
This function will need read access to the ConnectionsTable but it will not actually need permissions for the MessagesTable as the event stream will pass to it the details of the message that was written to the table.
You can also see in the Metadata tag that we are adding a new external library so that this Lambda function can send messages down the socket to players.
Now we can add the table under the ConnectionsTable resources.
 MessagesTable:
   Type: AWS::DynamoDB::Table
   Properties:
     AttributeDefinitions:
       - AttributeName: recipientId
         AttributeType: S
       - AttributeName: messageId
         AttributeType: S
     KeySchema:
       - AttributeName: messageId
         KeyType: HASH               # HASH allows DynamoDB to partition keys
     BillingMode: PAY_PER_REQUEST
     GlobalSecondaryIndexes:
       - IndexName: RecipientIdIndex
         Projection:
           ProjectionType: ALL
         KeySchema:
           - AttributeName: recipientId
             KeyType: HASH
     TimeToLiveSpecification:
       Enabled: true
       AttributeName: expireAt
     StreamSpecification:
       StreamViewType: NEW_IMAGE
     Tags:
       - Key: game
         Value: !Ref Game
       - Key: stage
         Value: !Ref Stage
       - Key: region
         Value: !Ref AWS::Region
Create a new script called “onMessageInserted.ts” in the root of your script, and add the generic Lambda handler function code as we did before.
And finally we want to add our new table details to the config.ts file.
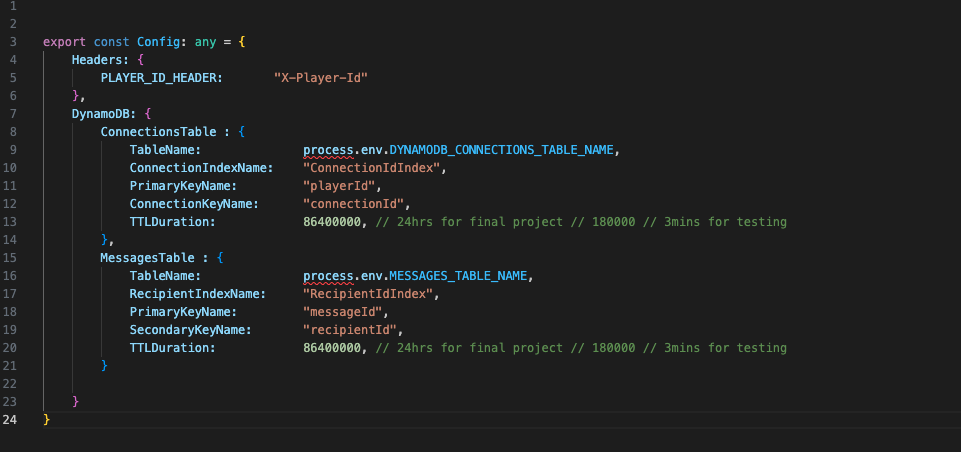
Build and deploy your project again now and check that all the new resources have been deployed.
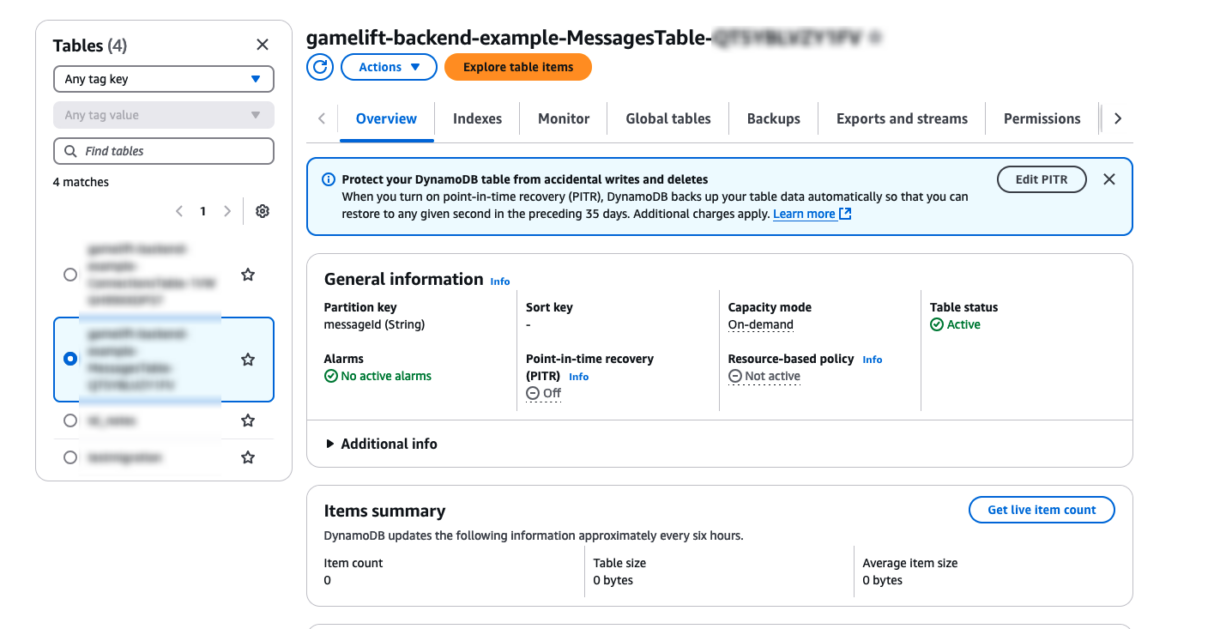
In the DynamoDB dashboard of your AWS account you will see the new MessagesTable.
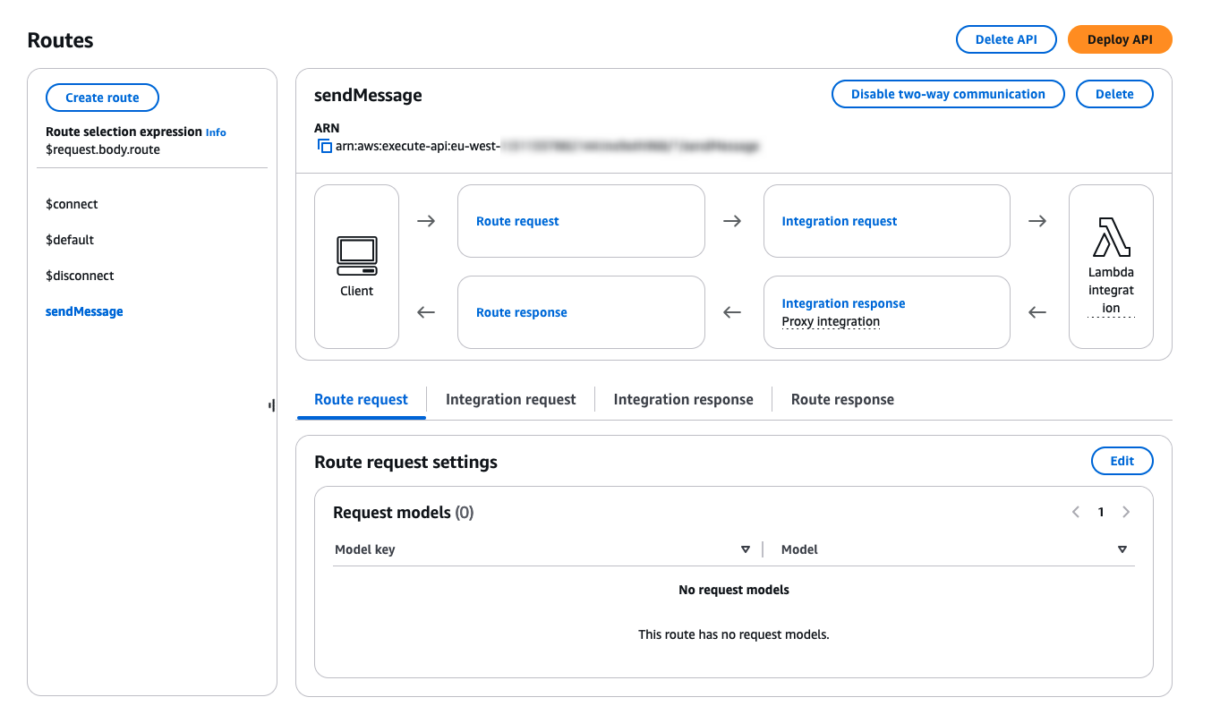
And in the API Gateway dashboard you will see the new sendMessage route.
Test your new sendMessage route in Postman using the following JSON payload.
{
   "route" : "sendMessage",
   "body" : {
       "playerIds" : ["88888888"],
       "message" : "Hello Me"
   }
}
For now, you should see a response from your route indicating that everything is working so far.

3 – Pushing Messages To MessagesTable
Now we need to start pushing messages into the MessagesTable from the sendMessage script.
This script is going to preform the following actions:
- We will validate that there is a param called “message” in the body of the request.
- We will validate that there is a param called “playerIds” in the body of the request.
Note here that we wont do additional validation on these params for the sake of brevity, but you could add validation for data-types formatting of these params later if you wish.
- We will load the player record for the sender so that we can get their player ID.
- We will load the player records of the recipients.
- We will iterate through these recipients, creating a new Message object and then saving this Message object to the MessagesTable.
BatchGet & BatchPut
DynamoDB allows you to get a batch of items at once instead of loading them one by one. We will be using this for loading player records in batches. However, there are limitations to this API call (docs here).
We can only load 100 items at a time or a total of 16MB worth of data. This means that if you wish to modify the example to send more than 100 messages, you will need to add some of your own code.
This example is really just for GameLift setups so we wont need more than 100 players to be sent messages at once, but you can do this yourself. Keep in mind that batching sets of 100 players in a loop could be hard on the DB and may result in throttling.
Despite this, BatchGetItem is a very efficient way to load multiple records at once, and because the player ID is the primary key, we don’t need an additional call to the DB in order to get player records this way so it is more efficient.Likewise, there is a BatchWriteItem function API available with DynamoDB, which also has its own limitations. We are not using this API for this example, however, if you intend to send messages in batches more than 25, you could consider using this function. In practice, SuperNimbus would use batch functions where possible, but to keep the example simple we are going to use them here.
4 – LoadRecordBatch
Before we start writing out the sendMessage function we need to add two new functions to our PlayerConnectionRecord class.
/**
    * Returns an array of connection records for each player in the playerId list
    * @param _playerIds - {string[]} a list of playerIds corresponding to connection records
    * @returns {PlayerConnectionRecord[]}
    */
   static async LoadRecordBatch(_playerIds: string[]): Promise<PlayerConnectionRecord[]> {
       // [1] - Before sending the request to dynamo we have to remove duplicates //
       _playerIds = [...new Set(_playerIds)];

       // console.log({ playerIds: _playerIds }, "PlayerConnectionRecord: LoadBatch: arguments");


       let playerConnectionList: PlayerConnectionRecord[] = [];
       const playerDbRecordList: any[] = await DynamoHelper.GetItemsBatch(
           _playerIds,
           Config.DynamoDB.ConnectionsTable.PrimaryKeyName,
           Config.DynamoDB.ConnectionsTable.TableName
       );
       if(playerDbRecordList.length > 0){
           playerDbRecordList.forEach(dbRecord => {
               const playerConnectionRecord: PlayerConnectionRecord = PlayerConnectionRecord.ParseDBItem(dbRecord)
               if(playerConnectionRecord != undefined){
                   playerConnectionList.push(playerConnectionRecord);
               }
           });
       }
       return playerConnectionList;
   }


   /**
    * Parses a dynamoDB item into a PlayerConnectionRecord object
    * @param dbItem        - the db item JSON returned from Dynamo
    * @returns             {PlayerConnectionRecord}
    */
   static ParseDBItem(dbItem: any): PlayerConnectionRecord {
       // console.log({ dbItem: dbItem }, "ParseDBItem: arguments");


       return new PlayerConnectionRecord({
           playerId:       dbItem.playerId["S"] as string,
           connectionId:   dbItem.connectionId["S"] as string,
           stage:          dbItem.stage["S"] as string,
           domain:         dbItem.domain["S"] as string,
           expireAt:       dbItem.expireAt["N"] as number
       });
   }
You can see that before we return PlayerConnectionRecords from the LoadRecordBatch function, we are parsing those objects from DBItems to PlayerConnectionRecord object.
This is because we are going to use a different DynamoDB API for the BatchGetItemCommand and this API returns a DynamoDB Item instead of an object. We therefore have to parse that object in order for us to use it.
Next we can add the GetItemsBatch function to the DynamoHelper class.
   /**
    * Returns a list of dynamo items based on a list of primary key values
    * @param primaryKeyList        - The list of primary key values
    * @param primaryKeyName        - The name of the primary key in the table
    * @param tableName             - The name of the table
    * @returns {any[]}
    */
   static async GetItemsBatch(primaryKeyList: string[], primaryKeyName: string, tableName: any): Promise<any[]> {
       //console.log({ primaryKeyList: primaryKeyList }, "DynamoHelper: GetItemsBatch: arguments");


       // first we need to convert the key list into a format dynamo can use  //
       let keysArray: any[] = [];
       primaryKeyList.forEach(key => {
           keysArray.push({
               [primaryKeyName]: { "S" : key }
           });
       });
       const command = new BatchGetItemCommand({
           RequestItems: {
               [tableName]: { Keys: keysArray }
           }
       });


       try {
           const response: any = await client.send(command);
           if(response.Responses[tableName].length > 0){
               return response.Responses[tableName];
           }
           return [];

       } catch (err) {
           console.error({ err }, "DynamoHelper: GetItemsBatch: error ");
           return [];
       }
   }
Now our sendMessage function will be able to load an array of player records to send messages to.
5 – Message Structures
We will define message structure now so that we can formally add messages to the MessagesTable. You can modify this code for your use-case if you like, this is just a standard example.
Create a new script in the “utils” folder called messageStructures.ts and add the following code.
import { Config } from "./config";
import { DBMessageItem } from "./dynamo";


interface IMessage {
   messageId: string;
   recipientId: string;
   senderId: string;
   message: string;
   expireAt: number;
}


export class Message implements IMessage {
   messageId: string;
   recipientId: string;
   senderId: string;
   message: string;
   expireAt: number;


   constructor(_recipientId: string, _senderId: string, _message: string){
       this.messageId =    Math.random().toString(16).slice(2); // << generate random Id
       this.recipientId =  _recipientId;
       this.senderId =     _senderId;
       this.message =      _message;
       this.expireAt =     ((new Date().getTime()+Config.DynamoDB.MessagesTable.TTLDuration)/1000)
   }


   /**
    * Converts the Message object into a DBMesageItem object which can be stored in Dynamo
    * @returns {DBMessageItem}
    */
   ParseToDBMessageItem(): DBMessageItem {
       const dbItem: DBMessageItem = {
           messageId:      this.messageId,
           recipientId:    this.recipientId,
           senderId:       this.senderId,
           message:        this.message,
           expireAt:       this.expireAt
       }
       return dbItem;
   }


   /**
    * Converts raw DynamoDB items to Message objects
    * @param _dbItemData - {any} This object comes directly from the dynamo client
    * @returns {Message}
    */
   static ParseDBItem(_dbItemData: any): Message {
       let newMesage: Message = new Message(
           _dbItemData.recipientId["S"] as string,
           _dbItemData.senderId["S"] as string,
           _dbItemData.message["S"] as string,
       );
       newMesage.messageId =   _dbItemData.messageId["S"] as string;
       newMesage.expireAt =    _dbItemData.expireAt["N"] as number;
       return newMesage;
   }
}


interface IOnMessageUpdated {
   messageId: string;
   senderId: string;
   recipientId: string;
   creationTime: number;
   messageDetails: Message
}


export class OnMessageUpdated implements IOnMessageUpdated {
   messageId: string;
   senderId: string;
   recipientId: string;
   creationTime: number;
   messageDetails: Message;

   constructor(_dynamoRecordEvent: any){
       this.messageId =            _dynamoRecordEvent.Keys["messageId"]["S"] as string;
       this.creationTime =         _dynamoRecordEvent.ApproximateCreationDateTime as number;
       this.messageDetails =       Message.ParseDBItem(_dynamoRecordEvent["NewImage"]);
       this.senderId =             this.messageDetails.senderId;
       this.recipientId =          this.messageDetails.recipientId;
   }
}
You can also see here that we need some functions for parsing messages from the raw DB structure and from the object to the DB structure.
This will be used later in the onMessageInserted function as we dont want to load messages from the DB in that function because it’s payload already contains this information.
Its payload does contain the message ID, so we could load the message and forgo parsing it, however, that would be one more DB call that we need and we should always attempt to design our backend in a way that reduces the number of hits to the DB whenever possible.
We now have everything we need for our sendMessage function. Add the following code to that script.
import { APIGatewayProxyEvent, APIGatewayProxyResult } from 'aws-lambda';
import { ResponseError } from './utils/responseStructures';
import { DBMessageItem, DynamoHelper } from './utils/dynamo';
import { Config } from './utils/config';
import { PlayerConnectionRecord } from './utils/playerConnectionRecords';
import { Message } from './utils/messageStructures';


export const lambdaHandler = async (event: APIGatewayProxyEvent): Promise<APIGatewayProxyResult> => {
   // console.log(event);
   const requestBodyJSON: any = JSON.parse(event.body);


   // [1] - First we want to validate the request parameters                                       //
   //          If the request body does not have a message or playerIds field then it is invalid   //
   if(requestBodyJSON.body["playerIds"] == undefined){
       return new ResponseError(400, "Missing Params [playerIds(array)]");
   }
   if(requestBodyJSON.body["message"] == undefined){
       return new ResponseError(400, "Missing Params [message(string)]");
   }


   const message: string =     requestBodyJSON.body["message"];
   const playerIds: string[] = requestBodyJSON.body["playerIds"];
   // note - you could do additional validation before assigning these params so that they are the correct type //


   // [2] - Load the current player so we can get their Id //
   const currPlayerRecord: PlayerConnectionRecord | undefined = await PlayerConnectionRecord.LoadPlayerRecord(
       undefined,
       event.requestContext.connectionId
   );


   // [3] - Load a batch of player connection records based on the playerIds we want to send messages to //
   const recipientRecordList: PlayerConnectionRecord[] = await PlayerConnectionRecord.LoadRecordBatch(playerIds);
   for(let i: number = 0; i < recipientRecordList.length; i++){
       const playerRecord: PlayerConnectionRecord = recipientRecordList[i];


       // [4] - Create a new message object so we can send it to this player //
       const newMessage: Message = new Message(playerRecord.playerId, currPlayerRecord?.playerId || "undefined", message);


       // [5] - Add this message to the message table //
       if(!await DynamoHelper.PutItem(newMessage.ParseToDBMessageItem(), Config.DynamoDB.MessagesTable.TableName)){
           console.error("failed to update message table");
       }
   }


   return {
       statusCode: 200,
       body:   'Message(s) Sent'
   }
};
You can now build and deploy your backend.
6 – Testing Message Insertion
Before we test the sendMessage function we would like to how you an easy way to debug these functions using AWS CloudWatch.
This function should now write messages to the MessagesTable, so we will see them there if it works. But it should also trigger the table to invoke the onMessageInserted Lambda function.
To test this, go to the log-groups in your CloudWatch dashboard and delete all the current logs for your project by selecting them and choosing delete from the “Actions” dropdown.

Now connect to the websocket and send the sendMessage request with the example JSON from before.
If you wait a little while and refresh the page you should see the OnMessageFunction logs show up.

This means that your OnMessageFunction was invoked correctly.
You can also check that the message was inserted from the MessageTable explorer.
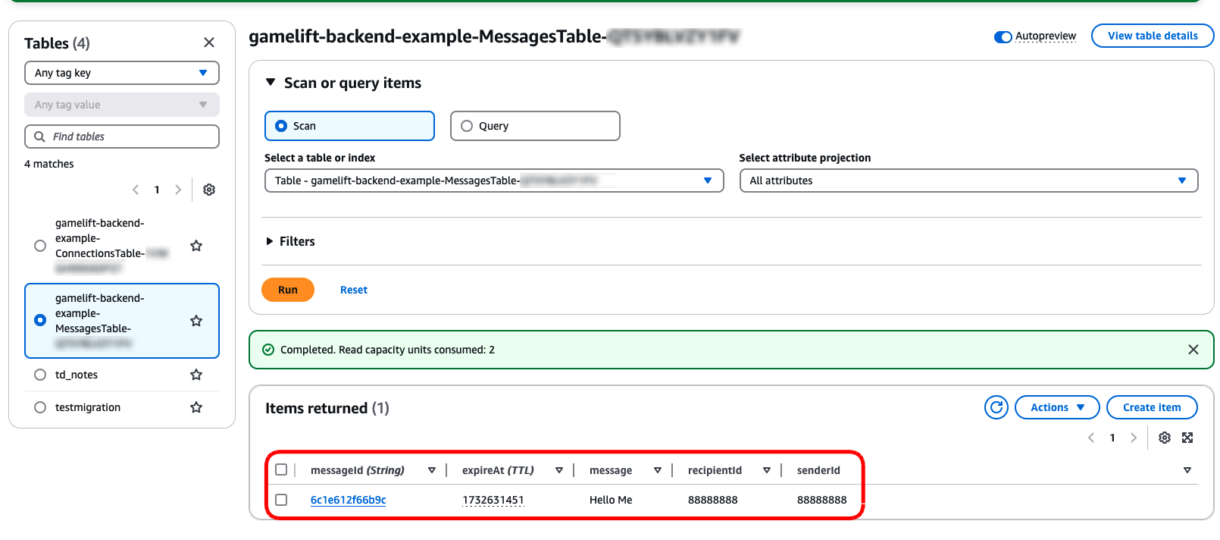
7 – OnMessageInserted
Now that we know the OnMessageInserted Lambda function is being invoked, lets head back and get it to send messages to players asynchronously.
Before we do that, you can check out what the payload for that request looks like by going to the log-group for that function in CloudWatch.
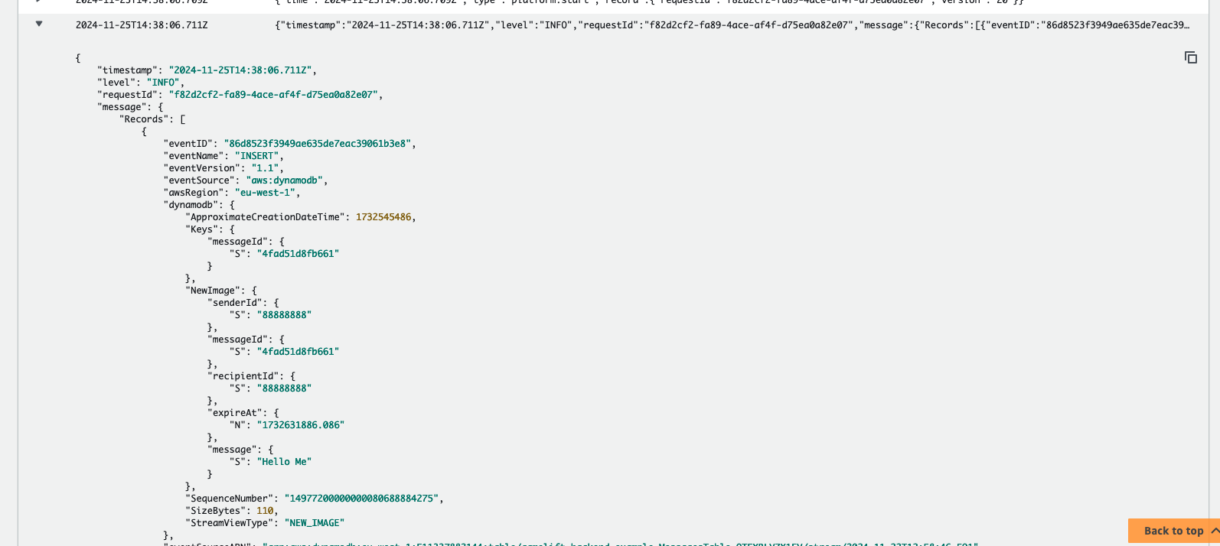
You can see here that the payload contains the message details in the raw DB form, as well as the message ID (the primary key) and the creation date.
It also tells us if there was an update, deletion or insert in the “eventName” field, so we can use that to stop messages being sent out for other events.
Summary
In this section of the tutorial we added the next two routes needed for our websocket application to function correctly and tested out some asynchronous functionality at the same time.
In the next section, we are going to take a look at hooking up GameLift-specific requests for placing players into sessions.
7 – [Session Placement Request] Introduction
This is the seventh in a series of tutorials covering how to set up a GameLift backend using serverless websockets.
You can find a link to the previous tutorial here, which covers setting up the AWS SAM template project and connecting to the websocket.
In this tutorial we are going to take a look at some other required functionality our websocket project will need before we can start working on GameLift-specific features.
The first thing we need to do is create a new Route and hook it up to a new Lambda function in our template.yml. This Route will later be used to request session placement from GameLift but for now we will use it for testing our messaging and disconnects.
Each new route we are going to add will also be linked with a new Lambda function, so as we add functionality to our API, our template.yml does become more complex.
Multiple Functions Or One Large Function?
Something to note here is that we are creating separate Lambda functions for each of the operations our socket-backend will perform.
We could combine all of this functionality into one Lambda function and separate it out with different handler functions within that script, or even a single function with a switch-case based on the action being performed.
So why do we separate them out in this example?
Lambda functions scale automatically, so if, for example, we have 10 users online at a given point in time, and they all want to connect at the same time, AWS Lambda will scale up 10 Lambda functions and everything will be okay.
However, if that Lambda function is responsible for more than one operation, any inefficiencies (errors, bottlenecks, retries, slow response times, etc) will only be visible from that one Lambda. So, for example, if your authentication flow is slow, prone to timeouts, etc, it will affect all other operations in that function, as AWS Lambda will respond by scaling up. It will also make it harder to debug, as poorly performing Lambda functions could be doing a number of different things that are unknown by looking at surface-level metrics.
Separating our operations into separate Lambda functions allows us to monitor these processes independently, and also allow us to add specific rules as to how Lambda functions should scale, and identify any bottlenecks or issues with specific Lambda functions.
We will explore this in a later section on load testing this project.
Setting up a new route for our websocket API is pretty similar to the way we set things up previously. The only thing to be careful about is to make sure you are editing the correct place in the template.yml, as we sometimes will need to edit parts which have already been configured.
1 – Adding New Connection Route
First we will add a new connect route dependency to the websocket API. Find the tag in your template.yml called WebSocketApiDeployment and add the following route to its configuration.
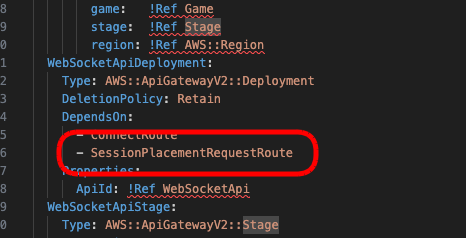
Now we are going to add this new route and the corresponding integration for our Lambda function. Add this below the ConnectRoute and ConnectInteg tags.
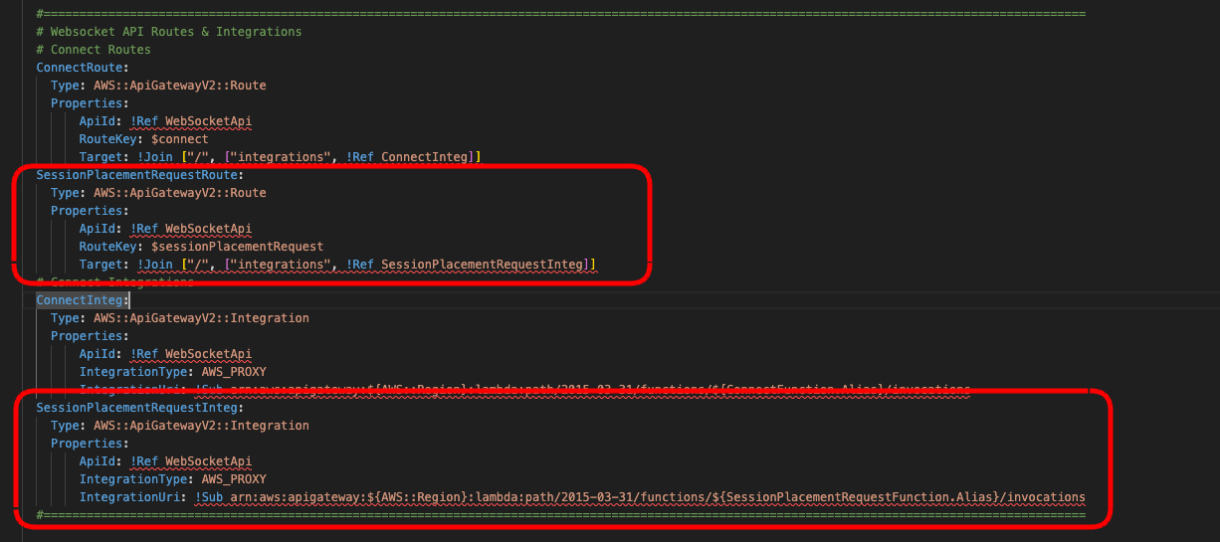
Important
The sessionPlacementRequest route key is custom so it should not include the ‘$’ before it like the ConnectRoute has.
2 – Add Session Request Lambda Function
Next we need to define a new Lambda function in our template.yml. This new Lambda function will be the same as the existing ConnectFunction, just with the entry point configured to invoke a different script.
SessionPlacementRequestFunction:
   Type: AWS::Serverless::Function
   Properties:
     Handler: sessionPlacementRequest.lambdaHandler
     CodeUri: src/
   Connectors:
     ConnectionsConn:
       Properties:
         Destination:
           Id: ConnectionsTable
         Permissions:
           - Write
           - Read
   Metadata: # Manage esbuild properties
     BuildMethod: esbuild
     BuildProperties:
       Minify: true
       Target: "es2020"
       External:
       - "@aws-sdk/client-dynamodb"
       - "@aws-sdk/lib-dynamodb"
       Sourcemap: true
       EntryPoints:
       - sessionPlacementRequest.ts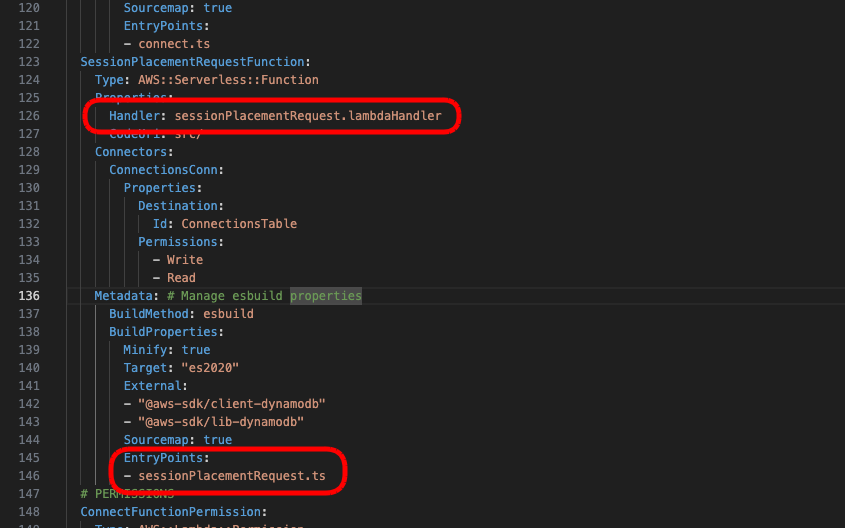
And next we add the permission for our SessionPlacementRequestFunction. Again, this is the same as the one we created for the ConnectFunction.
SessionPlacementRequestFunctionPermission:
   Type: AWS::Lambda::Permission
   DependsOn:
     - WebSocketApi
   Properties:
     Action: lambda:InvokeFunction
     FunctionName: !Ref SessionPlacementRequestFunction.Alias
     Principal: apigateway.amazonaws.com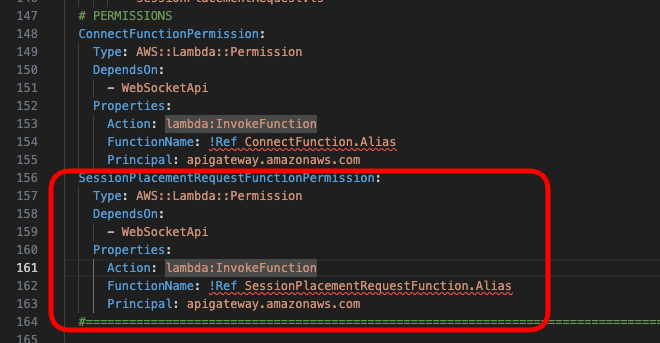
And lastly, we need to create the new sessionPlacementRequest.ts script in the “src” folder of our project. Just to test our new route, we will add some logs at the start of our handler function before we add more functionality to this session placement request.
import { APIGatewayProxyEvent, APIGatewayProxyResult } from 'aws-lambda';


export const lambdaHandler = async (event: APIGatewayProxyEvent): Promise<APIGatewayProxyResult> => {
   console.log(">>>>>> SESSION PLACEMENT REQUEST.lambdaHandler");
   console.log(event);


   return {
       statusCode: 200
   };
};
