Slack Vacation Bot Tutorial – Slack Calendar Notifications
- Sean Durkan
- 24th May 2023
- Integration Guides
In this tutorial we are going to follow on from the Annual Leave Calendar Google Sheet we created and add a Slack integration which will report the daily and weekly AL for each employee to a shared channel in Slack.
Creating A Slack App
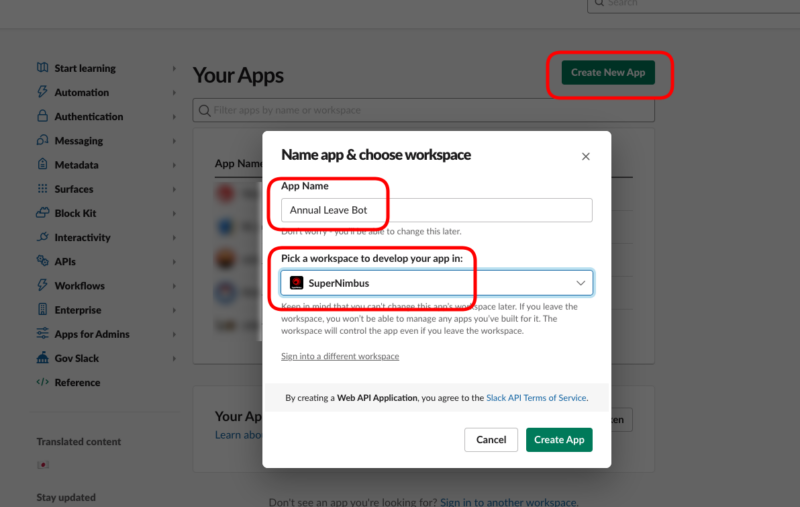
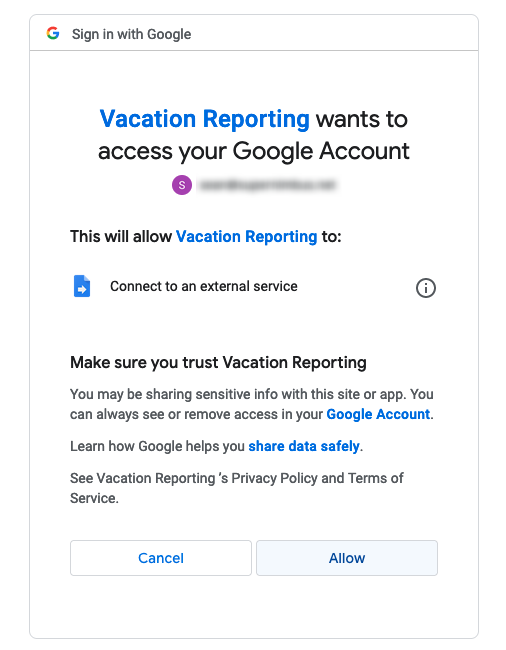
In order to create a new Slack app you will need to be logged into your slack workspace as an admin. You can see your Slack apps listed here.
Click on the “Create New App” button and enter the name of your app and the workspace you want to apply the bot to. Click on the “Create App” button to proceed.
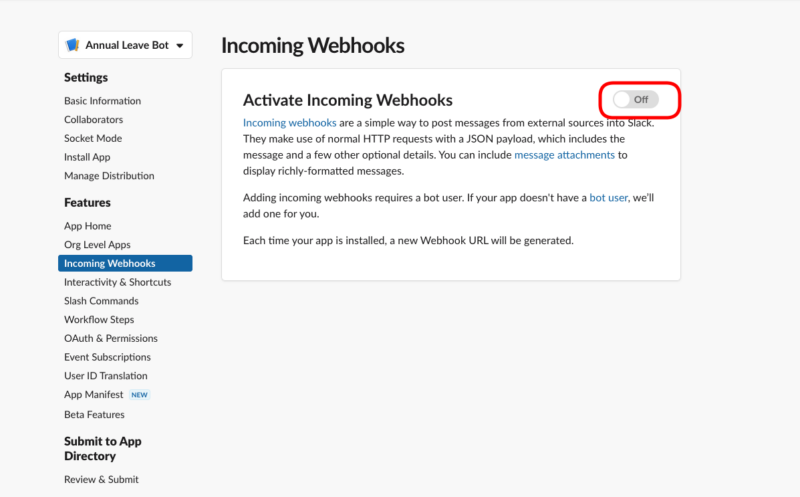
Now that your app has been created it will ask you for some basic information. The important things we need to check at this stage are the features and functionality section. We need to enable “Incoming Webhooks”.
Incoming Webhooks
Click on this option and you will be taken to a page titled “Activate Incoming Webhooks”. Click on the toggle to enable webhooks.
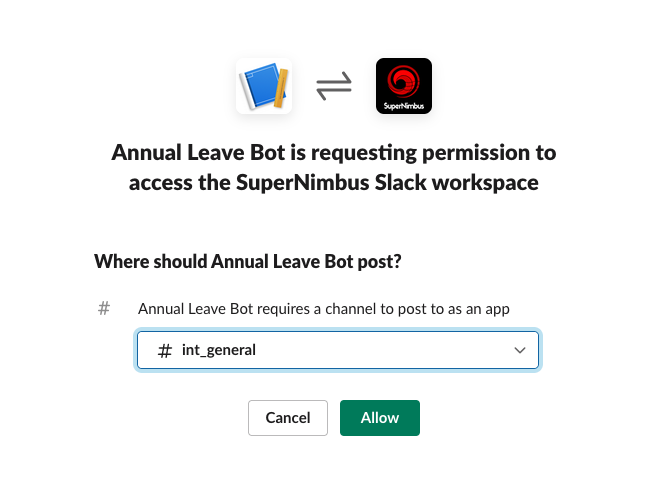
Enabling this toggle will display some info for the webhook URL for your Slack app, however, it will not create the URL until you click on “Add New Webhook to Workspace”.
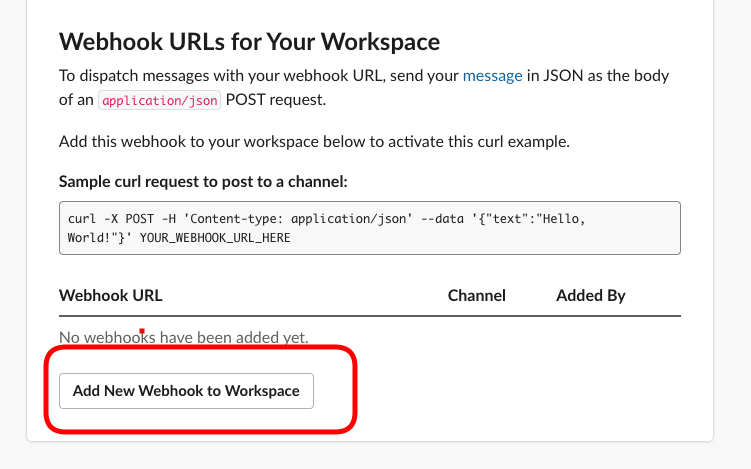
This will open a new page asking you which channel you want the app to post to. In our case these reports go to the #general channel.
Note – This will not affect the slash command we will add in a future tutorial.
You should now be able to see the URL for your webhook along with an example curl command which you can use to test if things are set up correctly at this point.
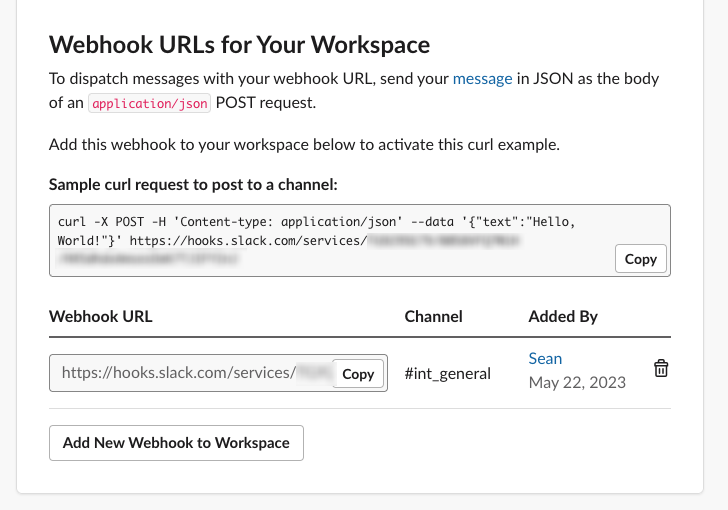
Testing Webhook URL
We recommend using Postman to test this URL. To do this in Postman, copy the curl request example. In Postman import the request by going to File -> Import and then paste your example into the field.
Navigate to the body or your example and you should see the example body with the “Hello World!” string.

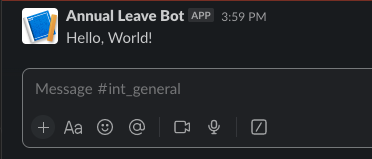
Sending this request will result in the app posting “Hello World!” to the channel you selected.
Keep note of the URL for your webhook. We will need it shortly in our Google script.
Google Script
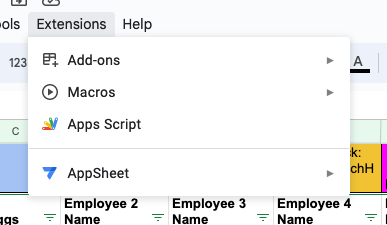
Going back to your Google Sheet click on the “extensions” menu and then “Apps Script”.
Slack Webhook Function
The first thing we are going to add is the ability for this script to post to your slack channel.
const webhookUrl = "https://hooks.slack.com/services/<>/<>/<>";
function postToSlack(message) {
let payload = {
"channel": "#int_general",
"username": "Annual Leave Calendar Bot",
"text": message
}
let options = {
"method": "post",
"contentType": "application/json",
"payload": JSON.stringify(payload)
};
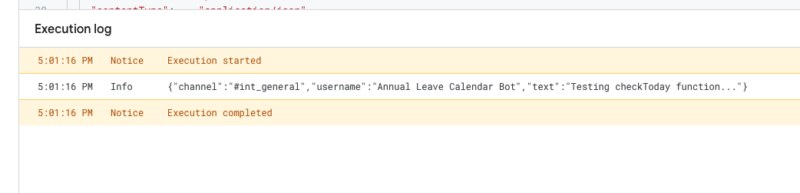
console.log(JSON.stringify(payload));
return UrlFetchApp.fetch(webhookUrl, options)
}Make sure to update the webhookURL variable to the same URL as your app.
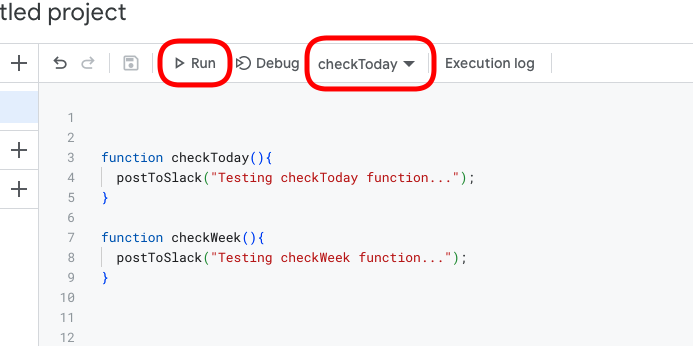
Next we are going to create some test functions. We will use them to test the daily report and the weekly report but for now we will just use them to send test-messages to Slack.
function checkToday(){
 postToSlack("Testing checkToday function...");
}

function checkWeek(){
 postToSlack("Testing checkWeek function...");
}
You can now test your Slack posting by selecting the function from the drop-down menu at the top of the script and clicking the “Run” button.
You may be prompted to attach permissions to this script before it will run the code. You can go ahead and allow this.
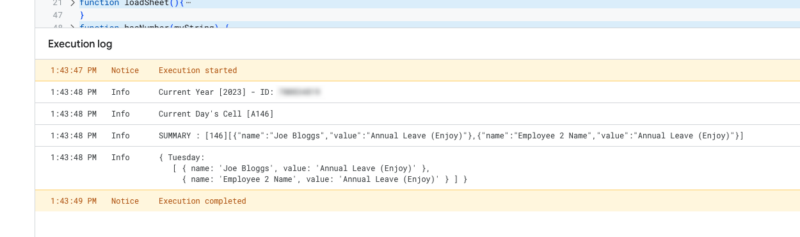
If everything is setup correctly, you should see your Slack payload printed out in the Execution Log.
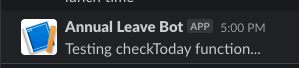
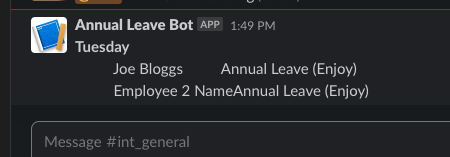
And you should also see your custom test message appear in your Slack channel.
Assigning Buttons
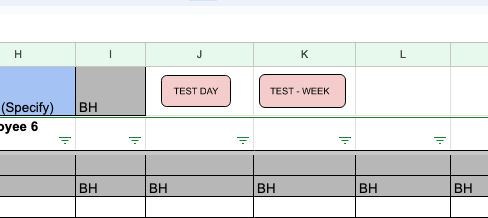
In our Google Sheet template we added some buttons to allow you to test functionality without having to open the script each time. Lets hook these up now.
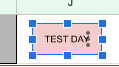
You can see them on the top left-hand-side at cells J1+K1.
To add script function to these buttons, right-click on the button and you will see three dots.
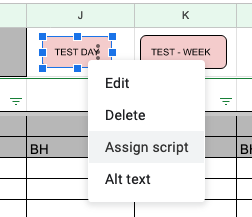
Click on those three dots and you will see an option for “Assign Script”.
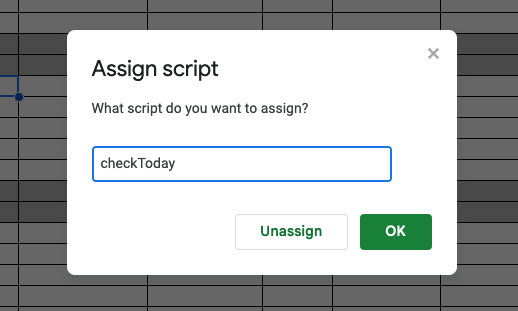
In this field we want to add the name of the function we want to assign. Note that there is no auto-complete here so make sure the function is correctly named.
Do the same with the “TEST – WEEK” button.
You can now test if your functions are correctly set up by pressing the buttons in your sheet. The test message should be printed to your Slack channel as expected.
Automatically Go To Current Date
The next functionality we added to our script was to have the sheet automatically switch to the correct year and date when the sheet is opened.
We added this functionality because we found it was easy for admins to edit the wrong tab/year or the wrong date. Having the tab and date automatically sync when the sheet is opened reduces the human error involved in updating employee days.
For this we used one of the default triggers of the Google Sheets API. By adding a function named “onOpen” our code will be executed anytime we open the sheet or reload it.
// CONSTS & VARIABLES //
const startingCellIndex = 3; // we start at A5
let currSheet = undefined;
let currDay = undefined;
let currDayCell = undefined;
const weekDayList = ['Sunday', 'Monday', 'Tuesday', 'Wednesday', 'Thursday', 'Friday', 'Saturday'];

function onOpen() {
 loadSheet();
}

function loadSheet(){
 // We want to get the list of all tabs in the sheet and focus on the newest sheet //
 // this will be the current year //
 let allTabs = SpreadsheetApp.getActiveSpreadsheet().getSheets();
 let yearsList = [];
 for(let i = 0; i < allTabs.length; i++){
   let sheetData = allTabs[i];
   if(hasNumber(sheetData.getSheetName())){
     let year = parseInt(sheetData.getSheetName().split(' ')[0]);
     yearsList.push({
       sheet:  sheetData,
       year:   year
     });
   }
 }

 yearsList = yearsList.sort((a, b) => b.year - a.year);
 let currYear = yearsList[0];
 console.log(`Current Year [${currYear.year}] - ID: ${currYear.sheet.getSheetId()}`);
 currSheet = SpreadsheetApp.getActiveSpreadsheet().setActiveSheet(currYear.sheet);
 // Now we want to focus on the current date //
 currDay = getCurrentDayInYear();
 currDayCell = "A"+(startingCellIndex+currDay);
 console.log(`Current Day's Cell [${currDayCell}]`);
 let currCell = currSheet.getRange(currDayCell);
 SpreadsheetApp.getActiveSpreadsheet().setCurrentCell(currCell);
}

function hasNumber(myString) {
 return /\d/.test(myString);
}

function getCurrentDayInYear(){
 var now = new Date();
 var start = new Date(now.getFullYear(), 0, 0);
 var diff = now - start;
 var oneDay = 1000 * 60 * 60 * 24;
 var day = Math.floor(diff / oneDay);
 return day;
}
Note that we also need to add an offset constant called startingCellIndex that adjusts the date iterator to skip the first few rows of the sheet which contain titles and cell definitions.
Go ahead and test if this code is working by reloading your sheet. You should see the cursor go to the current day of the year automatically. If you had more than one tab you would see that this would also open the correct tab before moving the cursor to the correct date provided your tab is correctly named.
Report Current Day
Next we are going to add functionality for this script to report to Slack all the employee leave for the current day.
For this we are going to need new variables so we can track objects we have loaded previously in the script. We are also going to use the loadSheet function that we have already created as it ensures the reporting function is pointing to the right date and tab.
function checkToday(){
 if(!currSheet){
   loadSheet();
 }

 const todayRowIndex = (getCurrentDayInYear()+startingCellIndex);
 const valuesForDay = getValuesForDay(todayRowIndex);
 const dayName = weekDayList[new Date(Date.now()).getDay()];
 if(dayName === "Saturday" || dayName === "Sunday"){
   return;
 }

 const dayReport = {
   [dayName]:  valuesForDay
 }
 console.log(dayReport);
}

////////// SPREADSHEET FUNCTIONS //////////////

function getLeaveContext(value){
 let message = "";
 switch(value){
   case "AL":
     message += "Annual Leave (Enjoy)";
     break;
   case "Requested":
     message += "Requested - Not Approved <@manager>";
     break;
 }

 if(message.length === 0){ // << messy hack
   if(value.indexOf('OOO') > -1){
     message += "Out of the Office: "+ value.split('OOO:')[1];
   }
   else if(value !== ''){
     message += "Note: "+ value;
   }
 }

 if(message.length === 0){
   return null;
 }
 return message;}

function getNoOfEmployees(){
 const rangeString = `C3:Z3`; // If you have more than 26 employees then you have to update
 const rangeData = currSheet.getRange(rangeString).getValues();

 for(let i = 0; i < rangeData[0].length; i++){
   var name =  rangeData[0][i];
   if(name === undefined || name === ""){
     return (i+1);
   }
 }
}

function getValuesForDay(rowIndex){
 const currDayCell = "C"+(rowIndex);
 const finalCell = `${numberToEncodedLetter(getNoOfEmployees()+2)}${(rowIndex)}`;
 const rangeString = `${currDayCell}:${finalCell}`;
 const range = currSheet.getRange(rangeString);
 let summary = [];
 for(let i = 0; i < range.getValues().length; i++){
   for(let val = 0; val < range.getValues()[i].length; val++){
     const employeeIndex = `${numberToEncodedLetter(val+3)}3`;
     const employeeName =  currSheet.getRange(employeeIndex).getValues()[0][0];
     const valString = getLeaveContext(range.getValues()[i][val]);
     if(valString !== null){
       summary.push({
         name:   employeeName,
         value:  valString
       });
     }
   }
 }

 // Now we need to check if there is a bank holiday here //
 // if there is, we should set the report to one field instead of reporting "BH" for everyone //
 for(let i = 0; i < summary.length; i++){
   if(summary[i].value.indexOf("BH") > -1){
     summary = [{
       name:   "Report Bot",
       value:  "Monday is a Bank Holiday <!channel>"
     }];
     break;
   }
 }
 console.log("SUMMARY : ["+ rowIndex +"]"+JSON.stringify(summary));
 return summary;
}

function numberToEncodedLetter(number) {
   //Takes any number and converts it into a base (dictionary length) letter combo. 0 corresponds to an empty string.
   //It converts any numerical entry into a positive integer.
   if (isNaN(number)) {return undefined}
   number = Math.abs(Math.floor(number))
   const dictionary = getDictionary()
   let index = number % dictionary.length
   let quotient = number / dictionary.length
   let result
   if (number <= dictionary.length) {return numToLetter(number)}  //Number is within single digit bounds of our encoding letter alphabet
   if (quotient >= 1) {
       //This number was bigger than our dictionary, recursively perform this function until we're done
       if (index === 0) {quotient--}   //Accounts for the edge case of the last letter in the dictionary string
       result = numberToEncodedLetter(quotient)
   }
   if (index === 0) {index = dictionary.length}   //Accounts for the edge case of the final letter; avoids getting an empty string
   return result + numToLetter(index);
}
function numToLetter(number) {
       //Takes a letter between 0 and max letter length and returns the corresponding letter
       if (number > dictionary.length || number < 0) {return undefined}
       if (number === 0) {
           return ''
       } else {
           return dictionary.slice(number - 1, number)
       }
   }
}

function getDictionary() {
   return validateDictionary("ABCDEFGHIJKLMNOPQRSTUVWXYZ")
   function validateDictionary(dictionary) {
       for (let i = 0; i < dictionary.length; i++) {
           if(dictionary.indexOf(dictionary[i]) !== dictionary.lastIndexOf(dictionary[i])) {
               console.log('Error: The dictionary in use has at least one repeating symbol:', dictionary[i])
               return undefined
           }
       }
       return dictionary
   }
}
If everything is properly set up you should be able to run the checkToday function without any issues but let’s take a look at what each of these functions is doing.
- checkToday
This function gathers the correct parameters in order to get the values needed for each employee for the day.
The dayReport is a constant which we will use in another function later for formatting data before we send it onto Slack. - getValueForDay
This is one of the important functions of this script. It will get a range of cells based on the row representing the current day and the number of employees. It will then use other functions to parse those cells and put together the correct data for the report. - getLeaveContext
This function will check the contents of each cell and return a human-readable message for what’s happening that day so it can be displayed in Slack. - numberToEncodedLetter + getDictionary
This converts numbers to their equivalent letter. We use this to get the correct cells for the employee in the range of cells we take for the given day.
Running the checkToday function should result in the leave status for each employee being displayed in the console. Remember to add some AL for testing the current day.
Next we are going to add a function that will make this report array into something that will display appropriately in Slack and then send it onto the Slack webhook function we created earlier.
function sendReport(report){
 const reportKeys =  Object.keys(report);
 let reportString = "\n";
 if(reportKeys.length > 0){
   for(let i = 0; i < reportKeys.length; i++){
     const dayString = reportKeys[i];
     let dayPrefixString = "*"+dayString+"*";
     let dayPayloadString = '';
     if(report[dayString].length === 0){
       reportString += dayPrefixString + '\n' + " Nothing To Report " + '\n';
     }
     else{
       for(let y = 0; y < report[dayString].length; y++){
         const alData = report[dayString][y];
         dayPrefixString += '\n';

         const newName = alData.name.padEnd(50-alData.name.length, ' ');
         dayPrefixString += "          "+newName+alData.value;
       }
       reportString += dayPrefixString + '\n';
     }
   }
 }
 postToSlack(reportString);
}
Add this function to the end of the checkToday function.
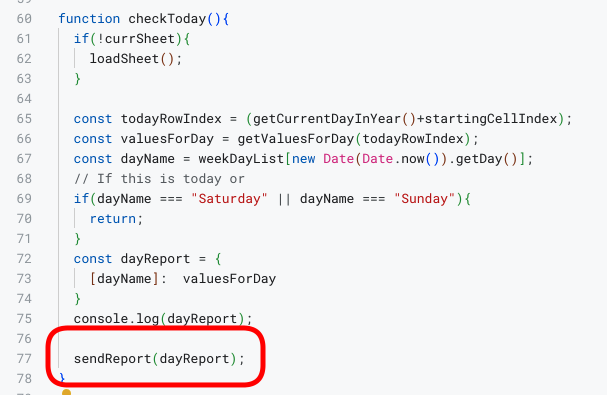
If you run the checkToday function now, you should get your report posted to your Slack channel.
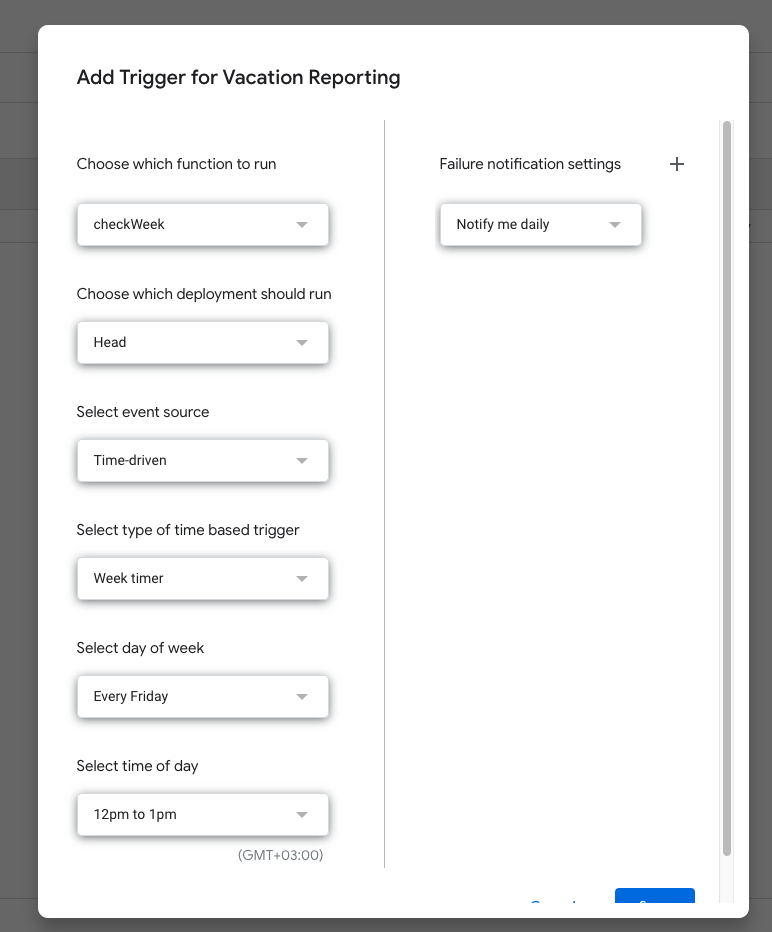
Daily Trigger
The next thing we need to do is set up a trigger in our script so that this function will run at a specific time each day.
To do this go to the “triggers” option on the left hand side menu.

Click on the “Add Trigger” button at the bottom right of this menu.
We want to set this trigger up for 9am each day (or whatever time suits your team). Using the trigger options you can see how this can be easily setup. Just make sure to select the checkToday function from the dropdown menu.
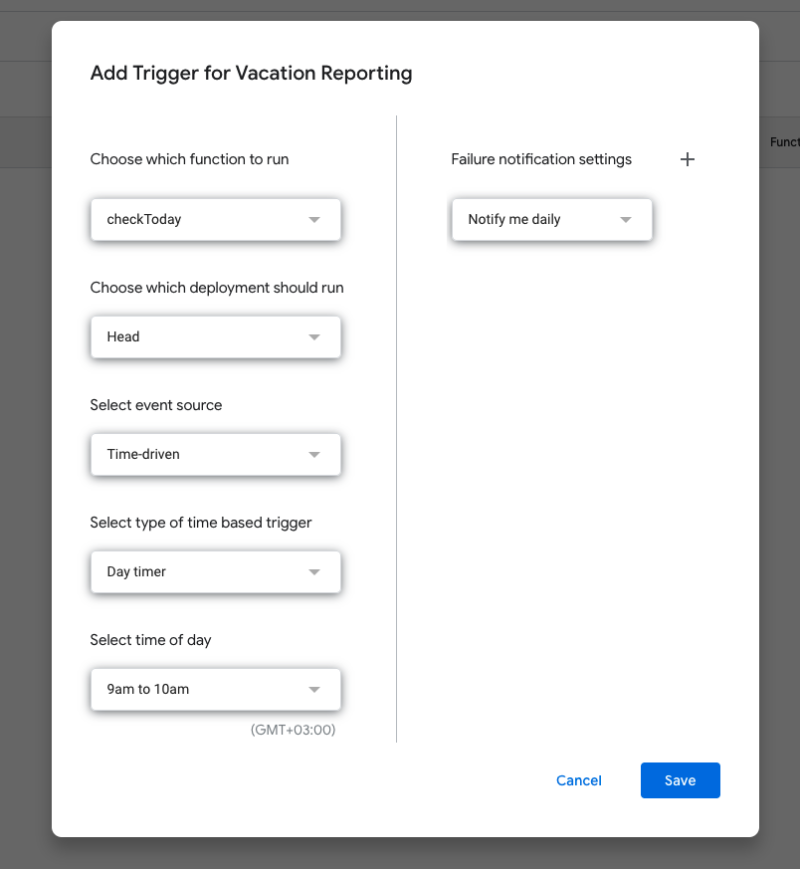
We will unfortunately have to wait in order to know if this trigger worked correctly but you can see that you will also be notified (by email) if the trigger failed or if there was an error in the script so you can debug it.
Weekly Report
Weekly reports are done with the same system we created previously, basically just getting a report for each day together and sending the list to Slack.
function checkWeek(){
 if(!currSheet){
   loadSheet();
 }

 postToSlack("[Weekly Report]");
 let mondayRowIndex = getRowForMonday();
 let weekReport = {};
 for(let i = 1; i < 6; i++){
   const dayReport = getValuesForDay(mondayRowIndex+(i-1));
   const dayString = weekDayList[i];
   weekReport[dayString] = dayReport;
 }

 console.log(JSON.stringify(weekReport));
 sendReport(weekReport);
}

function getRowForMonday(){
 let currDay = getCurrentDayInYear();
 // Get next Monday //
 for(let i = 0; i < 7; i++){
   const currCell =      (currDay+startingCellIndex+i);
   const rangeString =   `B${(currDay+startingCellIndex+i)}`;
   const currWeekDay =   currSheet.getRange(rangeString).getValues()[0];
   if(currWeekDay == 'Monday'){
     currWeekStartCell = currWeekDay;
     currDay = currCell;
     break;
   }
 }

 console.log("Monday is Cell: "+currDay);
 return currDay;
}
Keep in mind that the checkWeek function code is designed to report the coming week instead of the current week. The idea would be to call this function on Friday in order to report the coming week ahead of time. You will therefore need to add some AL for the following week in order to test.
Weekly Trigger
As we did with the daily report, we now need to setup a trigger to kick off the checkWeek function at a certain time each Friday.
Now your weekly and Daily reporting is all set up, we can move onto the next feature which is allowing your employees to interact with the calendar.